TechDocs Lab 2: Production TechDocs
How is a production-grade deployment different from the default Red Hat Developer Hub TechDocs deployment?
The TechDocs default deployment mode generates and stores documentation artifacts within the RHDH instance. For production use, it is recommended to use persistent storage, external to RHDH, and potentially distribute the TechDocs generation step to continuous integration tasks in each repository.
High Level Tasks
Implementing those differences to create a production-ready TechDocs deployment involves 3 high level tasks:
-
Storage - ODF S3 Emulation
-
Create a ODF storage claim for an emulated S3 bucket and configure TechDocs to retrieve HTML from it.
-
-
Flexible Generation centered in Red Hat Developer Hub, or distributed in project CI pipelines
-
Integrate documentation site generation and storage publication into the CI/CD pipeline for each source repository.
-
-
Read-Mostly TechDocs
-
Modify
app-config.yamlin the RHDH ConfigMap, settingtechdocs.builderfromlocaltoexternal. This disables the local generator.
-
Configuring Storage
This lab establishes production TechDocs in divisible segments. First, establish persistent storage (for the document cache) on an S3-style object store. This is the key step, because some kind of persistent storage is required in order to even consider external generation, and because when running on OpenShift, even external (that is, external to RHDH) generation will tend to run in pipelines on the cluster. This is a distinct advantage of deploying a Backstage IDP in the form of Red Hat Developer Hub on OpenShift, because it makes the choice between local and external TechDocs generation a matter of site practices and preferences, rather than a hard requirement for the most basic division of labor.
Use Existing Deployment
Begin with the platform components already deployed in the tssc-dh Project.
-
Go to the {openshift_console_url}[OpenShift Web Console^]. Log in with the credentials:
-
Username:
{openshift_admin_user} -
Password:
{openshift_admin_password}
-
-
Ensure the Administrator perspective is selected using the Perspective Switcher at the top of the left-hand navigation.
You met OpenShift Data Foundation in the Setup Trusted Profile Analyzer module. A part of OpenShift Platform Plus, OpenShift Data Foundation is already configured and deployed in your environment. You need ODF to provide an emulated S3 bucket to store generated TechDocs HTML.
Create ObjectBucketClaim
-
In the OpenShift Web Console, visit Storage > Object Storage > ObjectBucketClaims to check the OpenShift Data Foundation. You’ll see UI tabs for storage Buckets, backing stores, and this step’s focus, Object Bucket Claims (OBC). These represent resources that declare segments of storage available to applications on the cluster.
-
Click the
(+)button at the top of the console, and choose Import YAML. -
Copy the following Kubernetes manifest into the YAML editor.
apiVersion: objectbucket.io/v1alpha1
kind: ObjectBucketClaim
metadata:
  name: rhdh-bucket-claim
  namespace: tssc-dh
spec:
  generateBucketName: techdocs (1)
  storageClassName: openshift-storage.noobaa.io (2)
1 A prefix to add to the generated bucket name, for uniqueness and later identification/filtering. 2 The storage class to use for the bucket. NooBaa (the upstream of Multicloud Object Gateway in OpenShift products) is a smart S3 gateway that routes object data across multiple storage backends. Click Create to declare a storage bucket to store rendered TechDocs. This will also create a Secret and ConfigMap containing configuration details for the bucket. You’ll use those to configure Red Hat Developer Hub to use this bucket.
-
In the OpenShift Web Console, visit Workloads → ConfigMaps and Workloads → Secrets in turn to examine the
rhdh-bucket-claimresources of each type automatically created when you created the ObjectBucketClaim. In the next steps, you will configure Red Hat Developer Hub to use these resources, available as environment variables (or mounted on the filesystem) in the Red Hat Developer Hub Pod.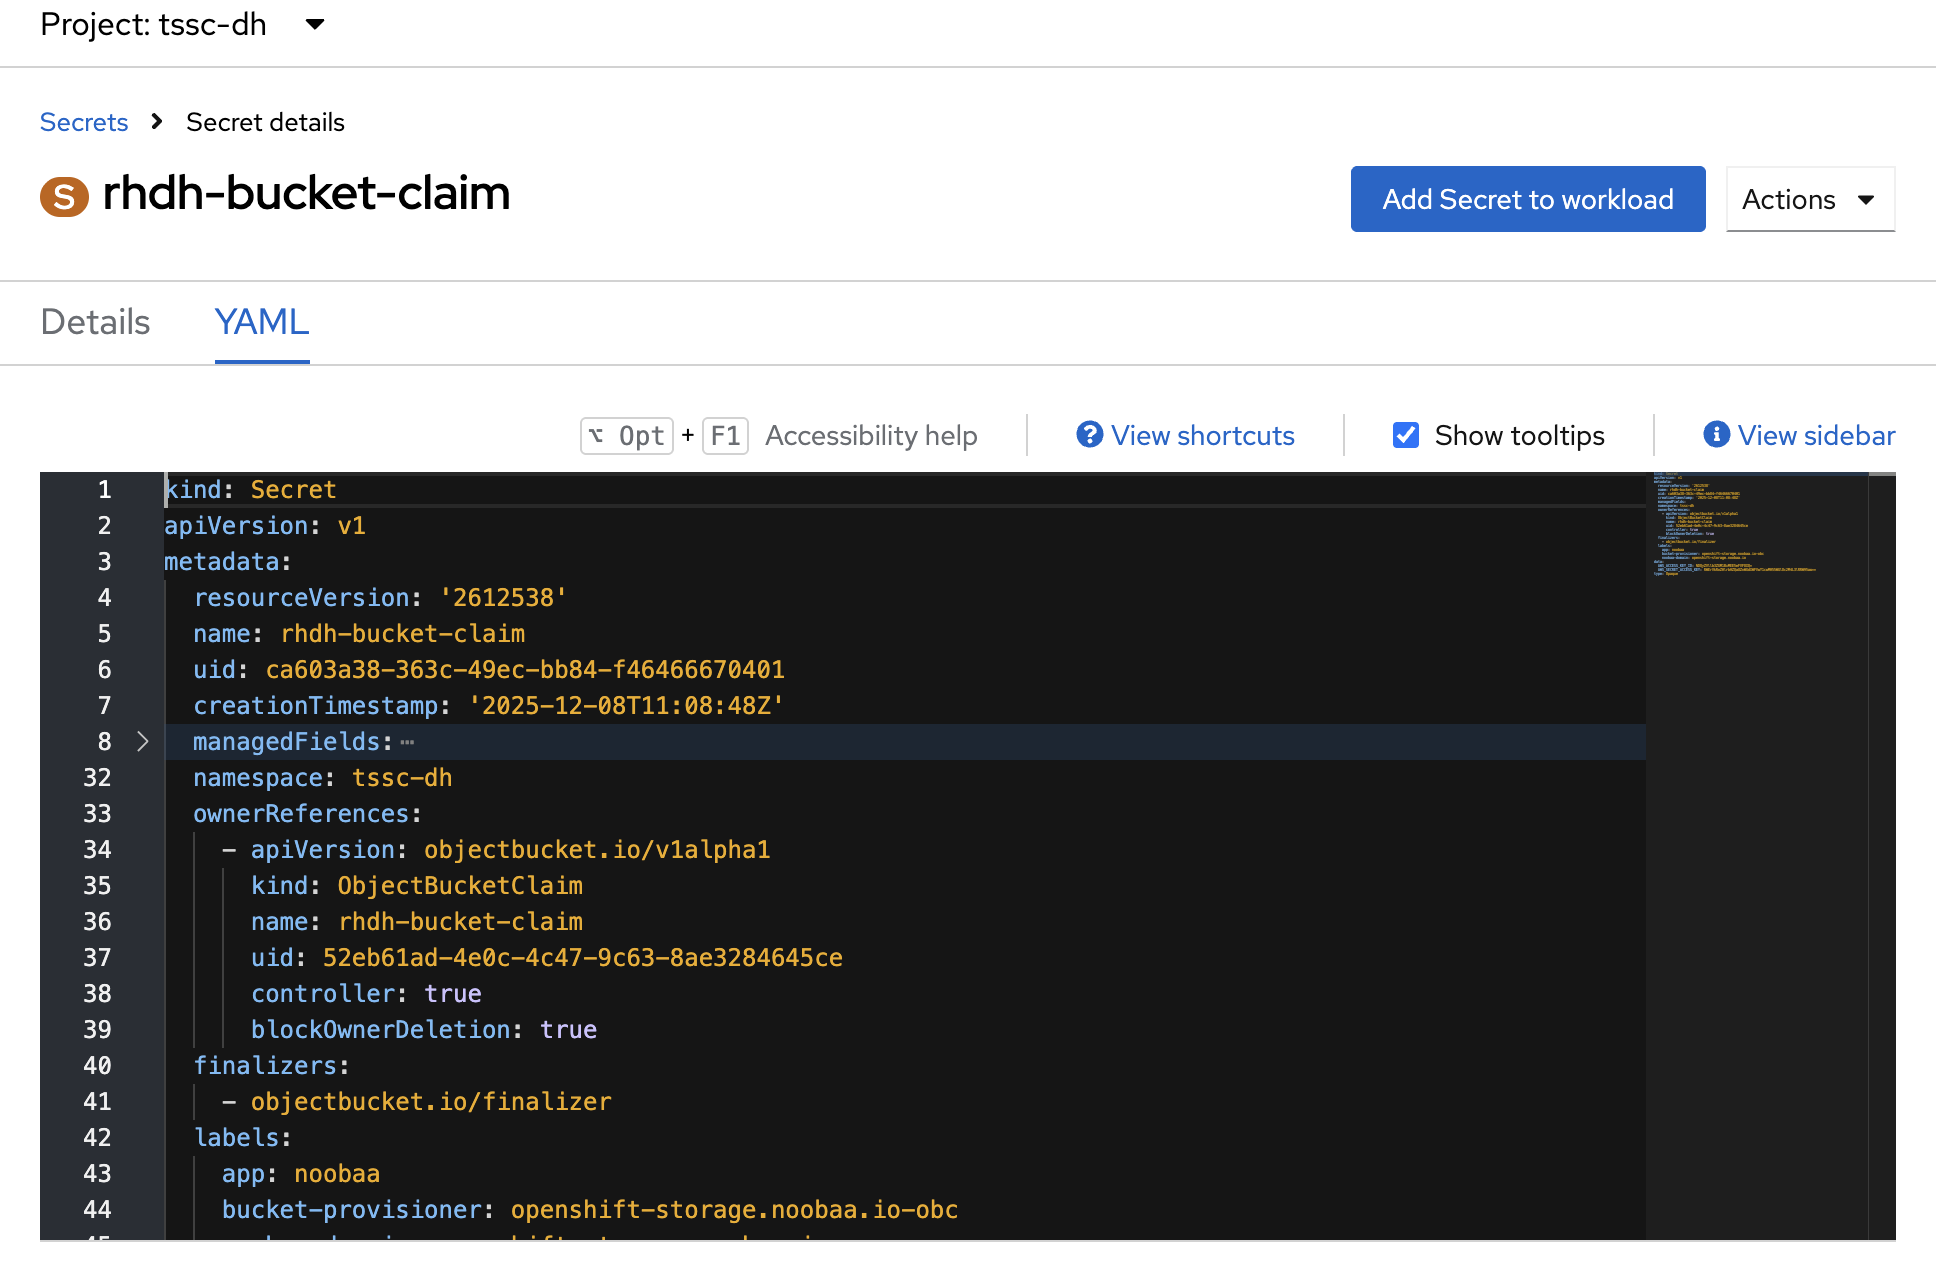
Configure Developer Hub
In the following steps, you will configure Red Hat Developer Hub to connect to the storage bucket you created. The RHDH configuration will refer to variables defined in the rhdh-bucket-claim ConfigMap and Secret. Referenced here, those variables will be populated after you adjust the RHDH Custom Resource to point to their sources in the rhdh-bucket-claim ConfigMap and Secret.
-
In the OpenShift Web Console, click Workloads in the left navigation to expand it, then click ConfigMaps.
-
Select the tssc-developer-hub-app-config ConfigMap to open it.
-
Click the YAML tab to open the ConfigMap source.
-
Near the bottom of the file, delete and replace the
techdocs:section with the following content (be sure to match indentation, such as aligningtechdocs:with the previoussignInPage:element):techdocs: builder: local generator: runIn: local publisher: type: awsS3 (1) awsS3: (2) bucketName: '${BUCKET_NAME}' credentials: accessKeyId: '${AWS_ACCESS_KEY_ID}' secretAccessKey: '${AWS_SECRET_ACCESS_KEY}' endpoint: 'https://${BUCKET_HOST}' region: noobaa (3) s3ForcePathStyle: true (4)1 The type of publisher to use. In this case, you are using the awsS3publisher type to publish to the ODF storage bucket.2 The awsS3publisher type configuration.3 A placeholder value provides a counterfeit region. 4 The s3ForcePathStyleparameter uses the storage bucket’s conventional file path interface rather the content-addressable API.As you may remember from the setup-tpa module, the following script when executed in the
tssc-dhProject namespace retrieves all of the credentials for your ODF storage bucket at once and dressed up with a bit of formatting, so you can inspect what is constructed from the variables in the YAML above. Remember, the values for these variables come from therhdh-bucket-claimConfigMap and Secret generated when you create therhdh-bucket-claimObjectBucketClaim. If you’re interested, run the following commands in the Web Terminal (the>_icon near the top right of the OpenShift Web Console) to see their values. You will use this later on when configuring GitLab CI.CLAIM="rhdh-bucket-claim" echo "" echo -n "Bucket Name: " oc get configmap $CLAIM -n tssc-dh -o jsonpath='{.data.BUCKET_NAME}' echo "" echo -n "Access Key ID: " oc get secret $CLAIM -n tssc-dh -o jsonpath='{.data.AWS_ACCESS_KEY_ID}' | base64 -d echo "" echo -n "Secret Access Key: " oc get secret $CLAIM -n tssc-dh -o jsonpath='{.data.AWS_SECRET_ACCESS_KEY}' | base64 -d echo "" echo -n "Bucket Host: " oc get configmap $CLAIM -n tssc-dh -o jsonpath='{.data.BUCKET_HOST}' echo ""
Adjust RHDH Custom Resource
-
In the OpenShift Web Console, go to Operators → Installed Operators → Red Hat Developer Hub Operator
-
Click the Red Hat Developer Hub tab (next to Events)to see the list of all instances of Red Hat Developer Hub on the cluster (there should be only one).
-
Select the
developer-hubCR. Its letterBicon represents its Custom Resource Kind, Backstage. -
Open the YAML view by clicking the YAML tab
-
Edit the
extraEnvs:stanza to add the names of your bucket claim’s configMap and Secret (don’t remove any existing values!). Both are namedrhdh-bucket-claim. Be sure to use the correct indentation as shown below:apiVersion: rhdh.redhat.com/v1alpha3 kind: Backstage metadata: name: developer-hub spec: application: appConfig: configMaps: - name: tssc-developer-hub-app-config mountPath: /opt/app-root/src dynamicPluginsConfigMapName: tssc-developer-hub-dynamic-plugins extraEnvs: configMaps: - name: rhdh-bucket-claim secrets: - name: tssc-developer-hub-env - name: rhdh-bucket-claim replicas: 1 route: enabled: true [ ... ] -
Click Save to commit the changes. It will take a few moments for the Red Hat Developer Hub Pod to restart.
-
Navigate to Workloads → Pods in the left navigation to watch the new RHDH Pod rollout in response to your changes to the desired state. Wait for the new Pod to be ready (and the old Pod to be terminated) before proceeding.
Edit TechDocs to trigger rebuild
-
Navigate to {rhdh_url}[Red Hat Developer Hub^, window="rhdh"] and login as
{rhdh_user}with password{rhdh_user_password}. -
In Red Hat Developer Hub, click Docs in the left navigation to open the TechDocs index page.
-
Click on the
uqcomponent to open its TechDocs index page. -
Click the pencil-and-paper Edit icon to the right of the first document heading, Trusted Application Pipeline Software Template, in your uq document.
-
Log into GitLab using username
{gitlab_user}and password{gitlab_user_password}. -
Arrive in the doc source in the GitLab user1/uq source repository that holds your component source and documentation.
-
Edit the document in the repository service editor for the quickest experience. For example, you might change the second sentence to clarify it, or change the page first heading for the highest visibility in the result.
-
Leave the default Commit message, or edit it if you like. The commit message can’t be blank.
-
Leave the Target Branch set to the default,
main.
-
-
Click the Commit changes button.
-
Navigate or switch browser tabs back to your component’s TechDoc index page in Red Hat Developer Hub. Refresh your browser if you don’t see the expected "building", then "please refresh" banner.
-
Click the Refresh link in the green-outlined "please refresh" banner shown on the TechDocs page to load the latest HTML rendition of your document from ODF object storage.
The experience is the same as before, but the documentation is now stored in ODF object storage instead of within the RHDH instance.
View the raw docs in ODF
You can see the new objects created by visiting the ODF storage bucket in the OpenShift Web Console.
-
In the OpenShift Web Console, visit Storage > Object Storage > Buckets and select the bucket beginning with
techdocs-. -
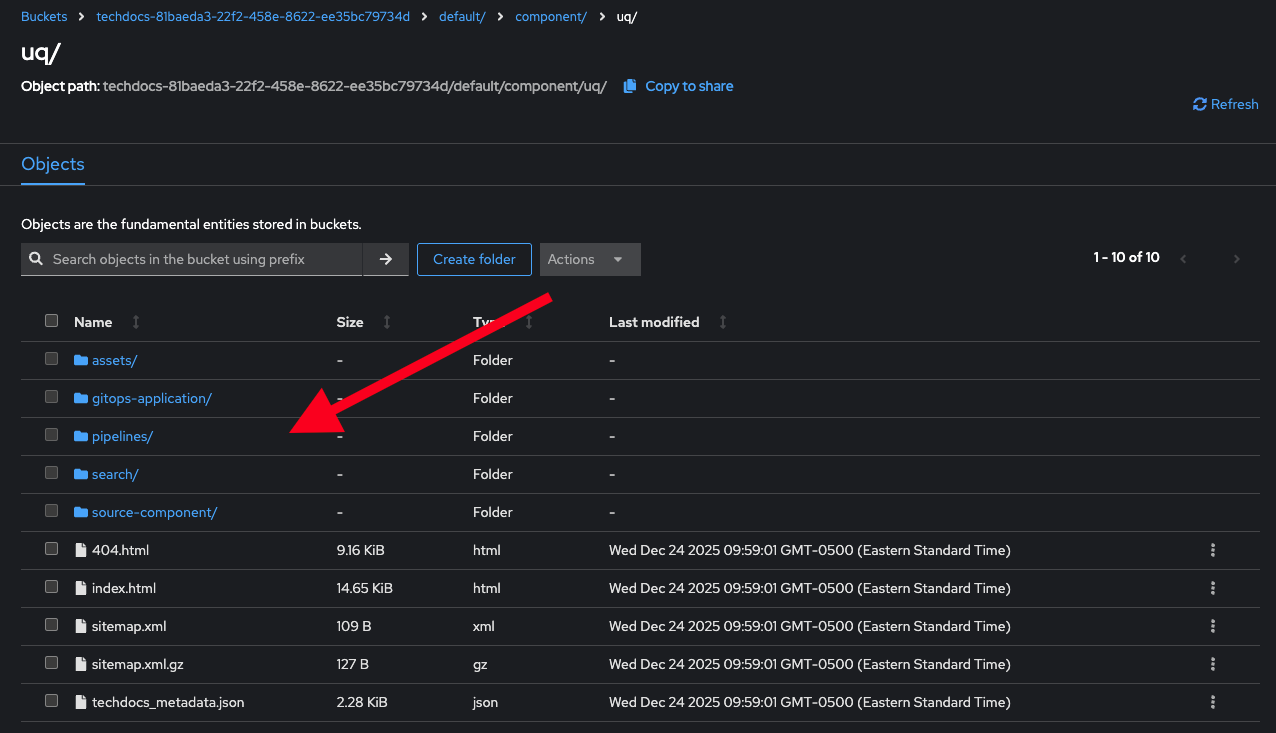
You should see a new folder
default/(the RHDH "namespace" used by youruqcomponent). Click on it and the folders within to eventually arrive at the html structure of the techdoc that was rendered:
External Storage: Summary
The Developer Hub Custom Resources' extraEnvs points to the rhdh-bucket-claim ConfigMap and Secret. This makes their contents available in the running RHDH Pod, where they appear to processes within as conventional files and environment variables.
The RHDH App Config ConfigMap then refers to those resources with names transmuted from the Kubernetes API to the conventional Unix namespace of the actual running process. For example, you can find the environment variable $AWS_ACCESS_KEY_ID in the next YAML listing, the relevant excerpt from the App Config ConfigMap.
When the Developer Hub application later reads $AWS_ACCESS_KEY_ID from its environment, it finds in it the value declared in the rhdh-bucket-claim Secret.
In effect, ODF has put the key to a storage bucket in a known location. You arranged for RHDH to access that location.
Flexible Generation: Builder Mechanics with MkDocs
An Entity has TechDocs features configured when it is tagged with the backstage.io/techdocs-ref annotation.
Understanding Entity Annotations
The backstage.io/techdocs-ref annotation in an entity’s catalog-info.yaml dictates the source file location for the entity’s documentation source.
Most entities should specify dir:. That is, their catalog-info’s dir: parameter should be set to dot (.), the current directory of catalog-info.yaml. With this configuration, Source files and mkdocs.yml live in the same directory as catalog-info.yaml. The entire directory is downloaded during the Prepare step.
A child directory of the current directory may be specified instead, e.g., dir:./name/.
Inspect annotations on your Component
Take a look at your {gitlab_url}/user1/uq/-/blob/main/catalog-info.yaml#L15[catalog-info.yaml definition’s line 15^]. You’ll see the backstage.io/techdocs-ref annotation and its reference to the current directory as the documentation location.
Configuring the builder with mkdocs.yaml:
Now view your Component’s {gitlab_url}/user1/uq/-/blob/main/mkdocs.yml[mkdocs.yml^]. This file configures any options for the mkdocs-techdocs builder.
Inspect Software Template
In the Quarkus Java template from which your uq template was instantiated, you’ll find the skeletal forms of the catalog-info.yaml and mkdocs.yml that are templated with instance values and added during the initialization of new instances created from the Template. You’ve probably noticed you can navigate from the RHDH Catalog to the Template’s source repo (like you can with any Catalog entity). template.yaml is a quick shortcut to the Template’s source.
This primary Template fills in the catalog-info.yaml and mkdocs.yml skeletons with instance configuration and settings you entered in the create-from-Template forms.
MkDocs Summary
You’ve been through the details of the "server" side (find, build, store, publish) of Red Hat Developer Hub TechDocs configuration for external storage, and you’ve seen the mechanism on the "client" side (Templates and the Entities they make) that specifies mkdocs-techdocs-core. Mkdocs-techdocs-core is a plugin that customizes the operation of MkDocs for TechDocs. MkDocs is a domain-specific static site generator for documentation.
At this point, your TechDocs deployment centralizes builds in OpenShift (builder: local), but stores the resulting HTML in object bucket storage external to Red Hat Developer Hub. It passes configuration and secrets references only between necessary applications and only through standard mechanisms. This configuration is not an exact match for the upstream BackStage "recommended" TechDocs setup, but the upstream recommended setup is not running on an OpenShift cluster. Many setups will still want to distribute TechDocs builds out to project pipelines, as shown in the next section, but RHDH on OpenShift makes local TechDocs builds to external storage a legitimate production layout.
Externalizing TechDocs Builds
Somewhat incredibly, a CLI tool drives all of this. Embedded in RHDH is a version of techdocs-cli, and you could employ the same program on the command line to fetch doc source from some repo and drive mkdocs-techdos-core to build and publish it.
Builder by hand
|
You are not expected to copy and run this, it is for reference only. It will not work without adjustments to fit the publish step to your |
Builder in GitLab Runner
The outlines of a .gitlab-ci.yaml defining a techdocs-cli Runner on your GitLab instance should look fairly familiar by now:
stages:
  - build-docs

generate-and-publish-techdocs:
  stage: build-docs
  image: node:18 # Tested 18 and 20.
  variables:
    AWS_ACCESS_KEY_ID: $AWS_ACCESS_KEY_ID
    AWS_SECRET_ACCESS_KEY: $AWS_SECRET_ACCESS_KEY
    AWS_REGION: noobaa
    TECHDOCS_BUCKET_NAME: $TECHDOCS_BUCKET_NAME
  script:
    - npm install -g npx
    - npm install -g @techdocs/cli
    # 1st half of entire Internet downloaded. Download part 2/2? Enter Y or N? Y
    - python3 -m venv .techdocs-venv
    - source .techdocs-venv/bin/activate
    - pip install "mkdocs-techdocs-core==1.*"
    # Generate the documentation site
    - npx @techdocs/cli generate --no-docker --source-dir . --output-dir ./site
    # Publish the generated site to external storage
    - npx @techdocs/cli publish --publisher-type awsS3 --storage-url https://${TECHDOCS_BUCKET_NAME}.s3.${AWS_REGION} --entity default/component/${{ parameters.name }}
  only:
    - main # Don't build branches etc - build commits that modify main branch
Create the GitLab CI for techdocs-cli, mkdocs-techdocs-core
In the following steps, you will create a GitLab CI pipeline for the uq component to generate and publish its TechDocs to the ODF object bucket.
|
The pre-installed GitLab you are using does not have GitLab runners configured, so the pipeline created below will not actually run. It demonstrates the configuration of a GitLab CI pipeline for TechDocs. In a production environment, you would continue on to configure a GitLab Runner and the GitLab Operator to run the pipeline. |
-
Copy the YAML excerpt above to your clipboard.
-
Visit {gitlab_url}/user1/uq/[your
uqcomponent’s source repo^]. -
Click Build in the left navigation, then Pipelines in the sub-menu that appears.
-
Since there is no existing
.gitlab-ci.yamlfile defining a pipeline in this repo yet, click Try test template to create the file. -
Select all of the skeleton YAML in the Default pipeline and delete it. Replace it entirely with the YAML you copied from the
stages:excerpt above. -
Replace
$AWS_ACCESS_KEY_IDwith the value returned by the same object bucket config dump bash script you used earlier. (I.e., return to the OpenShift Web Console in another browser tab or window, open the Web Terminal, and run the script to obtain the values for your object bucket. -
Replace
$AWS_SECRET_ACCESS_KEYwith its value returned from the config dump script. -
Replace
$TECHDOCS_BUCKET_NAMEwith its value returned from the script. -
Click Commit changes to save the file and create the CI action.
|
This exercise is specifically contrived to highlight what is happening when the system prepares, generates, and publishes Red Hat Developer Hub TechDocs. It is intentionally stripped out and isolated from other pipelines that build or scaffold source code and gitops configuration, so that the operation and position of For the same reasons, you quickly pasted plain text credentials into the GitLab CI action configuration, just to stay focused for the moment on operation rather configuration. The last cherry atop this lab as a production-like example of Red Hat Developer Hub would be entering those ODF object bucket credentials, fetched once again from the bucket claim dump script, into GitLab settings (or stored and accessed securely from an external credential vault), instead of into plain text. From there they become available, more securely, as names in an environment variable-like namespace accessible to the GitLab CI. Such configuration is left as a brief, and entirely optional, exercise for the reader. |
Reconfigure RHDH TechDocs for builder: external
Switch back to the OpenShift Web Console. Ensure you are in the Administrator perspective, in the tssc-dh Project. Click Workloads in the left navigation, then ConfigMaps. Select the tssc-developer-hub-app-config ConfigMap to open it for editing. Click the YAML tab and scroll down to the techdocs: section near the bottom and change builder: local to builder: external. Click Save to commit the changes. RHDH will start a new Pod with the new configuration in the read-mostly mode described in the introduction to this lab.
Edit docs, trigger rebuild
-
Return to {gitlab_url}/user1/uq/[your
uqcomponent’s source repo^] - this is the fastest route to commit a new change to its documentation and trigger the GitLab CI you’ve set up. -
Click the docs directory in the file listing, then click index.md to open it for editing. You’ve edited this file twice already, but previously reached it through links in RHDH.
-
Make a recognizable change to the file, then scroll down and Commit Changes.
Since the pre-installed GitLab you are using does not have any GitLab runners configured, the pipeline will not actually run (it will remain pending), and the docs won’t be updated. It demonstrates the configuration of a GitLab CI pipeline for TechDocs from a developer viewpoint.
-
Revert back to local generation by changing
builder: externalback tobuilder: localand click Save to commit the changes. Wait for the new Pod to be ready (and the old Pod to be terminated) before proceeding.
Read it again, for the very first time
At last you can return to {rhdh_url}[Red Hat Developer Hub^, window="rhdh"]. Click Catalog on the left, find your uq component in the catalog and click through to its TechDocs (or just click Docs in the left navigation). Refresh the content with the link in the green notification as in each of the previous milestones. You can also see the updated objects (by timestamp) in the ODF storage bucket (Navigate to Storage > Object Storage > Buckets and select the bucket beginning with techdocs-) and drill down to the HTML files.
Cleanup (Annihilate)
-
In Red Hat Developer Hub, click Catalog in the left navigation.
-
Click uq in the Owned Components Catalog list to open your Component.
-
Click the "falafel menu" (three stacked dots) near top right to expand the entity actions menu.
-
Click Unregister entity
-
Click Unregister Location in the presented dialog
-
Notice that the Owned Components list no longer includes the uq Component.
|
Unregistering a Component removes it from the Red Hat Developer Hub Catalog, but does not remove or change external resources that may have been created or executed when the Component was created from its Template. Git repos, OpenShift Projects, Deployments, Pods, and other resources associated with the unregistered Component will still exist. In fact, you can re-register a Component by again providing RHDH a reference to its source repo that still contains a |
TechDocs Summary
Nice work. Now you can explain how TechDocs prepares, generates, and publishes documentation in Backstage and Red Hat Developer Hub, and you have a foundation to assess at customer sites and projects whether simple centralized TechDocs processing directly within RHDH makes the most sense, or if the specific requirements of a particular case demand distributed generation at the point of continuous integration in each Catalog Entity repo. In either event, you know how to wire TechDocs to persistent and highly scalable storage atop OpenShift Data Foundation.