AI Engineering: Using Software Templates to Build an AI Agent with Red Hat Advanced Developer Suite
Objectives
In this lab, you will build an AI Agent using the component pre-created in Red Hat Developer Hub. You will add the new application source code to this component, making it part of the software development lifecycle.
Scenario
You are now a member of the Python AI Development team. Your responsibility is to build an AI agent using the tools provided by the AI Platform Engineering team.
Let’s get started.
AI Agent Overview
An AI agent requires the following components:
-
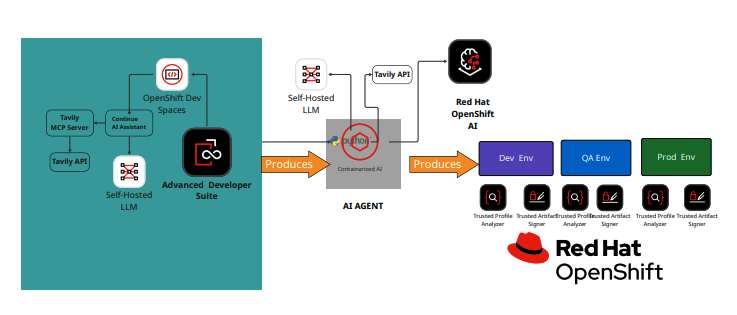
Planning and Reasoning: The agent uses an LLM for reasoning. This module uses a Red Hat self-hosted model.
-
Tools and Actions: An AI Engineer can build custom tools, but many pre-existing tools are available. Integrations with custom systems are also possible.
-
Memory: The ability to store and learn from data, using short-term or long-term memory.
-
Input: A website or any device that provides information to the agent.
-
Guardrails/Safety Layer: The rules that keep the agent’s actions in check.
AI Research Agent
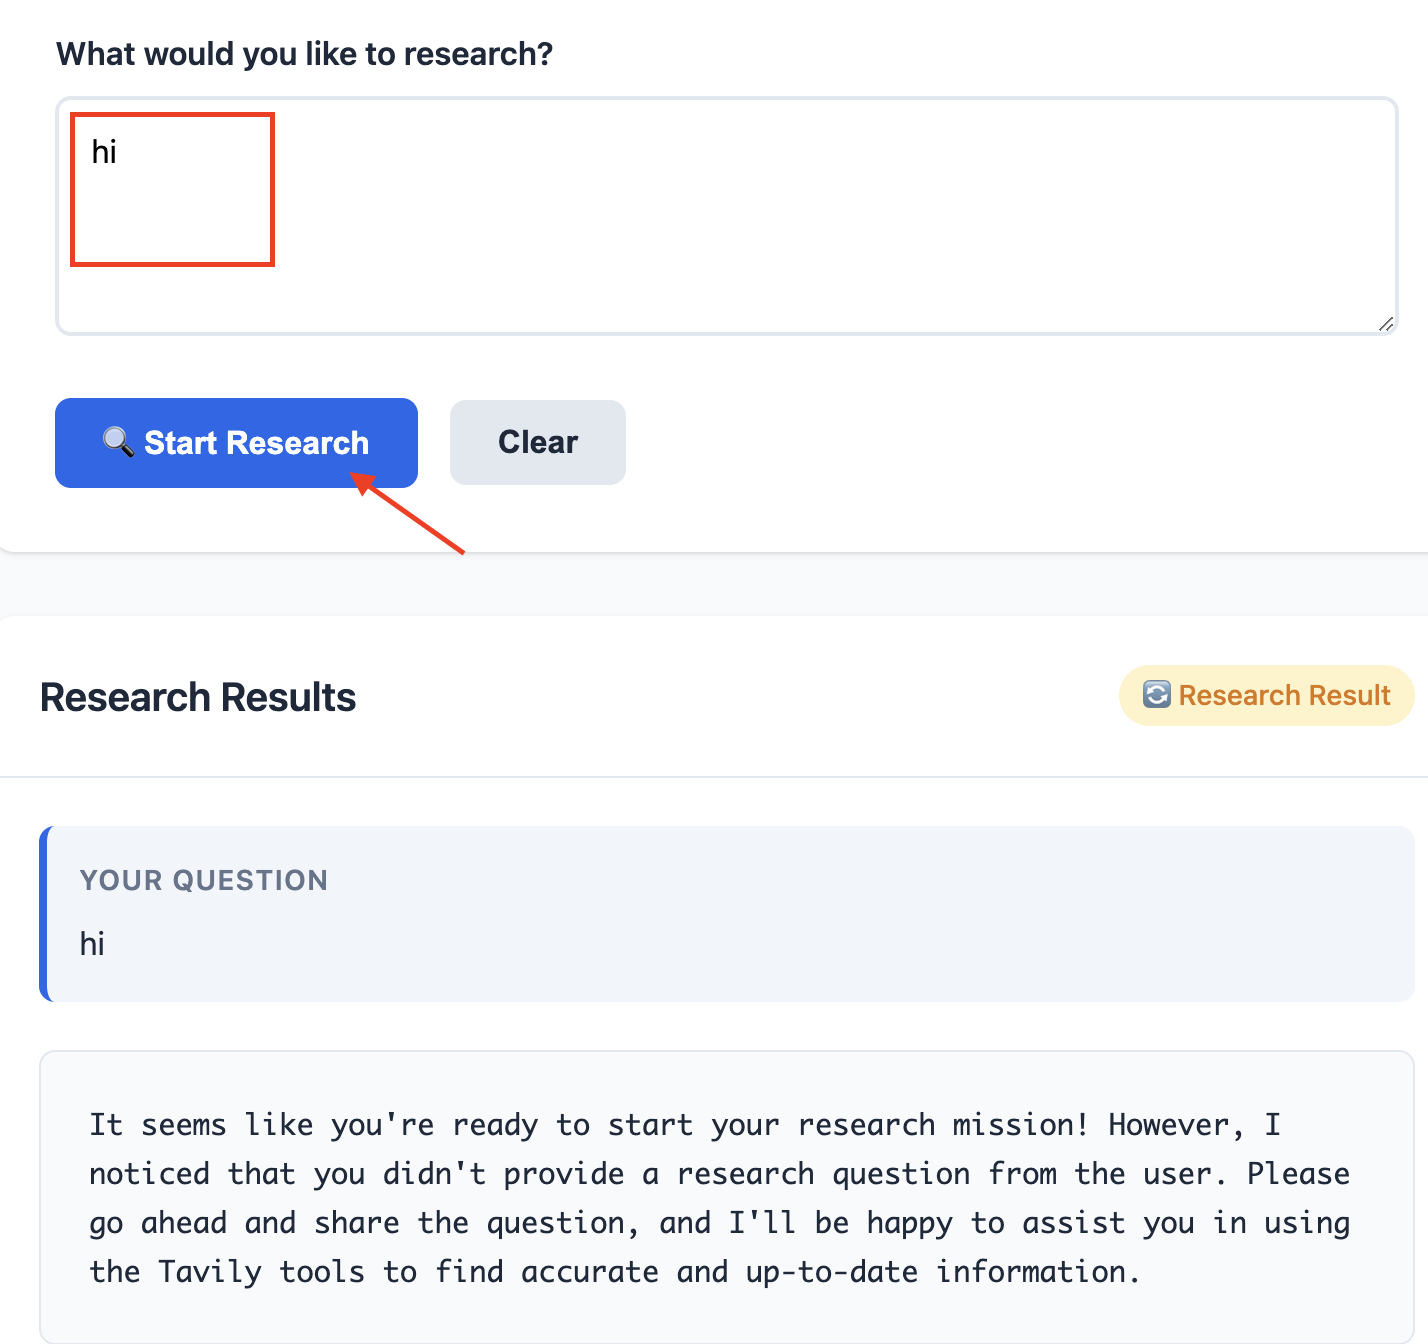
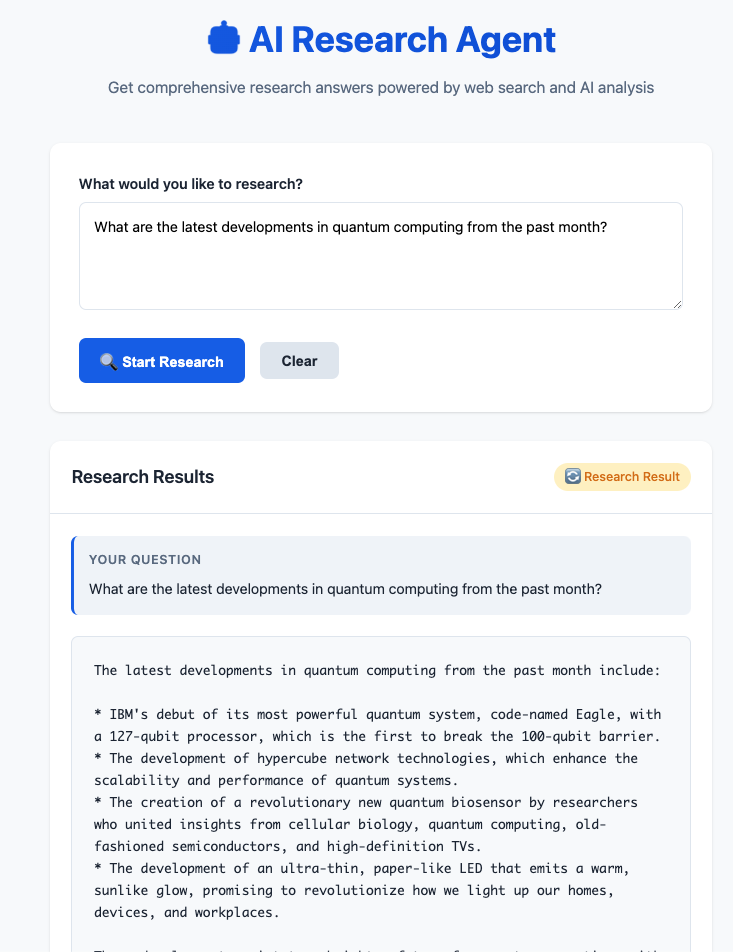
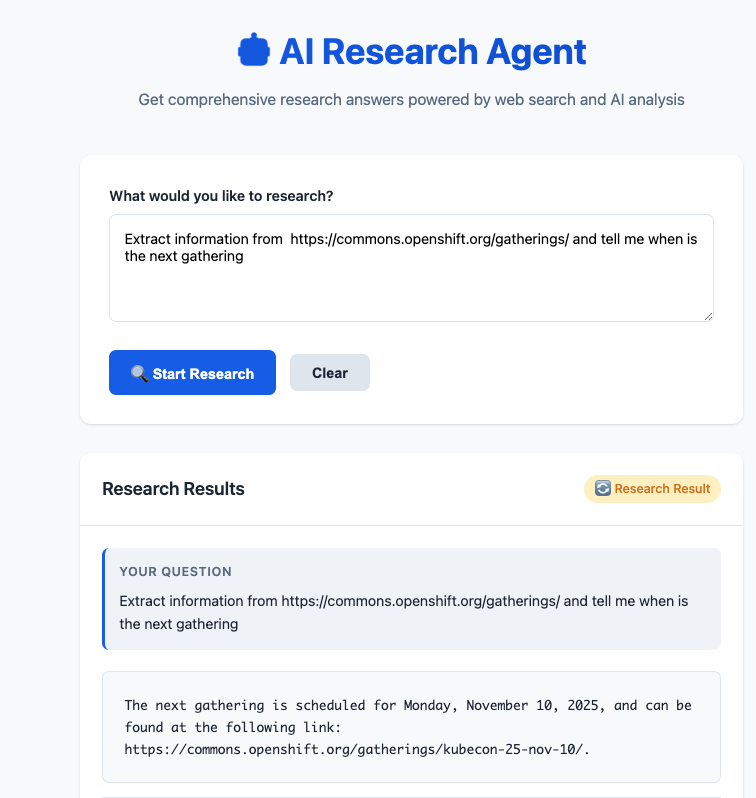
Our AI Agent is a Research Agent. It will search the internet and specific websites based on the user’s prompt. The agent will decide which tool to use to return the required information.
AI Research Agent Characteristics
-
Planning and Reasoning: We are using a Red Hat self-hosted model for this module.
-
Tools and Actions: This agent uses tools from Tavily. Tavily provides tools for web search (TavilySearch), extracting specific information from web pages (TavilyExtract), and discovering/indexing new content (TavilyCrawl).
-
Memory: This AI agent uses short-term memory.
-
Input: This solution includes a website to interact with the agent.
-
Guardrails/Security: Security starts with the prompt provided to the agent and is enforced by Red Hat Advanced Developer Suite, which provides integrated security, image scanning, and policies.
Create the AI Research Agent
Let’s build the AI Agent
-
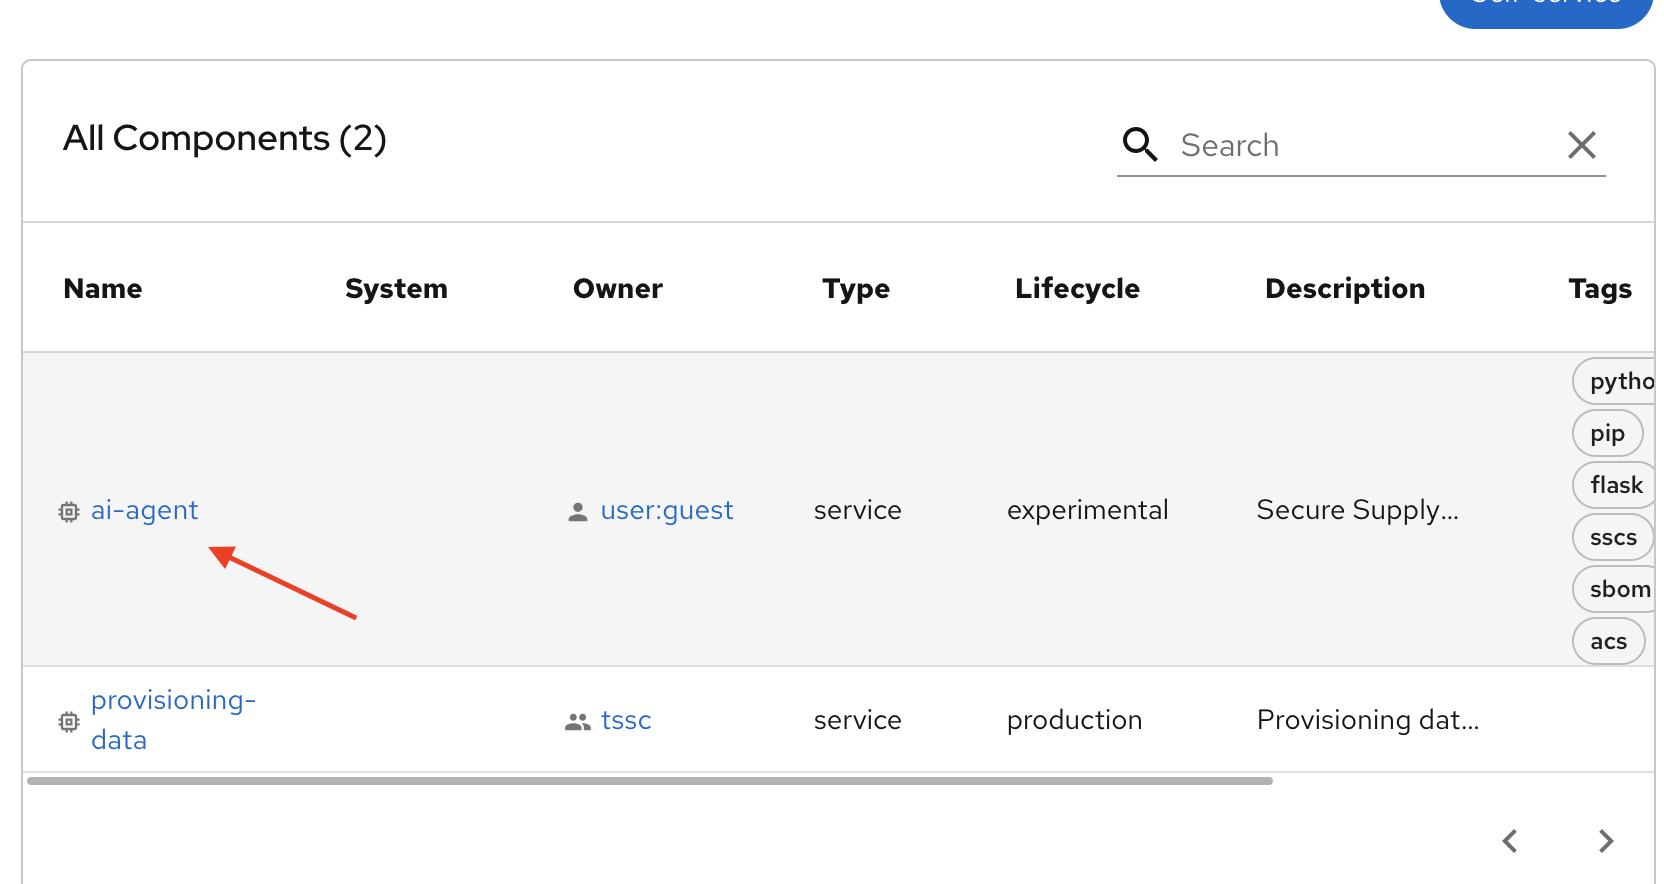
Access the Red Hat Developer Hub UI - Components with your credentials:
-
Username: {openshift_admin_user}
-
Password: {openshift_admin_password}
-
-
From catalog, then click AI Agent.
Getting started with Red Hat OpenShift Dev Spaces
-
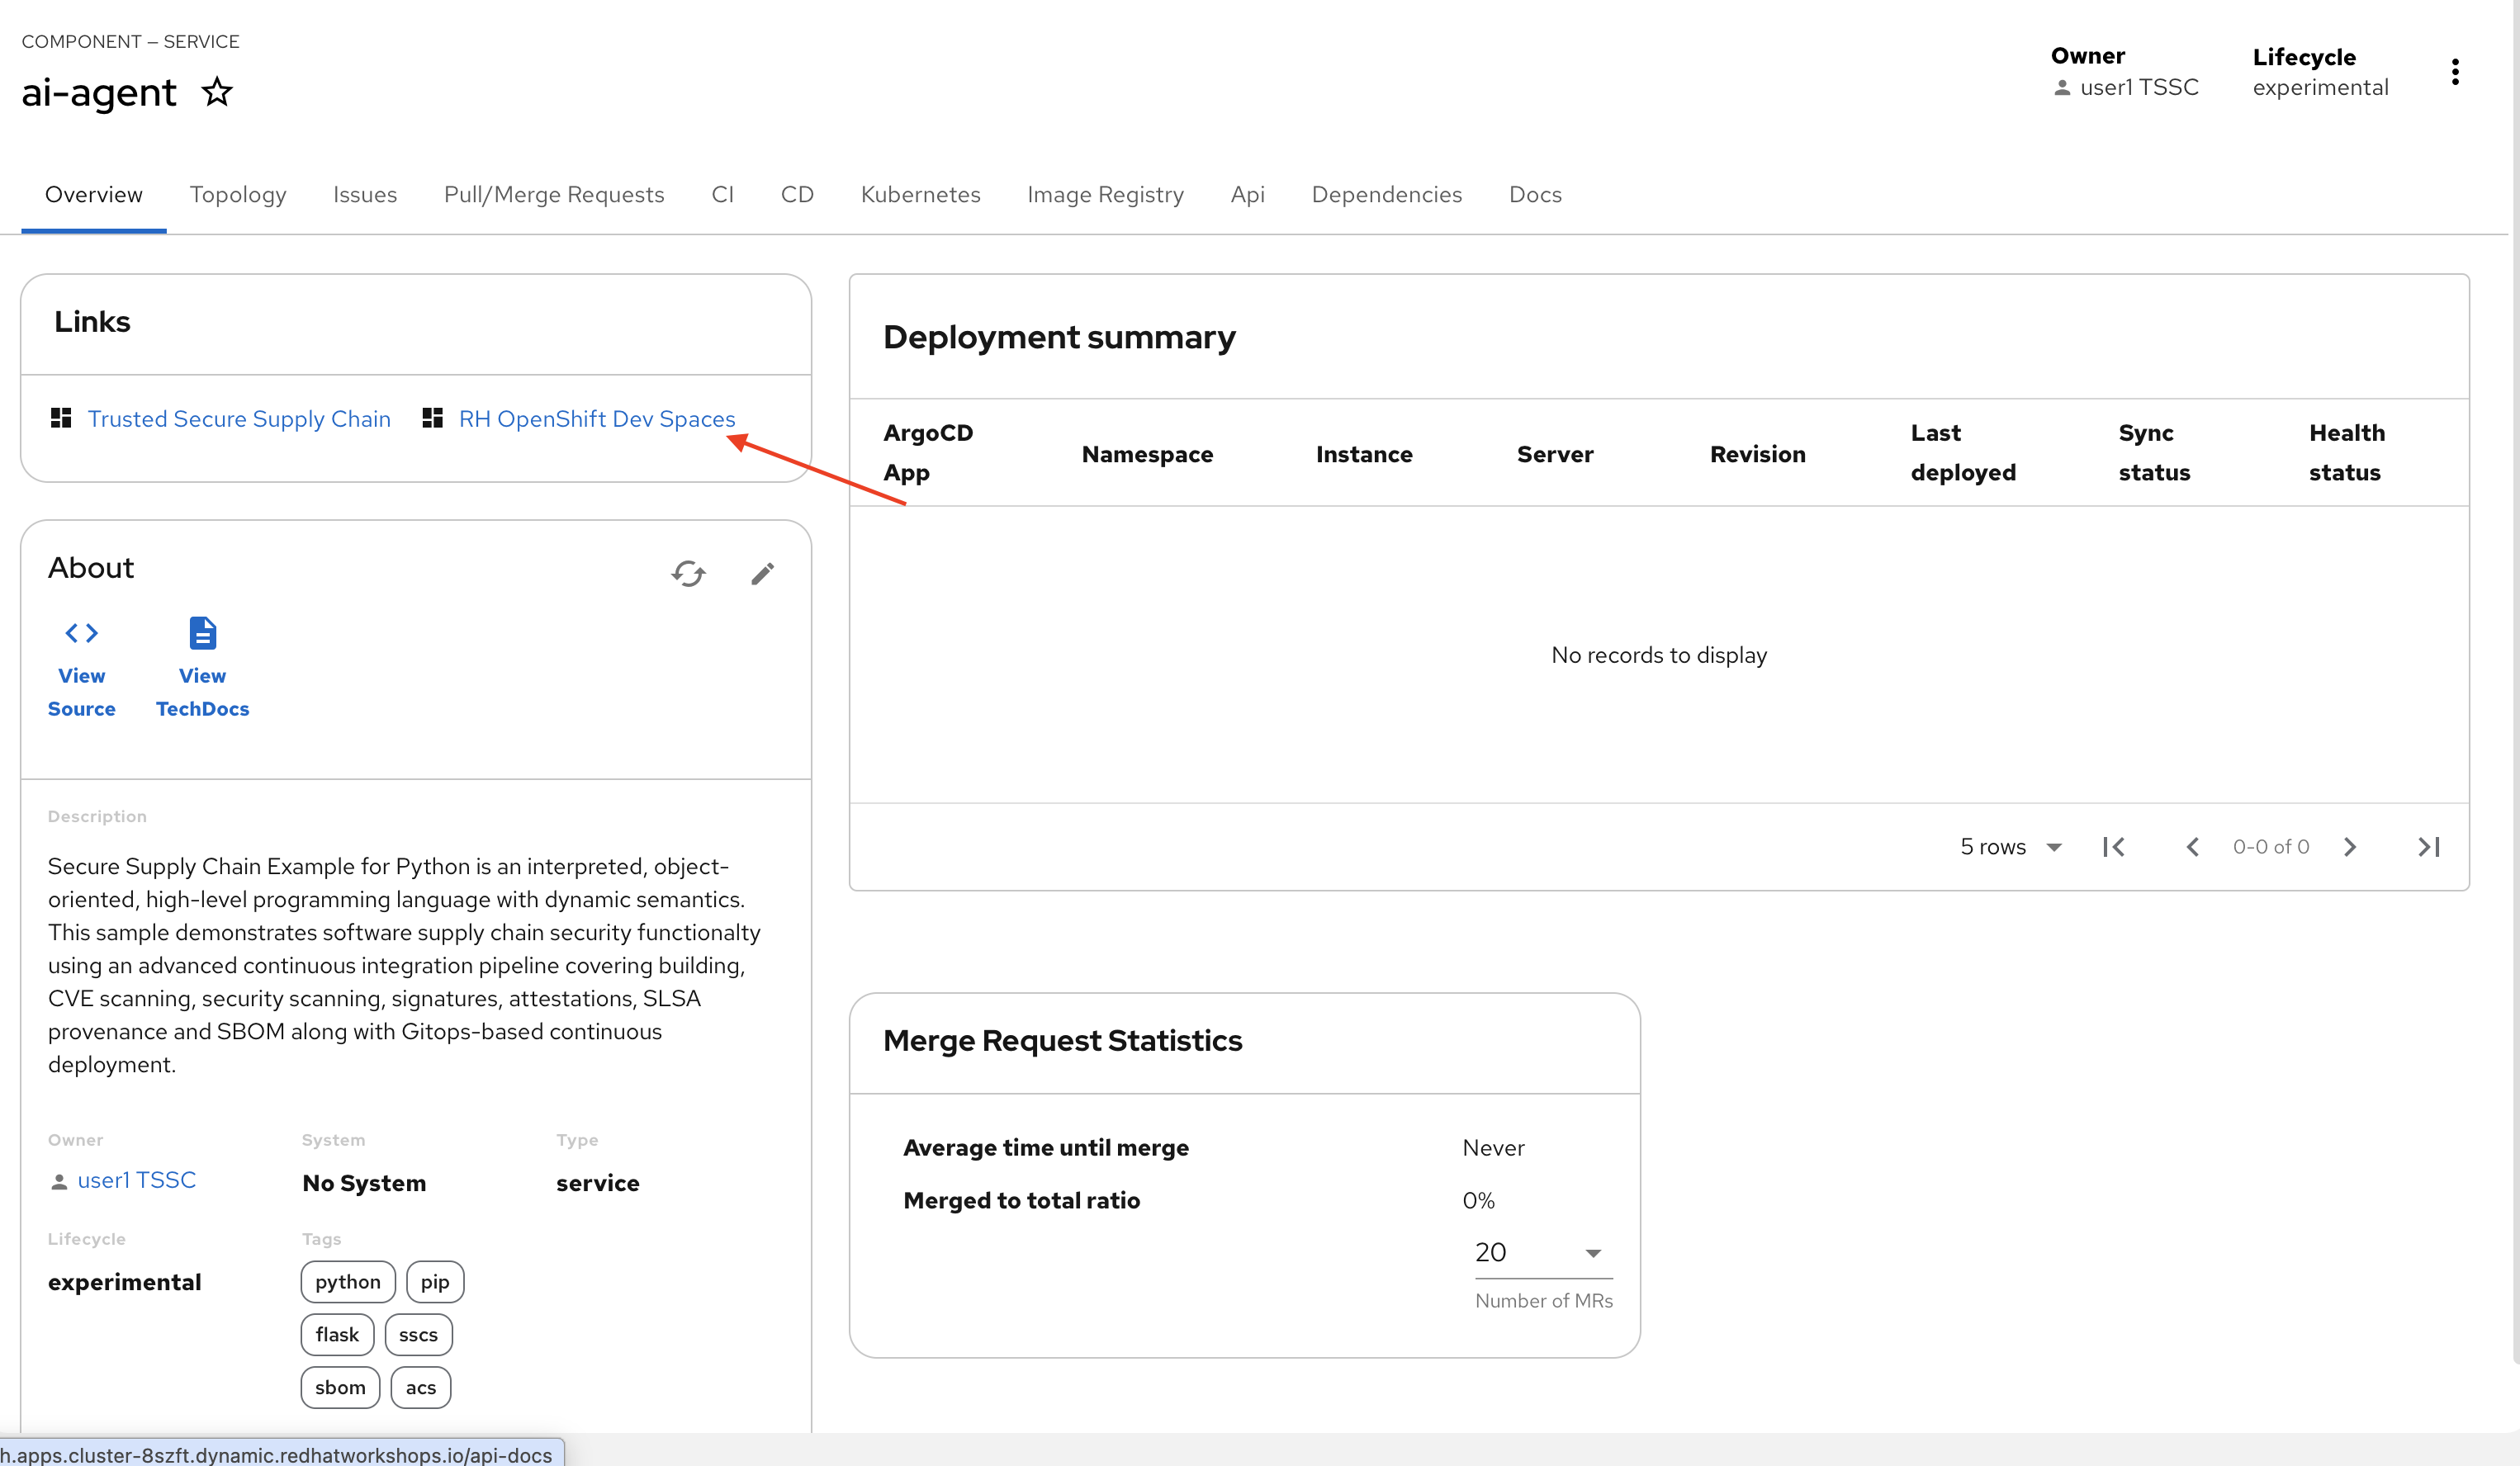
Click the RH OpenShift Dev Spaces link from the component overview screen.
-
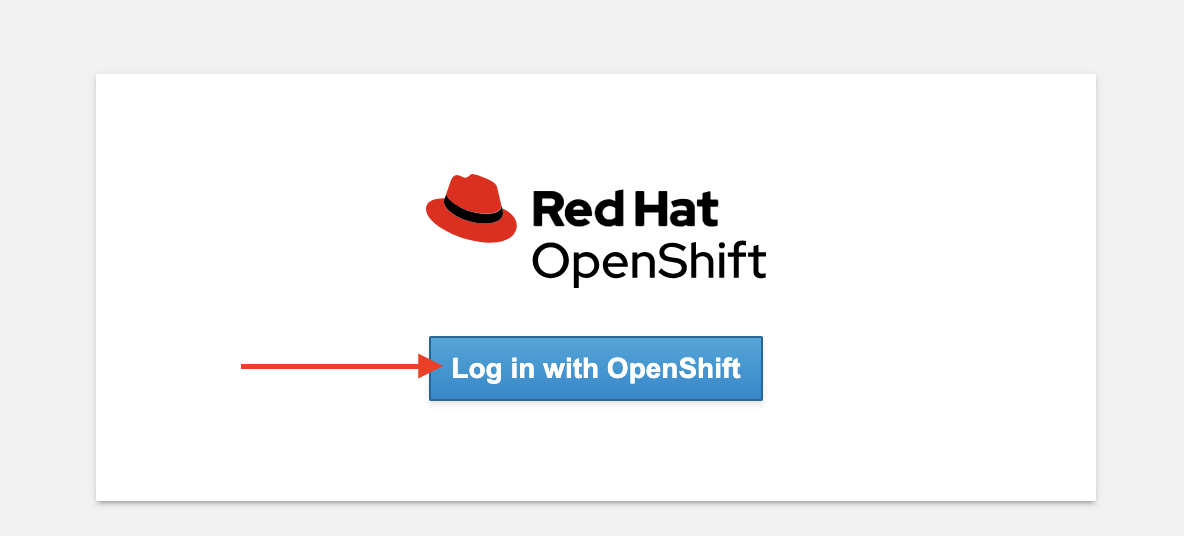
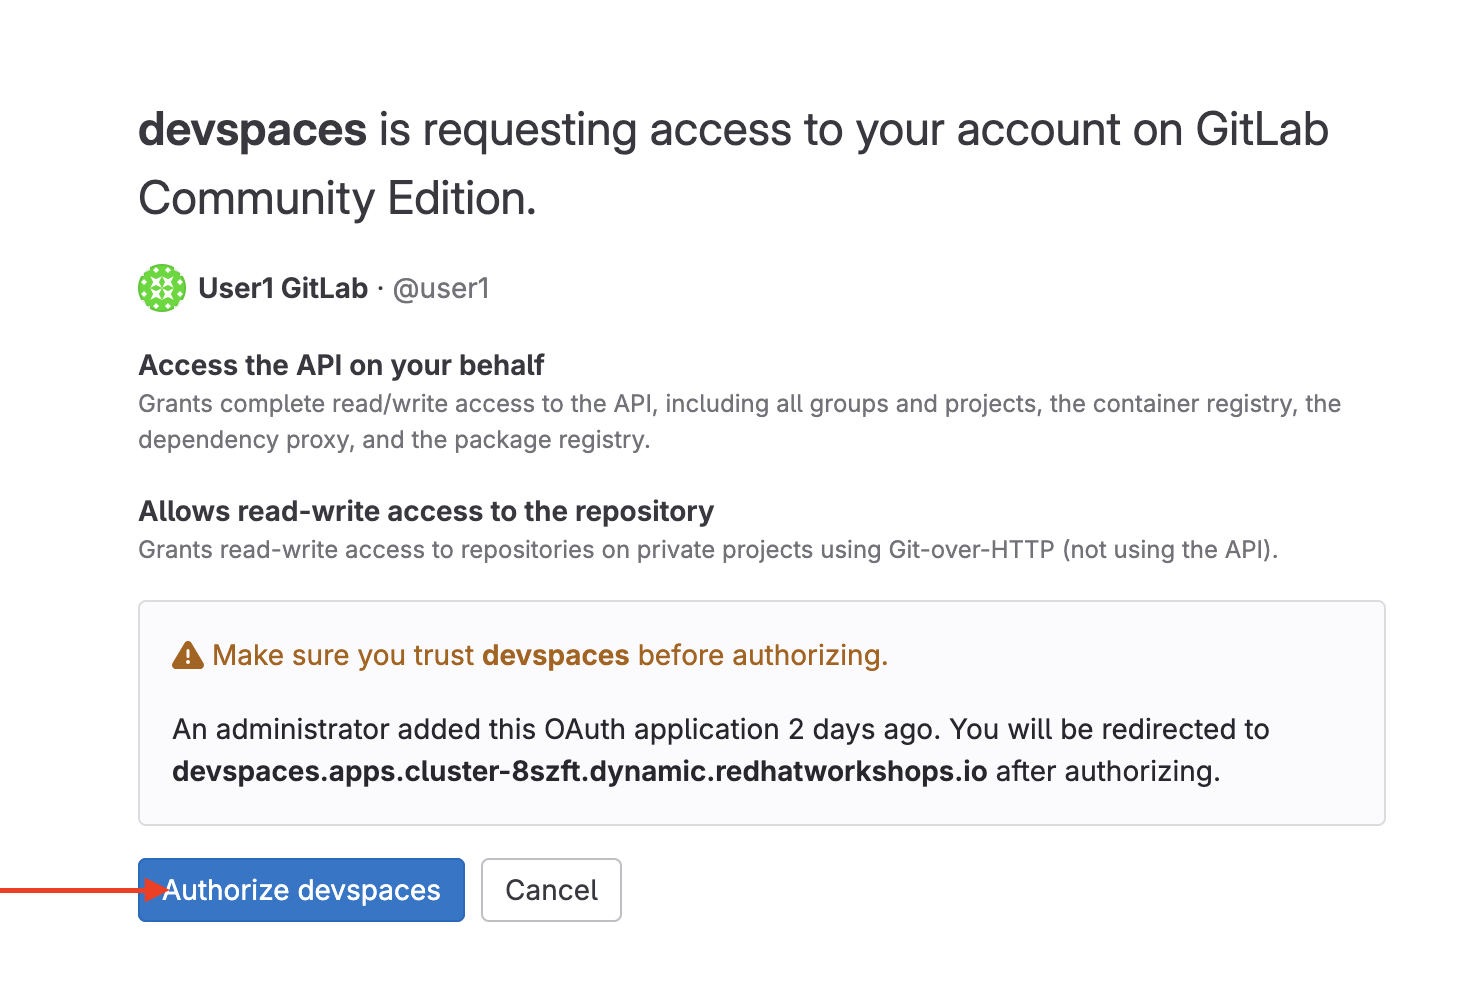
Log in using your current admin credentials. You might not be prompted for a username if you are already authenticated in OpenShift.
-
Username: {openshift_admin_user}
-
Password: {openshift_admin_password}
-
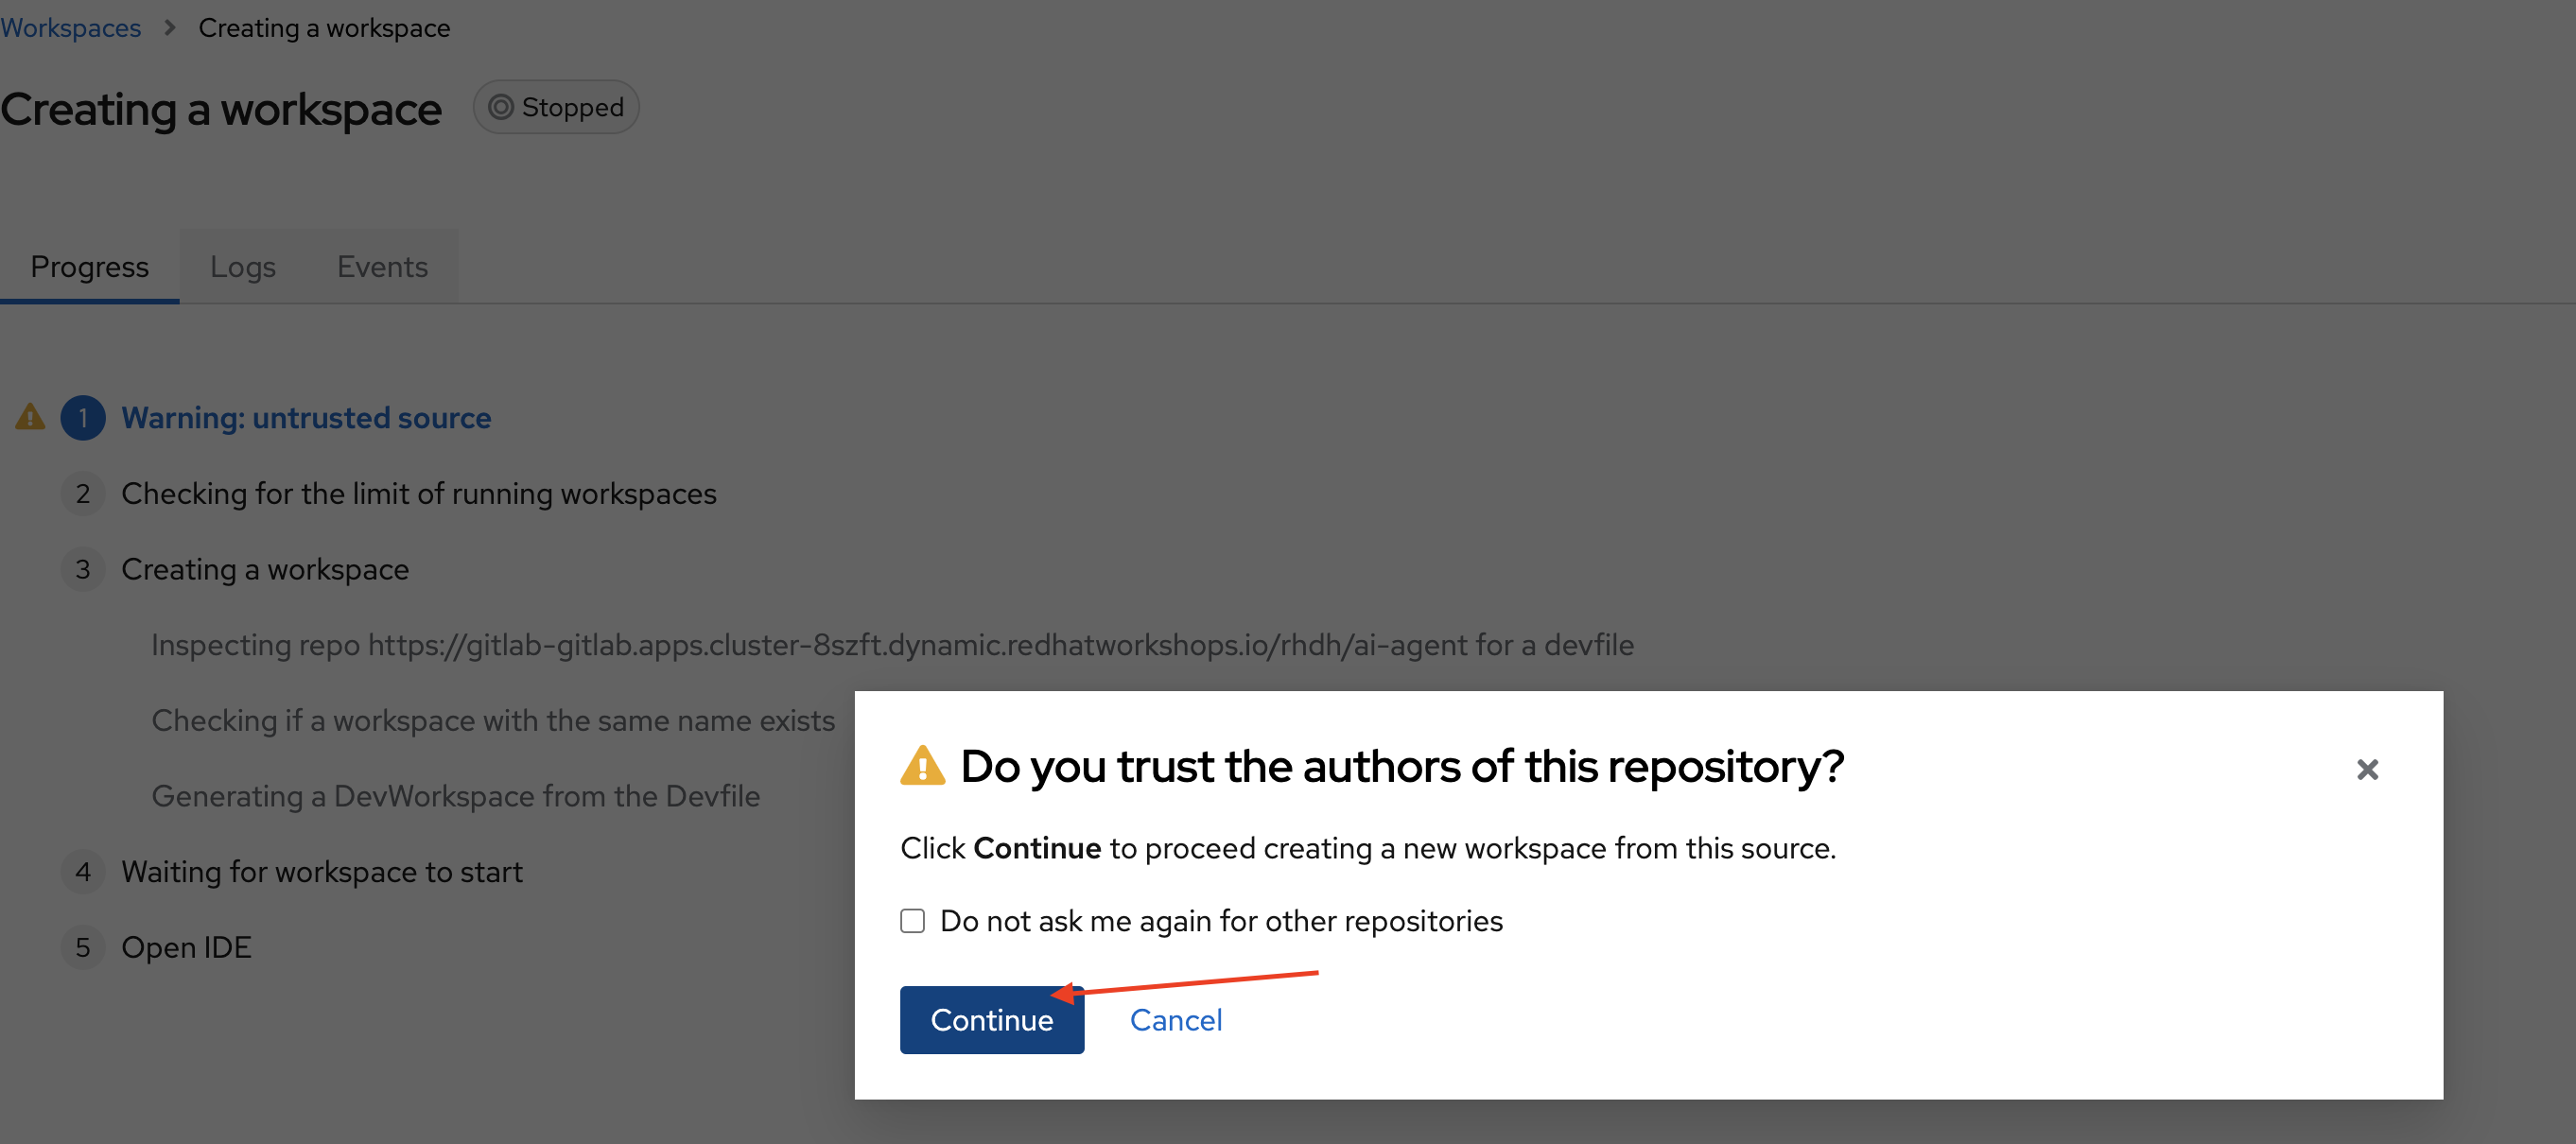
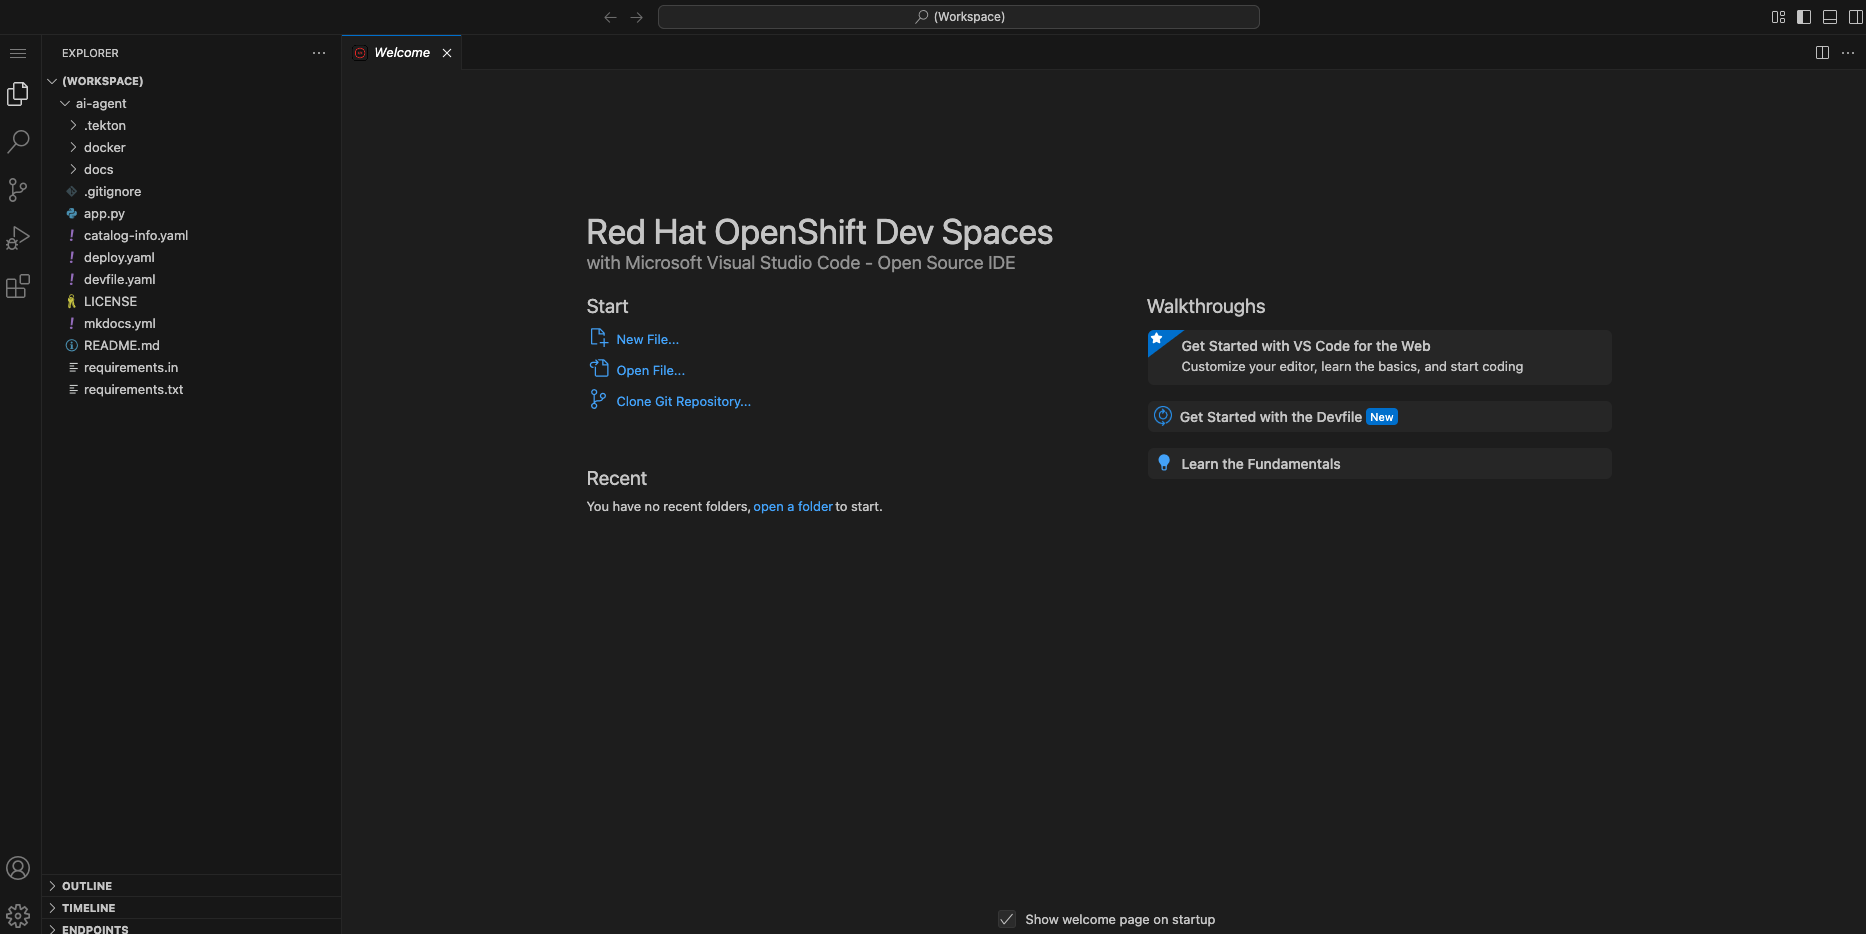
Red Hat OpenShift Dev Spaces will automatically analyze the repository. After reviewing it, Dev Spaces will select a suitable development environment. It will read the devfile.yaml and automatically configure the workspace with the specified container image, tools, and commands.
Connecting your AI Agent to APIs
First, you must connect your Agent with the LLM and API tools required for it to function. You will gather the API information and store it in a Kubernetes Secret to be used by the AI Agent.
NOTE: KEEP THE APIs KEY SECRET. Keep it safe. DO NOT PUBLISH IT, SHARE IT, OR COMMIT IT TO ANY PUBLIC GIT REPOSITORY. THIS IS YOUR PERSONAL API KEY.
Set up your account on the Tavily website
The AI Research Agent will use Tavily for tools, such as Web Search. We want to include the Tavily in our development environment as part of the AI agent implementation.
-
Access https://app.tavily.com
-
Click Sign up to create a new account.
-
Choose your sign-up method: Google, GitHub, or Email address.
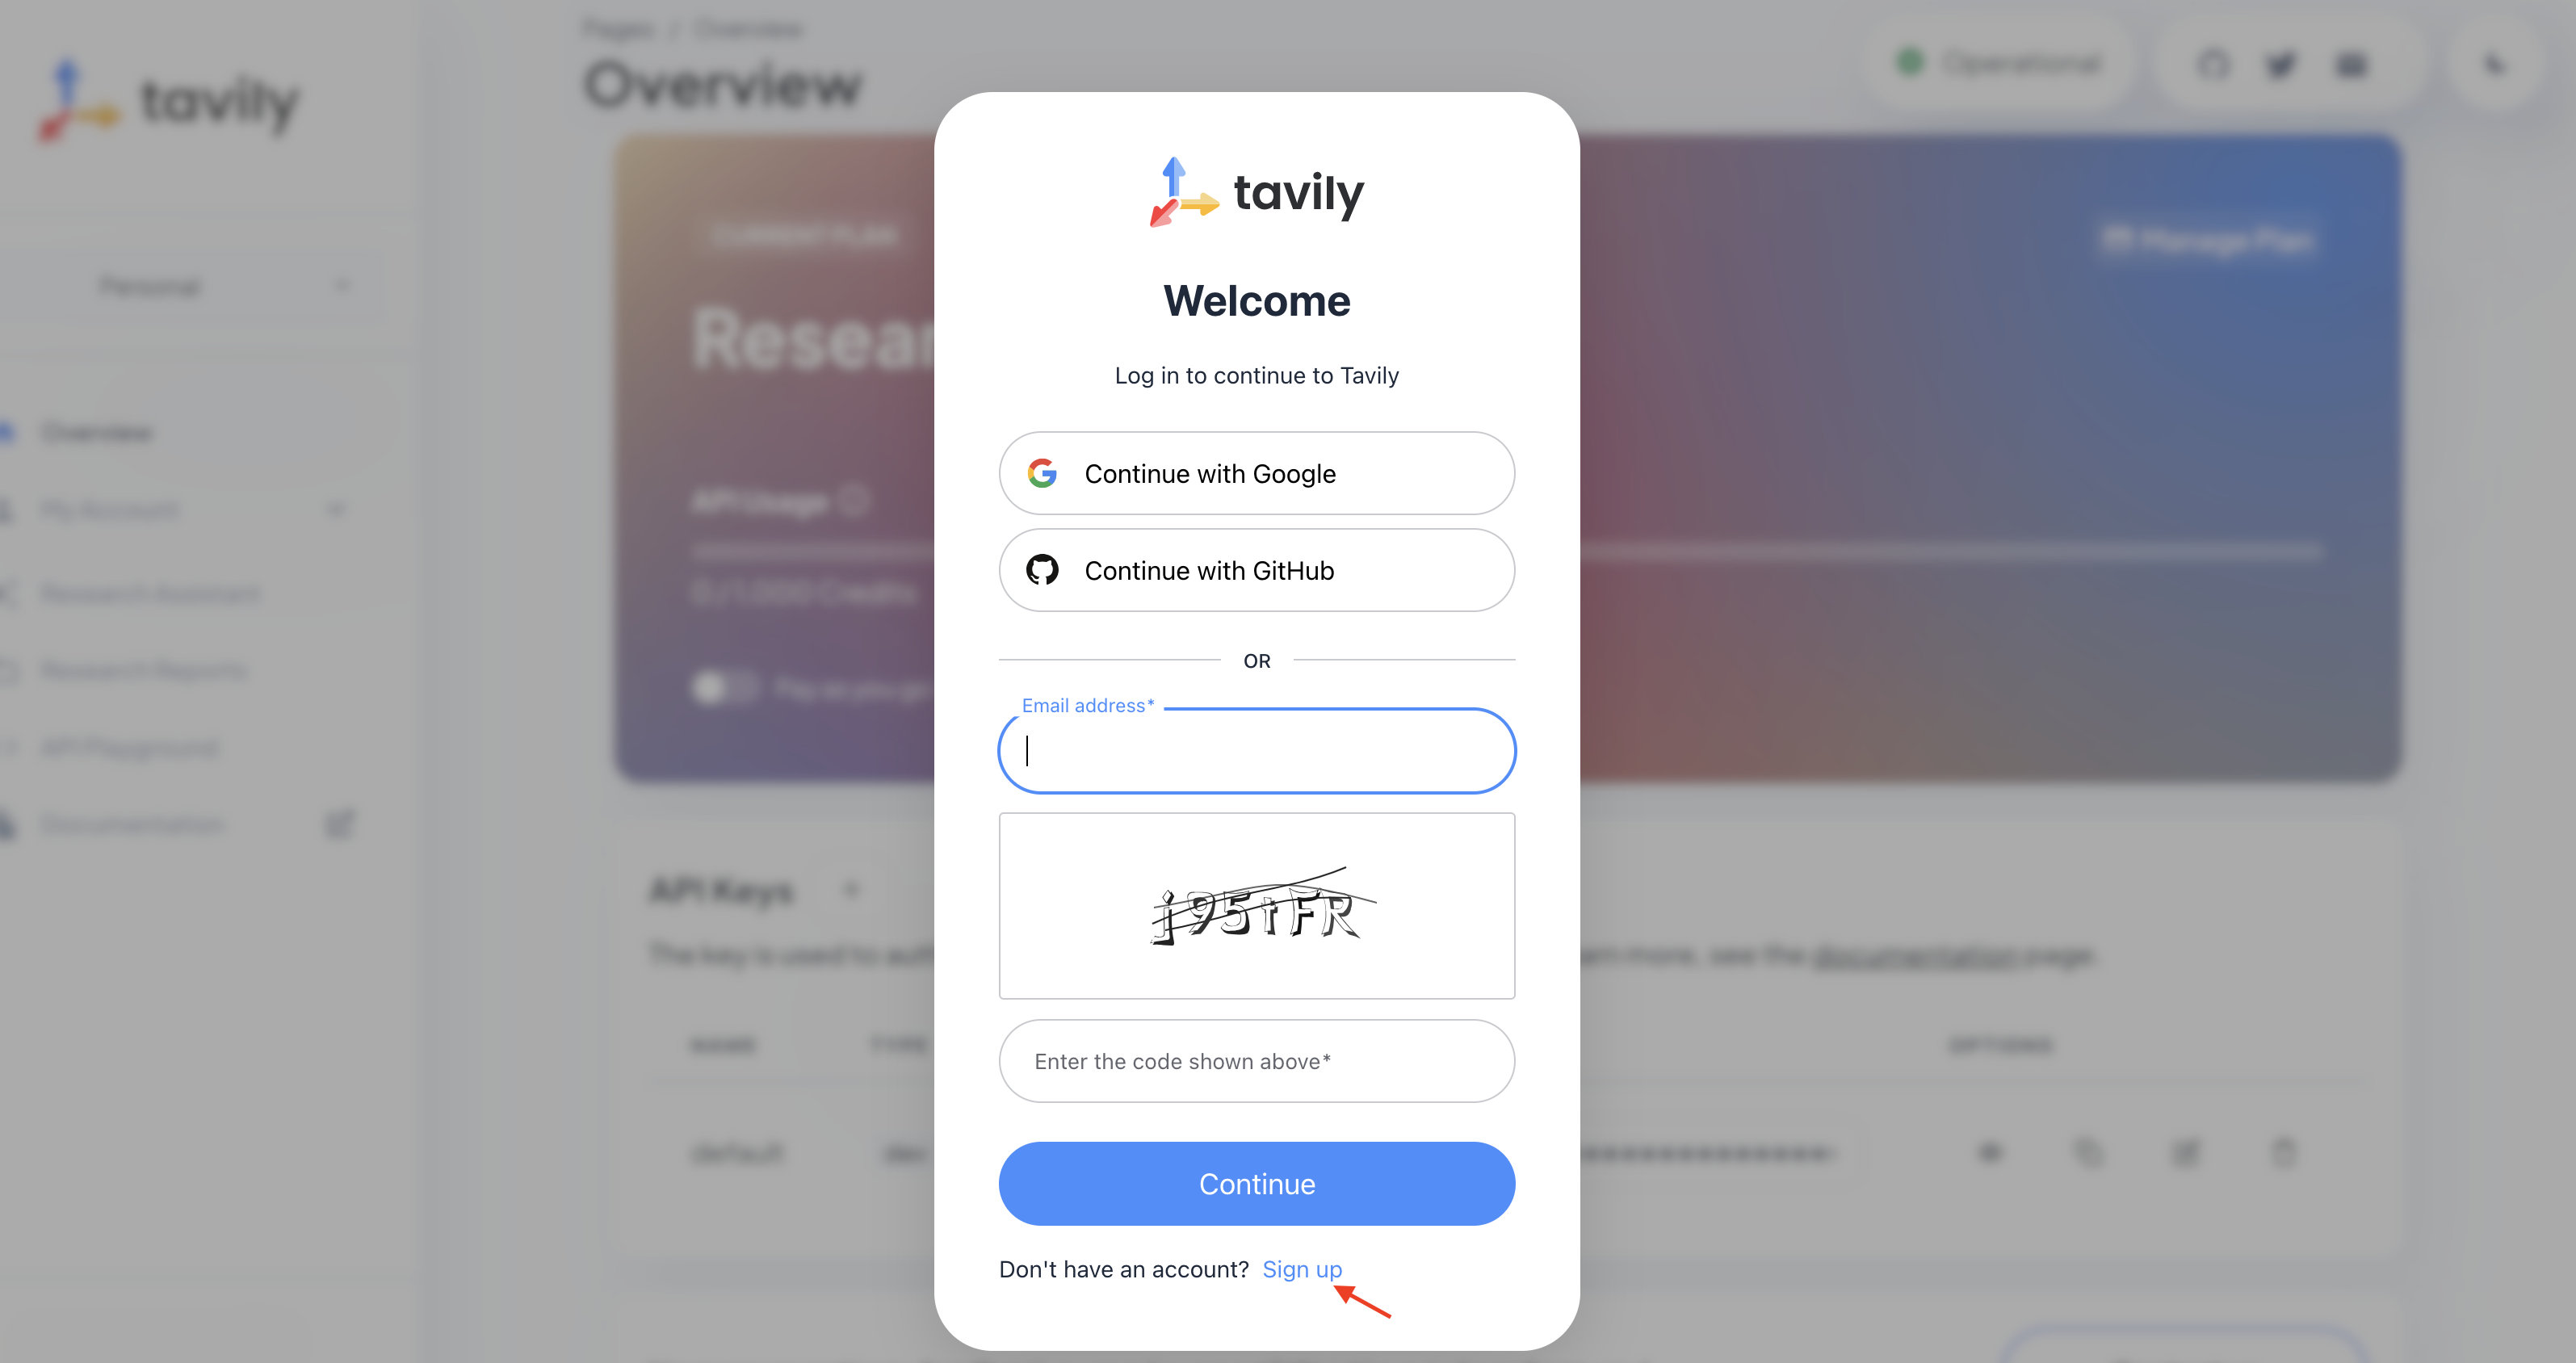
-
Click Continue, and once logged in, you will see a screen like this:
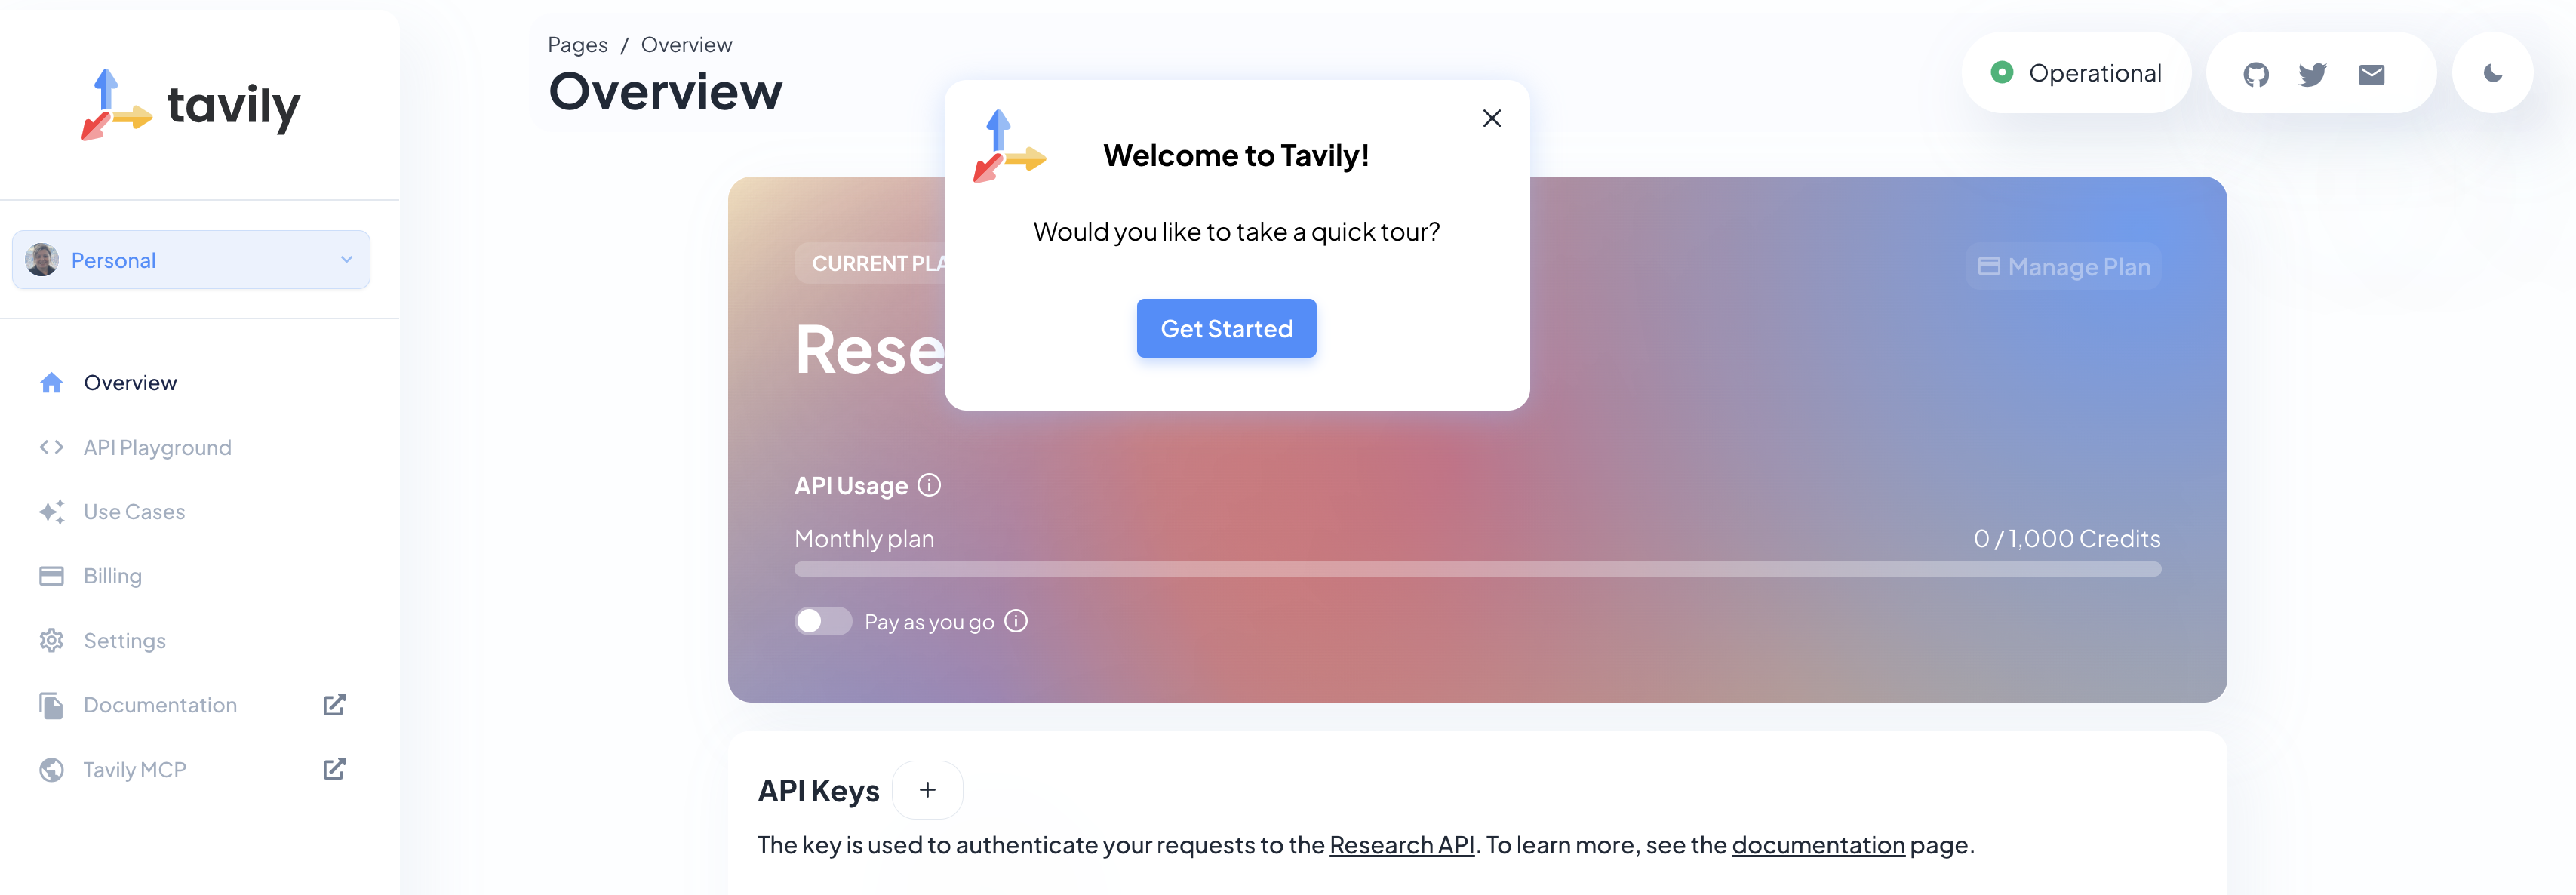
-
Select the provided API key, copy the API KEY VALUE
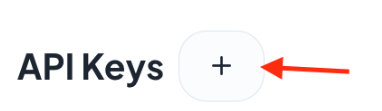
Create an API Key if Tavily doesn’t provide one
-
Close the Get started pop-up.
-
Click Add API Key.
-
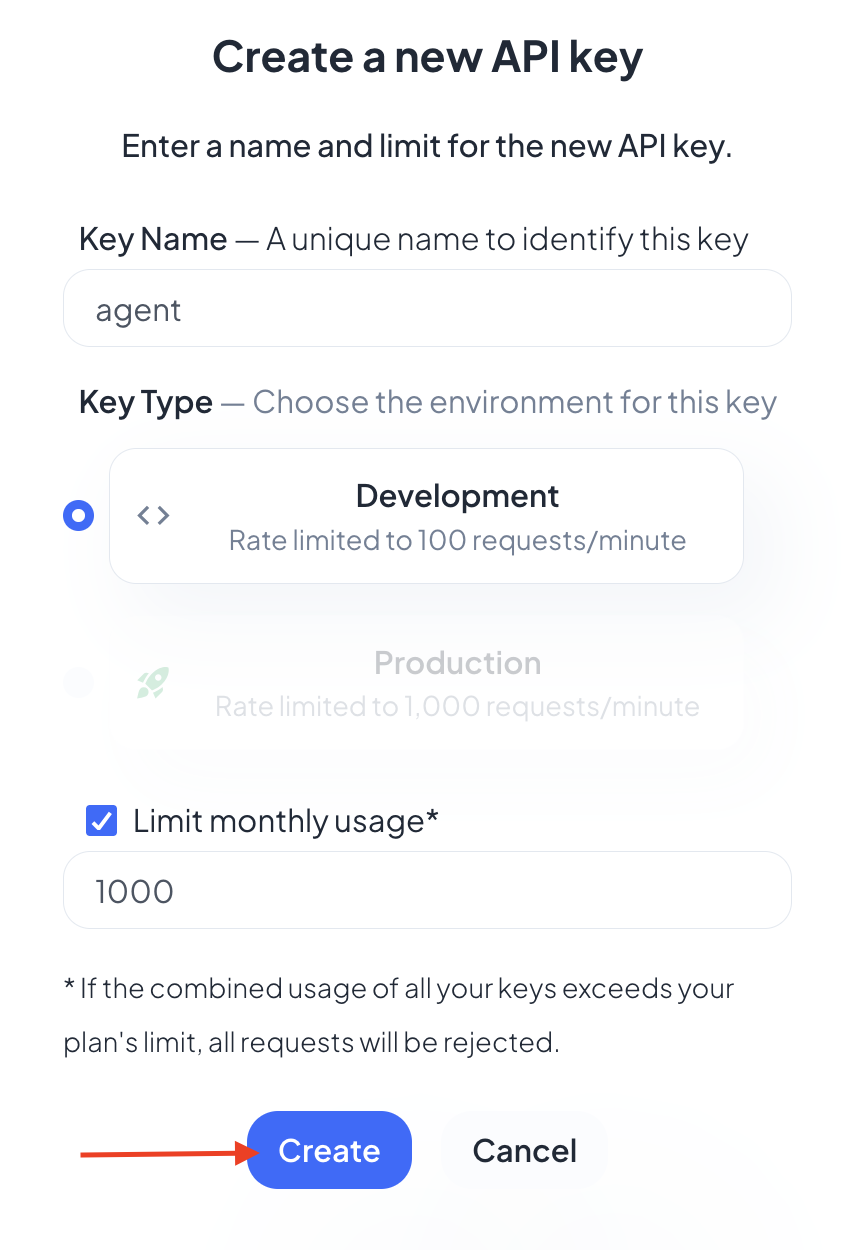
Create an API key named agent:
Note: The API key is free. The next screenshot shows additional information about limits.
-
After creating the API key, copy the API KEY VALUE
Create the secret in Kubernetes using RH OpenShift Dev Spaces terminal
You will create a Kubernetes secret with the Tavily API key.
-
From RH OpenShift Dev Spaces, open a Terminal by clicking New Terminal.
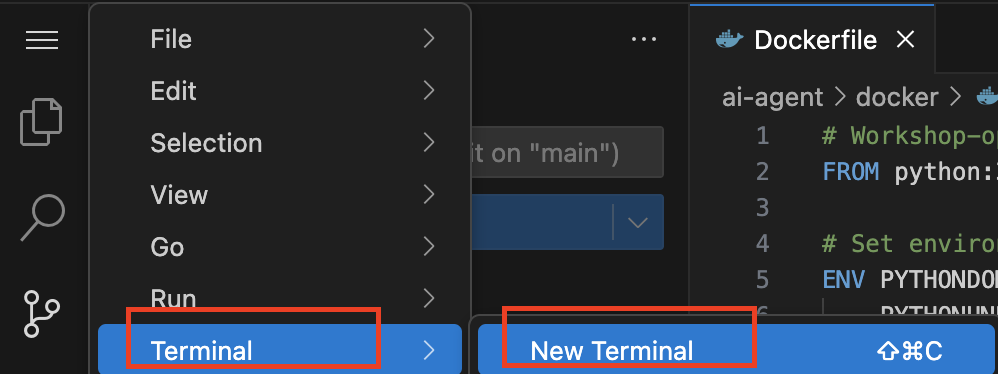
Note: Ignore any message from Red Hat OpenShift Dev Spaces:
"Some keybindings don’t go to the terminal by default and are handled by Red Hat OpenShift Dev Spaces with Microsoft Visual Studio Code - Open Source IDE instead." -
Copy the following content:
export TAVILY_API_KEY=<YOUR_KEY> kubectl create secret generic ai-agent-secrets-tavily \ --from-literal=TAVILY_API_KEY=$TAVILY_API_KEY \ -n tssc-app-development -
Paste the content in the terminal.
-
Paste your key after the TAVILY_API_KEY= in the kubernetes secret.
-
Press enter to create the secret. You should see the message: "secret/ai-agent-secrets-tavily created"
Get your API key for the self-hosted Model (for Red Hat internal only)
Now, set up your account on the Internal MaaS Demo from the AI BU. This account provides the API KEY needed to access the self-hosted model for this lab. Knowing how to access a self-hosted model is useful for building applications or connecting to third-party tools, like an AI assistant.
-
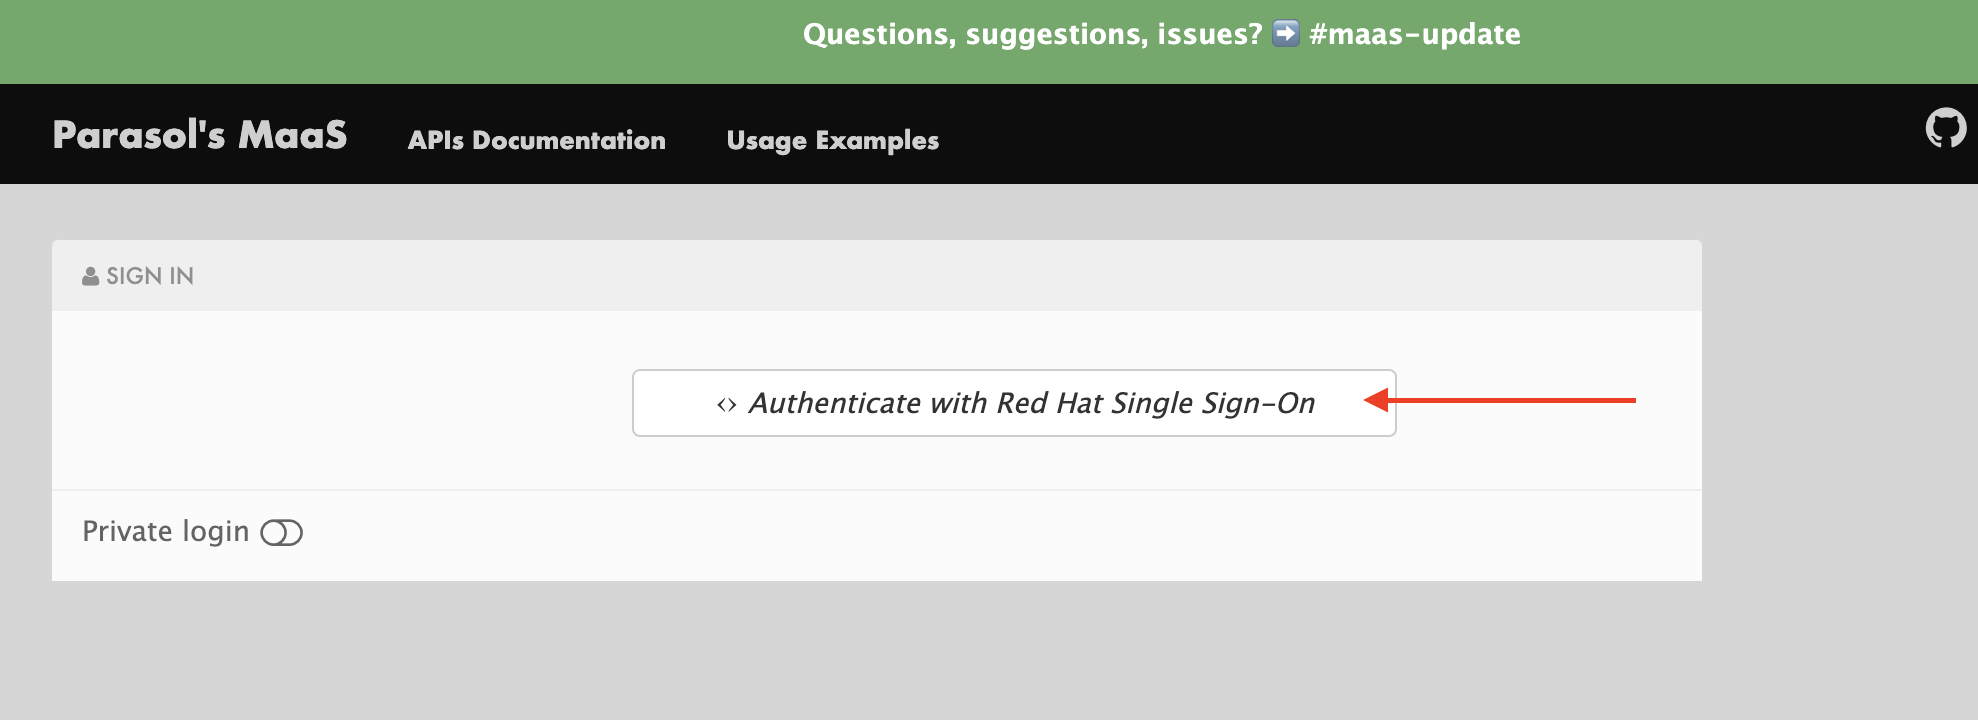
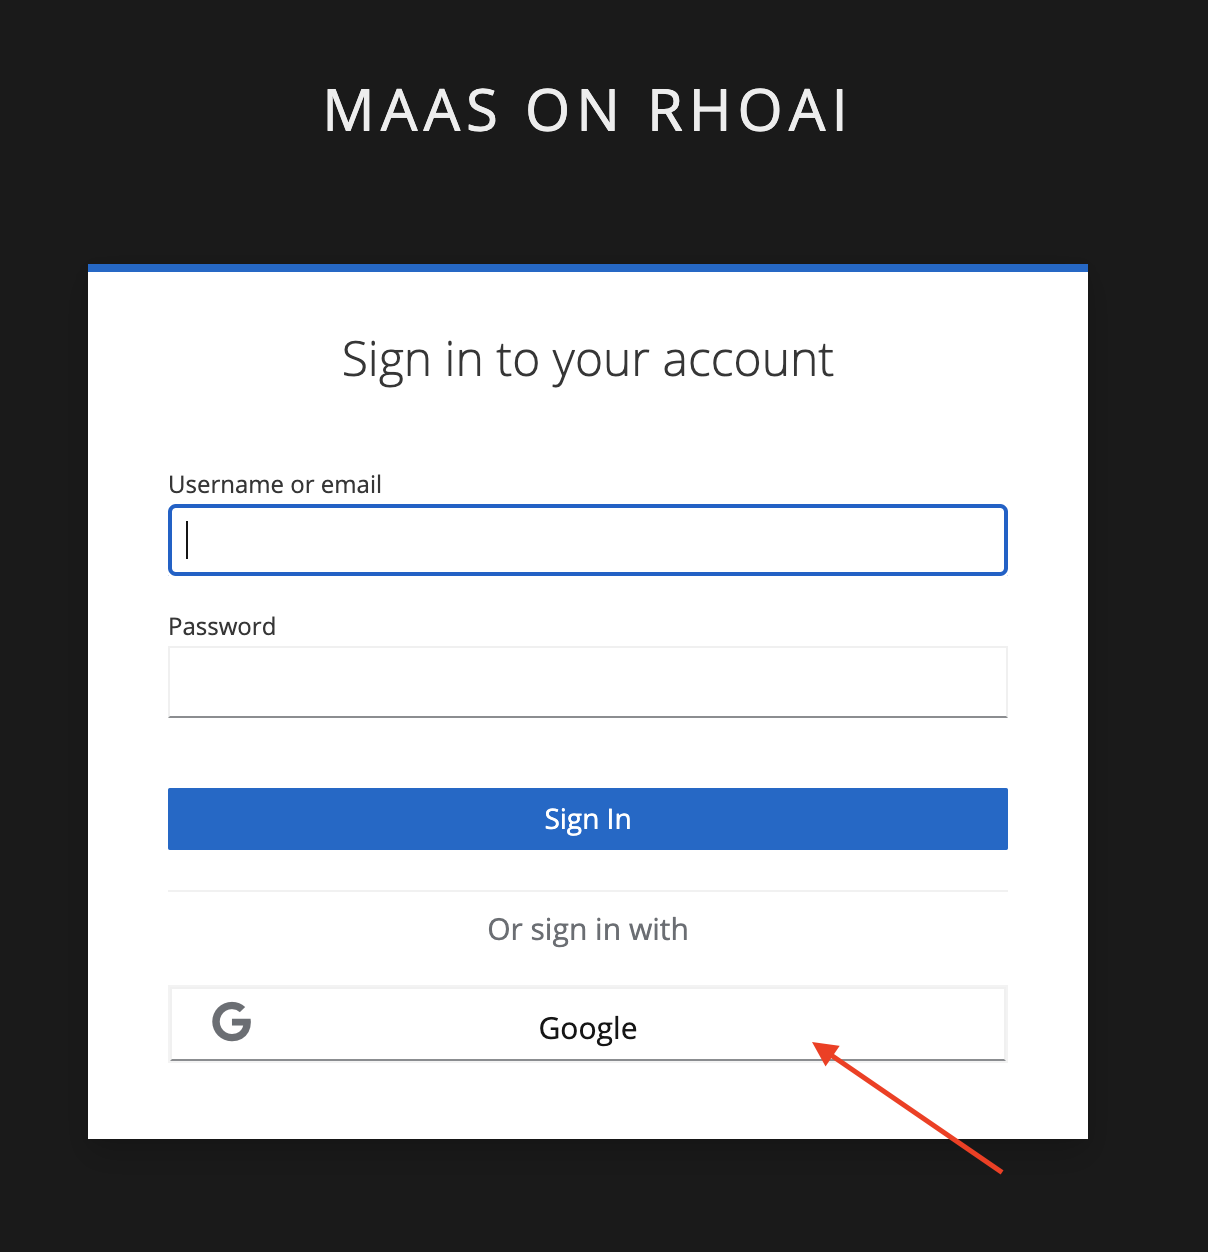
Access the URL and sign in with your Red Hat account:https://maas.apps.prod.rhoai.rh-aiservices-bu.com/[Maas website,window='_blank']
Note: The Maas website is not an official Red Hat service. It is for Red Hat associates' internal demo purposes only, provided 'as-is' without support or SLA. The intended purpose is to test the connectivity of Red Hat products to models that customers may use.
-
Click Sign in.

-
Click Authenticate with RH SSO.
-
Click Google to sign in to RHOAI with your account.
-
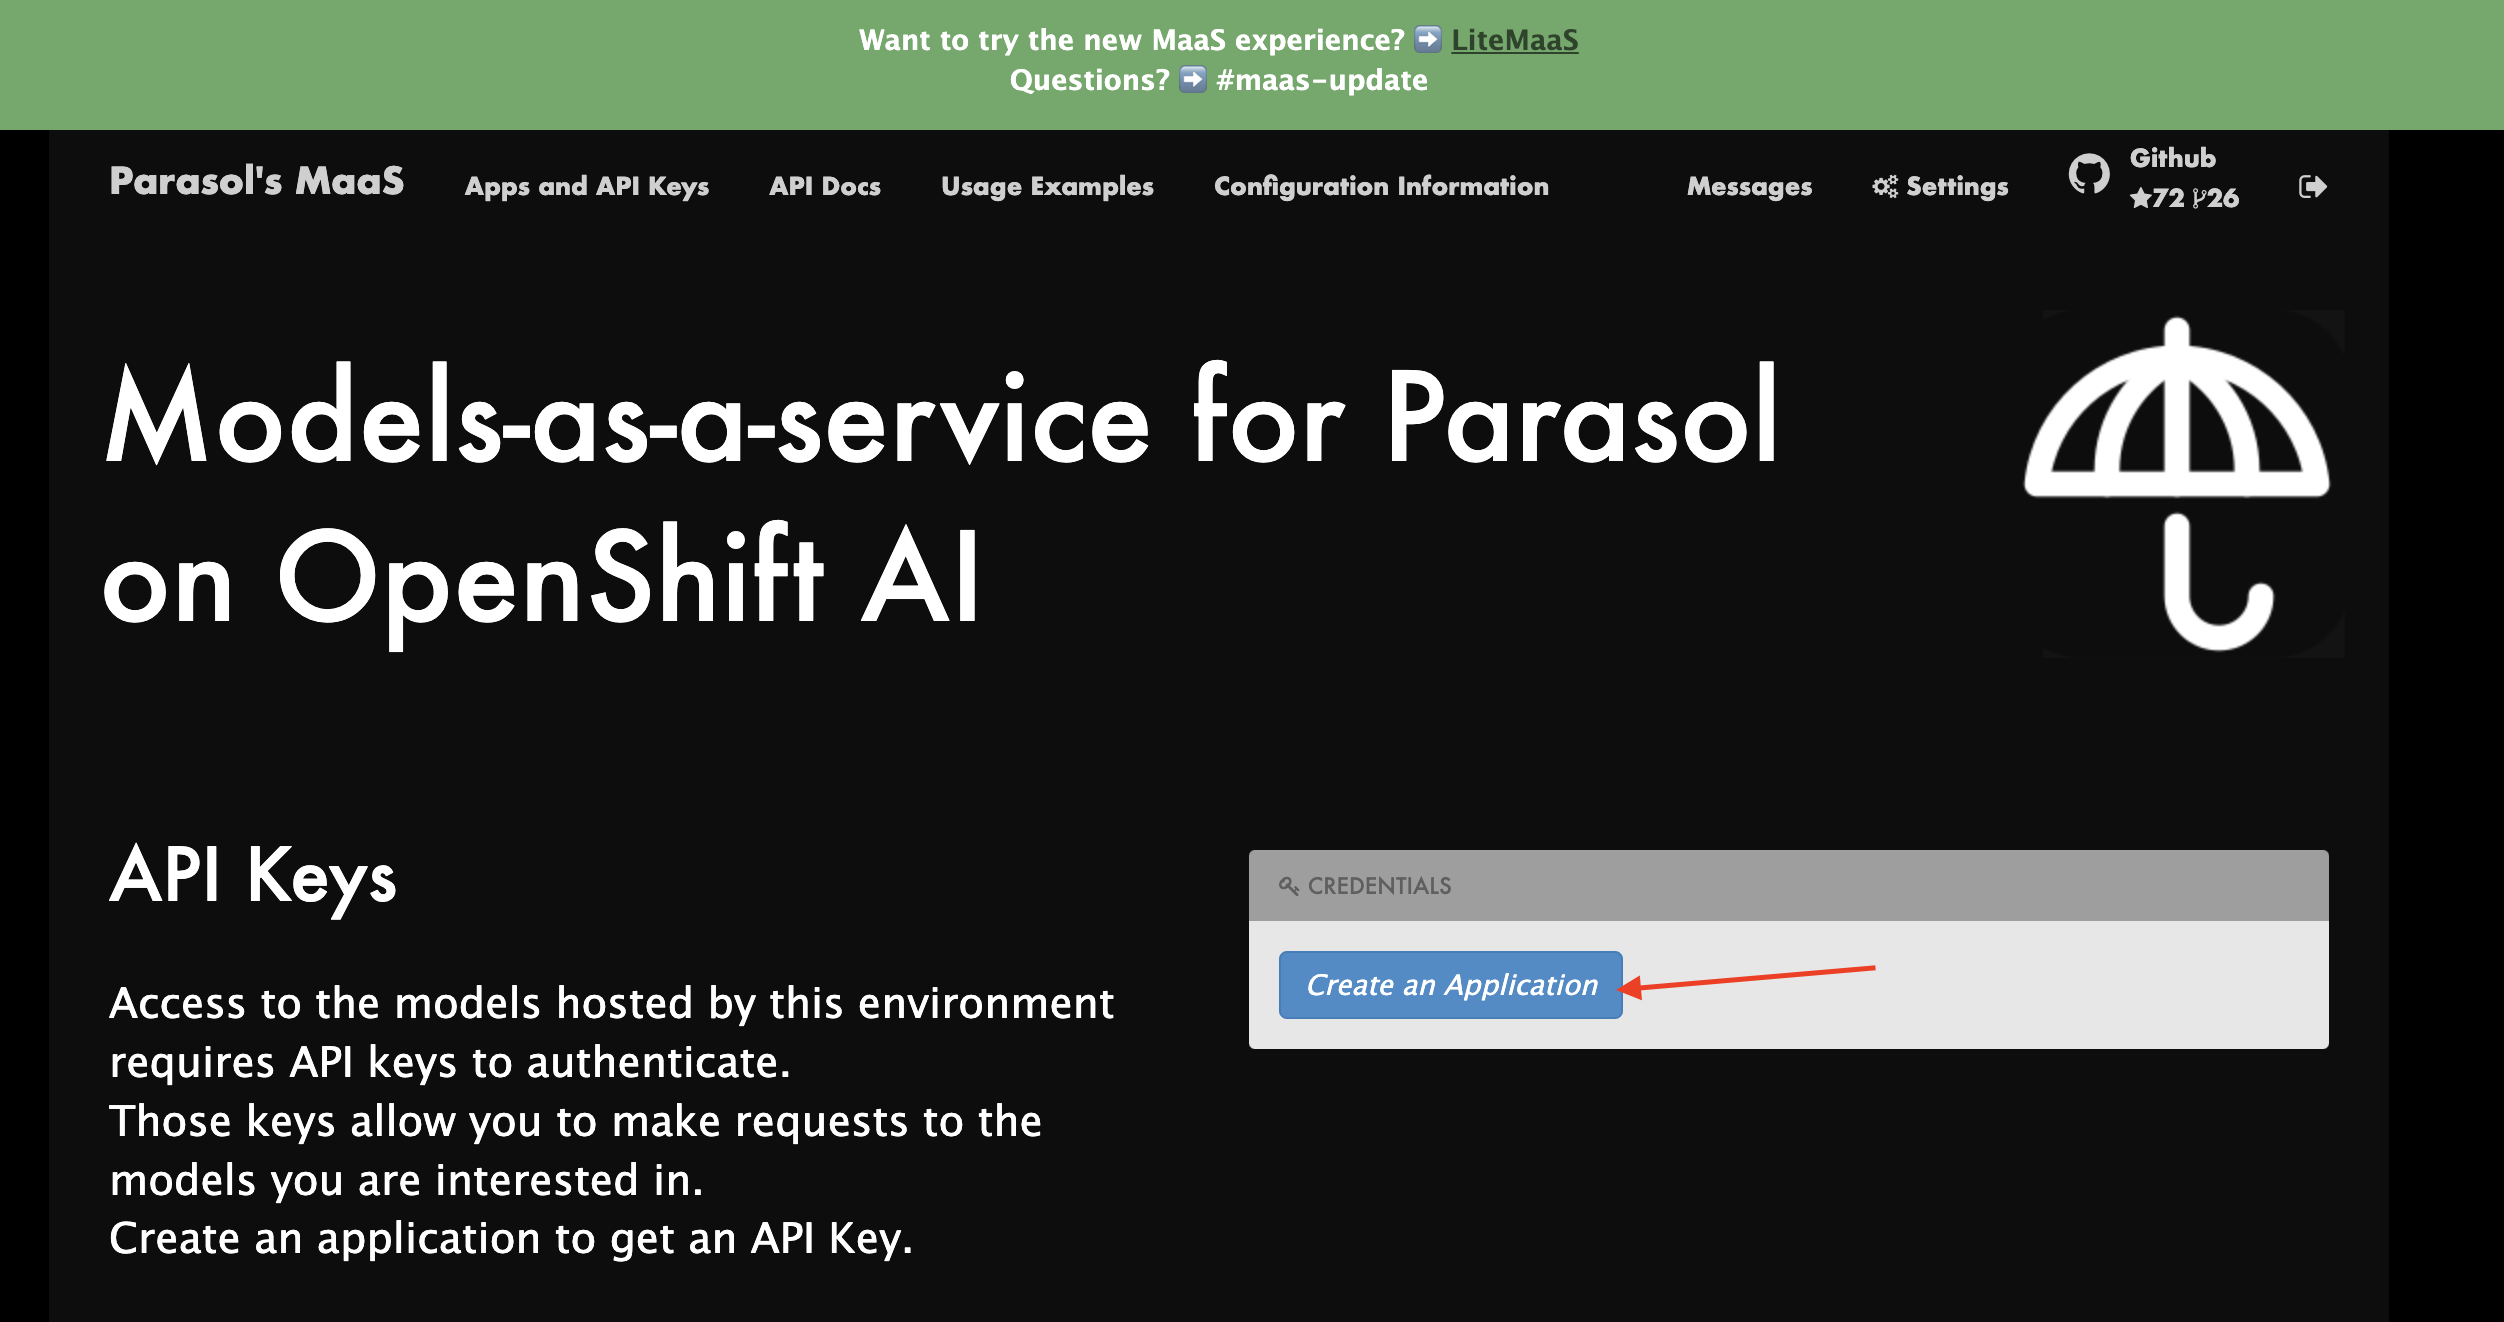
Click Create an Application
-
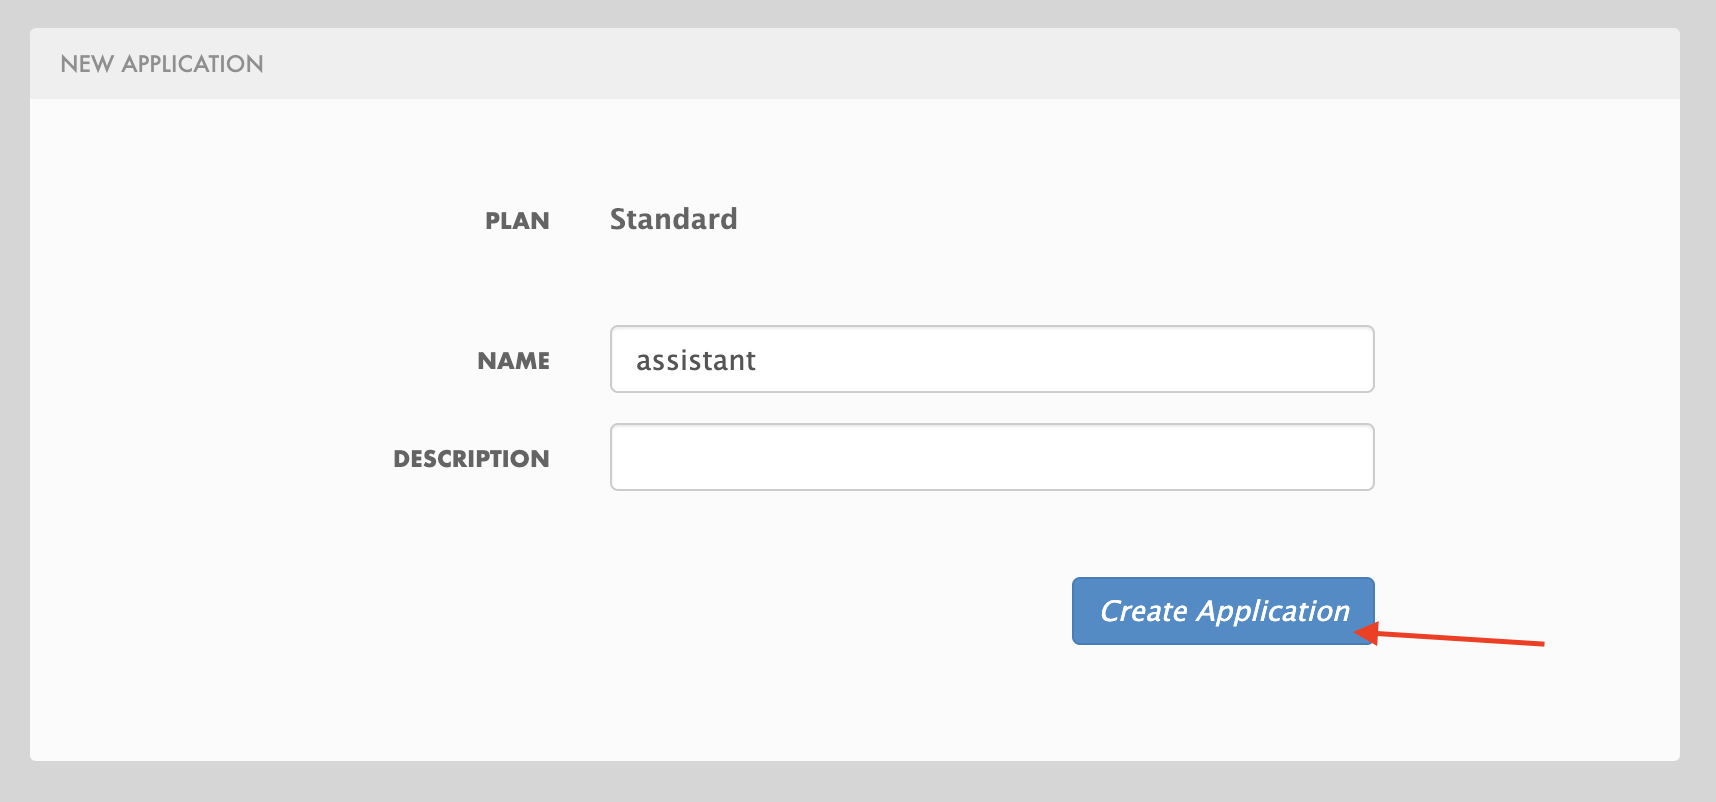
Click the llama-3-2-3b model.

-
Create an application named assistant to get the API Key.
Get your API key for the self-hosted Model (for partners only)
To finalize the AI Agent implementation, access to an LLM capable of agent retrieval. Since MaaS is exclusively for internal Red Hat use, please ensure we have access to the already deployed llama-3-2-3b LLM to connect with the agent.
Environment Variables (Kubernetes) Create a secret with your API keys:
Create a secret with your API keys:
kubectl create secret generic ai-agent-secrets-llm \
  --from-literal=LLM_API_BASE_URL=\
  --from-literal=LLM_API_KEY= \
  --from-literal=MODEL_NAME=llama-3-2-3b \
-n tssc-app-development-
Paste the secret in the RH OpenShift Dev Spaces terminal.
-
Copy the API Key and paste it after LLM_API_KEY= in the kubernetes secret.
-
Copy the Endpoint URL from the Maas website and paste it after LLM_API_BASE_URL= in the kubernetes secret. Include /v1 at the end of the URL.
-
Note: Ensure you have include '/v1' at the end of the URL.
-
-
Press Enter. You should see the message: "secret/ai-agent-secrets-llm created"
Add the AI Agent implementation
You will add new files and update existing content.
-
Create a new folder and within it, a new file, index.html: this file represents the UI.
-
Create a new python file
search_agent.py: this file contains the Agent Logic. -
Update the
app.pypython file: This is the main file the index.html will communicate with -
Update
Dockerfile: this file defines the container specification. -
Update the
requirements.txtfile: this file holds the required libraries for the Python AI app.
1- Create the index.html file
The index.html file needs to be located in the templates folder.
-
In Red Hat Red Hat OpenShift Dev Spaces, click the ai-agent project:
-
Create a new folder named: templates
-
Next, inside this folder, add a new file with the name index.html
-
In the index.html file, copy the provided content by clicking on the icon:
<!DOCTYPE html> <html lang="en"> <head> <meta charset="UTF-8"> <meta name="viewport" content="width=device-width, initial-scale=1.0"> <title>AI Research Agent</title> <style> :root { --primary-color: #2563eb; --primary-hover: #1d4ed8; --success-color: #16a34a; --error-color: #dc2626; --warning-color: #d97706; --background: #f8fafc; --card-background: #ffffff; --text-primary: #1e293b; --text-secondary: #64748b; --border-color: #e2e8f0; --shadow: 0 1px 3px 0 rgb(0 0 0 / 0.1), 0 1px 2px -1px rgb(0 0 0 / 0.1); } * { margin: 0; padding: 0; box-sizing: border-box; } body { font-family: -apple-system, BlinkMacSystemFont, 'Segoe UI', Roboto, sans-serif; background-color: var(--background); color: var(--text-primary); line-height: 1.6; min-height: 100vh; } .container { max-width: 800px; margin: 0 auto; padding: 2rem; } h1 { font-size: 2.5rem; font-weight: 700; text-align: center; margin-bottom: 0.5rem; background: linear-gradient(135deg, var(--primary-color), var(--primary-hover)); -webkit-background-clip: text; -webkit-text-fill-color: transparent; background-clip: text; } .subtitle { text-align: center; color: var(--text-secondary); margin-bottom: 3rem; font-size: 1.1rem; } .form-card { background: var(--card-background); padding: 2rem; border-radius: 12px; box-shadow: var(--shadow); margin-bottom: 2rem; } label { display: block; font-weight: 600; margin-bottom: 0.5rem; color: var(--text-primary); } #prompt { width: 100%; min-height: 120px; padding: 1rem; border: 2px solid var(--border-color); border-radius: 8px; font-family: inherit; font-size: 1rem; resize: vertical; transition: border-color 0.2s ease; background: var(--card-background); } #prompt:focus { outline: none; border-color: var(--primary-color); box-shadow: 0 0 0 3px rgb(37 99 235 / 0.1); } .form-actions { display: flex; gap: 1rem; margin-top: 1.5rem; align-items: center; } .btn { padding: 0.75rem 1.5rem; font-size: 1rem; font-weight: 600; border: none; border-radius: 8px; cursor: pointer; transition: all 0.2s ease; text-decoration: none; display: inline-flex; align-items: center; gap: 0.5rem; } .btn-primary { background: var(--primary-color); color: white; } .btn-primary:hover:not(:disabled) { background: var(--primary-hover); transform: translateY(-1px); } .btn-secondary { background: var(--border-color); color: var(--text-primary); } .btn-secondary:hover { background: #cbd5e1; } .btn:disabled { opacity: 0.6; cursor: not-allowed; transform: none; } .loading { display: none; align-items: center; gap: 0.5rem; color: var(--text-secondary); font-weight: 500; } .spinner { width: 20px; height: 20px; border: 2px solid var(--border-color); border-top: 2px solid var(--primary-color); border-radius: 50%; animation: spin 1s linear infinite; } @keyframes spin { 0% { transform: rotate(0deg); } 100% { transform: rotate(360deg); } } .result-card { background: var(--card-background); border-radius: 12px; box-shadow: var(--shadow); overflow: hidden; margin-bottom: 2rem; } .result-header { padding: 1.5rem; border-bottom: 1px solid var(--border-color); display: flex; justify-content: space-between; align-items: center; } .result-title { font-size: 1.25rem; font-weight: 600; color: var(--text-primary); } .cache-badge { padding: 0.25rem 0.75rem; border-radius: 20px; font-size: 0.875rem; font-weight: 500; } .cache-hit { background: #dcfce7; color: var(--success-color); } .cache-miss { background: #fef3c7; color: var(--warning-color); } .result-content { padding: 1.5rem; } .question { background: #f1f5f9; padding: 1rem; border-radius: 8px; margin-bottom: 1.5rem; border-left: 4px solid var(--primary-color); } .question-label { font-size: 0.875rem; font-weight: 600; color: var(--text-secondary); text-transform: uppercase; letter-spacing: 0.05em; margin-bottom: 0.5rem; } .answer { background: #f8fafc; padding: 1.5rem; border-radius: 8px; border: 1px solid var(--border-color); white-space: pre-wrap; font-family: 'SF Mono', Monaco, monospace; font-size: 0.9rem; line-height: 1.7; overflow-x: auto; } .error { background: #fef2f2; color: var(--error-color); padding: 1rem; border-radius: 8px; border: 1px solid #fecaca; margin-top: 1rem; } .stats { display: flex; gap: 1rem; margin-top: 1rem; padding-top: 1rem; border-top: 1px solid var(--border-color); font-size: 0.875rem; color: var(--text-secondary); } .progress-bar { display: none; width: 100%; height: 4px; background: var(--border-color); border-radius: 2px; overflow: hidden; margin-top: 1rem; } .progress-fill { height: 100%; background: var(--primary-color); border-radius: 2px; animation: progress 2s ease-in-out infinite; } @keyframes progress { 0% { width: 0%; } 50% { width: 70%; } 100% { width: 100%; } } @media (max-width: 768px) { .container { padding: 1rem; } h1 { font-size: 2rem; } .form-card, .result-card { padding: 1.5rem; } .form-actions { flex-direction: column; align-items: stretch; } .btn { justify-content: center; } } </style> </head> <body> <div class="container"> <h1>🤖 AI Research Agent</h1> <p class="subtitle">Get comprehensive research answers powered by web search and AI analysis</p> <div class="form-card"> <form id="research-form" onsubmit="return false;"> <label for="prompt">What would you like to research?</label> <textarea id="prompt" name="prompt" placeholder="Enter your research question here... For example: 'What are the latest developments in renewable energy?'" required ></textarea> <div class="form-actions"> <button type="submit" class="btn btn-primary" id="submit-btn"> <span id="submit-text">🔍 Start Research</span> </button> <button type="button" class="btn btn-secondary" onclick="clearForm()"> Clear </button> </div> <div class="loading" id="loading"> <div class="spinner"></div> <span>Researching your question...</span> </div> <div class="progress-bar" id="progress-bar"> <div class="progress-fill"></div> </div> </form> </div> <div id="result-container"></div> {% if prompt and result %} <div class="result-card"> <div class="result-header"> <h2 class="result-title">Research Results</h2> <span class="cache-badge cache-miss">🔄 Research Result</span> </div> <div class="result-content"> <div class="question"> <div class="question-label">Your Question</div> <div>{{ prompt }}</div> </div> <div class="answer">{{ result }}</div> </div> </div> {% endif %} </div> <script> let isProcessing = false; document.getElementById('research-form').addEventListener('submit', function(e) { e.preventDefault(); if (!isProcessing) { submitQuestion(); } }); document.getElementById('prompt').addEventListener('keydown', function(e) { if (e.ctrlKey && e.key === 'Enter' && !isProcessing) { e.preventDefault(); submitQuestion(); } }); function submitQuestion() { const prompt = document.getElementById('prompt').value.trim(); if (!prompt) { alert('Please enter a research question.'); return; } setLoadingState(true); fetch('/ask_async', { method: 'POST', headers: { 'Content-Type': 'application/json', }, body: JSON.stringify({ prompt: prompt }) }) .then(response => response.json()) .then(data => { if (data.error) { showError(data.error); } else { showResult(prompt, data.result); } }) .catch(error => { console.error('Error:', error); showError('Network error. Please check your connection and try again.'); }) .finally(() => { setLoadingState(false); }); } function setLoadingState(loading) { isProcessing = loading; const submitBtn = document.getElementById('submit-btn'); const submitText = document.getElementById('submit-text'); const loadingDiv = document.getElementById('loading'); const progressBar = document.getElementById('progress-bar'); const promptTextarea = document.getElementById('prompt'); if (loading) { submitBtn.disabled = true; submitText.textContent = '🔄 Researching...'; loadingDiv.style.display = 'flex'; progressBar.style.display = 'block'; promptTextarea.disabled = true; } else { submitBtn.disabled = false; submitText.textContent = '🔍 Start Research'; loadingDiv.style.display = 'none'; progressBar.style.display = 'none'; promptTextarea.disabled = false; } } function showResult(prompt, result) { const container = document.getElementById('result-container'); container.innerHTML = ` <div class="result-card"> <div class="result-header"> <h2 class="result-title">Research Results</h2> <span class="cache-badge cache-miss">🔄 Research Result</span> </div> <div class="result-content"> <div class="question"> <div class="question-label">Your Question</div> <div>${escapeHtml(prompt)}</div> </div> <div class="answer">${escapeHtml(result)}</div> <div class="stats"> <span>🤖 Source: AI Research Agent</span> <span>🔍 Powered by Tavily Search</span> </div> </div> </div> `; container.scrollIntoView({ behavior: 'smooth' }); } function showError(message) { const container = document.getElementById('result-container'); container.innerHTML = ` <div class="error"> <strong>❌ Error:</strong> ${escapeHtml(message)} </div> `; } function clearForm() { document.getElementById('prompt').value = ''; document.getElementById('result-container').innerHTML = ''; document.getElementById('prompt').focus(); } function escapeHtml(text) { const div = document.createElement('div'); div.textContent = text; return div.innerHTML; } // Focus on textarea when page loads document.addEventListener('DOMContentLoaded', function() { document.getElementById('prompt').focus(); }); </script> </body> </html> -
Paste the content in the index.html file, replacing the whole content.
-
Save the file.
-
If needed, verify the solution: index.html solution file
2- Add the search_agent.py file
-
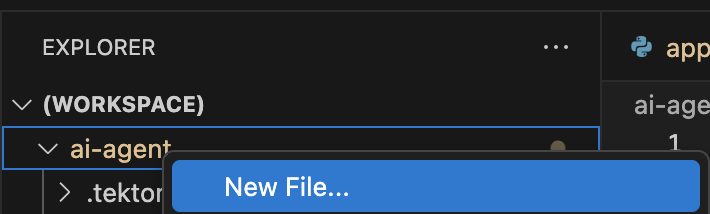
Click the project, then click New file. Ensure you create the new file at the project root.
-
Paste the following name and press Enter:
search_agent.py -
Copy the provided content, by clicking on the icon:
import os import datetime from dotenv import load_dotenv from tavily import TavilyClient from langchain_core.messages import HumanMessage from langchain_core.prompts import ChatPromptTemplate, MessagesPlaceholder from langchain.agents import create_openai_tools_agent, AgentExecutor from langgraph.prebuilt import create_react_agent from langchain_tavily import TavilySearch, TavilyExtract, TavilyCrawl from langchain.chat_models import init_chat_model from langchain_openai import ChatOpenAI from langchain_core.tools import tool class SearchAgent: """ A class to encapsulate the web research agent's functionality. """ def __init__(self): """ Initializes the agent by loading environment variables and setting up the LLM, tools, and the agent executor. """ self._load_config() self._init_llm() self._init_search_tools() self._init_tavily_client() def _load_config(self): """Loads environment variables from a .env file.""" load_dotenv() self.llm_api_base = os.getenv("LLM_API_BASE_URL") self.model_name = os.getenv("MODEL_NAME") self.llm_api_key = os.getenv("LLM_API_KEY") self.tavily_api_key = os.getenv("TAVILY_API_KEY") if not all([self.llm_api_base, self.model_name, self.llm_api_key, self.tavily_api_key]): raise ValueError("One or more required environment variables are missing.") def _init_llm(self): self.llm = ChatOpenAI( base_url=self.llm_api_base, api_key=self.llm_api_key, model=self.model_name, temperature=0 ) query = "Hi!" response = self.llm.invoke([{"role": "user", "content": query}]) print(response.text()) return response.text() def _init_tavily_client(self): """Initialize direct TavilyClient for crawl functionality""" self.tavily_client = TavilyClient(api_key=self.tavily_api_key) def direct_crawl_website(self, url: str) -> str: """Crawl a website using direct TavilyClient to avoid LangChain wrapper issues""" try: crawl_results = self.tavily_client.crawl(url=url) return str(crawl_results) except Exception as e: return f"Crawl failed for {url}: {str(e)}" def direct_extract_content(self, urls: str) -> str: """Extract content from specific URLs using direct TavilyClient""" try: # Handle both single URL and comma-separated URLs if ',' in urls: url_list = [url.strip() for url in urls.split(',')] else: url_list = [urls.strip()] extract_results = self.tavily_client.extract(urls=url_list) return str(extract_results) except Exception as e: return f"Extract failed for {urls}: {str(e)}" def _init_search_tools(self): search = TavilySearch() # Create custom tools using direct TavilyClient @tool def tavily_crawl_direct(url: str) -> str: """Crawl a website comprehensively. Provide just the URL.""" return self.direct_crawl_website(url) @tool def tavily_extract_direct(urls: str) -> str: """Extract content from specific web pages. Provide URL or comma-separated URLs.""" return self.direct_extract_content(urls) self.tools = [search, tavily_crawl_direct, tavily_extract_direct] def run(self, query: str): print("run method" ) model_with_tools = self.llm.bind_tools(self.tools) today = datetime.datetime.today().strftime("%A, %B %d, %Y") self.prompt = ChatPromptTemplate.from_messages([ ("system", f""" You are a research agent equipped with web search, website crawling, and content extraction tools. Your mission is to conduct comprehensive, accurate, and up-to-date research, grounding your findings in credible web sources. **CRITICAL TOOL USAGE:** - Tavily Search: Use only 'query' parameter for web search - Tavily Crawl Direct: Use only 'url' parameter for comprehensive website exploration - Tavily Extract Direct: Use only 'urls' parameter for extracting specific page content **Today's Date:** {today} **Available Tools:** 1. **Tavily Web Search** * **Purpose:** Retrieve relevant web pages based on a query. * **Usage:** ONLY use 'query' parameter * **Example:** Search for "LinkedIn NYC jobs" 2. **Tavily Crawl Direct** * **Purpose:** Comprehensively explore a website's structure and content. * **Usage:** ONLY use 'url' parameter * **When to use:** When you need complete coverage of a website's content * **Example:** Crawl "https://docs.python.org" for comprehensive documentation overview 3. **Tavily Extract Direct** * **Purpose:** Extract detailed content from specific web pages. * **Usage:** ONLY use 'urls' parameter (single URL or comma-separated) * **When to use:** When you have specific page URLs and need their detailed content * **Example:** Extract content from "https://docs.python.org/3/tutorial/introduction.html" **Guidelines for Conducting Research:** * **Citations:** Always support findings with source URLs as in-text citations. * **Accuracy:** Rely solely on data obtained via provided tools—never fabricate information. * **Methodology:** Follow a structured approach: Thought, Action, Observation, and repeat until you can provide a Final Answer. **CRITICAL TOOL USAGE RULES - FOLLOW EXACTLY:** * Tavily Search: Use ONLY query parameter. Example: tavily_search(query="your search text") * Tavily Crawl: Use ONLY url parameter. Example: tavily_crawl(url="https://example.com") * Tavily Extract: Use ONLY urls parameter as proper list. Example: tavily_extract(urls=["https://example.com"]) * NEVER use string representations of lists like '["url"]' - use actual lists ["url"] * NEVER wrap parameters in 'properties' objects * NEVER use optional parameters like include_domains, extract_depth, search_depth, time_range You will now receive a research question from the user: """, ), MessagesPlaceholder(variable_name="messages"), MessagesPlaceholder(variable_name="agent_scratchpad"), # Required for tool calls ]) model = create_openai_tools_agent(llm=model_with_tools, tools=self.tools, prompt=self.prompt) #model = create_react_agent(model=self.llm, tools="") #input_message = {"role": "user", "content": query} #response= model.invoke({"messages": [input_message]}) # Create an Agent Executor to handle tool execution agent_executor = AgentExecutor(agent=model, tools=self.tools, prompt=self.prompt, verbose=True) # Construct input properly as a dictionary output = agent_executor.invoke({"messages": [HumanMessage(content=query)]}) response = output['output'] print("Printing response from agent." + response) return response def _search(self): search = TavilySearch(max_results=2) search_results = search.invoke("What is the weather in SF") print(search_results) # If we want, we can create other tools. # Once we have all the tools we want, we can put them in a list that we will reference later. tools = [search] # --- Example of How to Use the Class --- if __name__ == "__main__": # 1. Instantiate the agent research_agent = SearchAgent() -
Save the file.
-
If needed, verify the solution: search_agent.py solution file
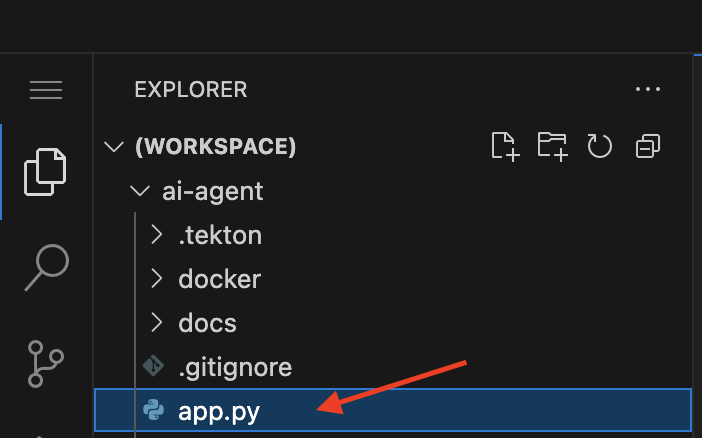
3- Update the app.py file
-
Go to the app.py file and open it:
-
Copy the provided content by clicking the icon:
from flask import Flask, render_template, request, jsonify from search_agent import SearchAgent # Initialize Flask app app = Flask(__name__) # Initialize the search agent print("Initializing AI Research Agent...") try: search_agent = SearchAgent() print("Agent initialized successfully!") except Exception as e: print(f"Failed to initialize agent: {e}") search_agent = None @app.route('/') def home(): """Render the home page with input form.""" return render_template('index.html') @app.route('/ask', methods=['POST']) def ask(): """Handle form submission and return results.""" user_prompt = request.form.get('prompt', '').strip() if not user_prompt: return render_template('index.html', prompt=user_prompt, result="Please enter a research question.") if not search_agent: return render_template('index.html', prompt=user_prompt, result="Error: Agent not available. Check your API keys.") try: print(f"Processing query: {user_prompt[:50]}...") result = search_agent.run(user_prompt) print("Query completed successfully!") return render_template('index.html', prompt=user_prompt, result=result) except Exception as e: print(f"Error processing query: {e}") return render_template('index.html', prompt=user_prompt, result=f"Error: {str(e)}") @app.route('/ask_async', methods=['POST']) def ask_async(): """Handle AJAX requests and return JSON.""" user_prompt = request.json.get('prompt', '').strip() if not user_prompt: return jsonify({'error': 'Please provide a valid prompt'}), 400 if not search_agent: return jsonify({'error': 'Agent not available'}), 500 try: result = search_agent.run(user_prompt) return jsonify({'result': result, 'cached': False}) except Exception as e: return jsonify({'error': str(e)}), 500 @app.route('/health') def health_check(): """Simple health check endpoint.""" if search_agent: return jsonify({'status': 'healthy'}) return jsonify({'status': 'unhealthy'}), 503 if __name__ == '__main__': app.run(debug=True, host='0.0.0.0', port=8080) -
Paste the content in the app.py file, replacing the whole content.
-
Save the file.
-
If needed, verify the solution: app.py solution file
4- Update Dockerfile
-
In Red Hat Red Hat OpenShift Dev Spaces, click the Dockerfile file

-
Copy the content provided, by clicking on the icon:
# Workshop-optimized Dockerfile with security best practices FROM python:3.11-slim # Set environment variables ENV PYTHONDONTWRITEBYTECODE=1 \ PYTHONUNBUFFERED=1 # Create non-root user RUN groupadd --gid 1001 appgroup && \ useradd --uid 1001 --gid appgroup --shell /bin/bash --create-home appuser # Set working directory WORKDIR /app # Install system dependencies and Python packages RUN apt-get update && apt-get install -y --no-install-recommends curl && rm -rf /var/lib/apt/lists/* COPY requirements.txt . RUN pip install --no-cache-dir -r requirements.txt # Copy application code and set ownership COPY app.py search_agent.py ./ COPY templates/ templates/ RUN chown -R appuser:appgroup /app # Switch to non-root user USER appuser # Expose the port EXPOSE 8081 # Production command (removed --reload for production) CMD ["gunicorn", "--bind", "0.0.0.0:8081", "--workers", "2", "--threads", "4", "app:app"] -
Paste the content in the Dockerfile file, replacing the whole content.
-
Save the file.
-
If needed, verify the solution: Dockerfile solution file
5- Update requirements.txt
-
In Red Hat Red Hat OpenShift Dev Spaces, click the requirements.txt file
-
Copy the provided content by clicking on the icon:
# AI Agent Core - let pip resolve compatible versions langchain-openai>=0.2.0,<0.3.0 langchain-tavily>=0.1.0,<0.3.0 langgraph>=0.2.0,<0.3.0 langchain>=0.3.0,<0.4.0 langchain-core>=0.3.0,<0.4.0 # Direct Tavily Client tavily-python>=0.4.0,<1.0.0 # Web Framework Flask==3.0.3 # Configuration python-dotenv==1.0.1 # Production Server gunicorn==23.0.0 -
Paste the content in the requirements.txt file, replacing the whole content.
-
Save the file.
-
If needed, verify the solution: requirements.txt solution file
Note: Depending on the organization, Platform Engineering teams might be responsible for defining the Dockerfile.
Now, we are ready to push the source code.
6- Push the source code
-
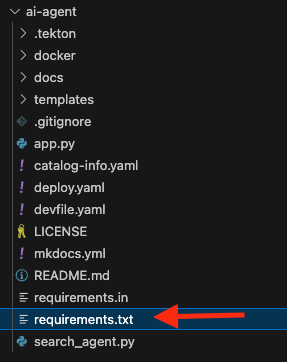
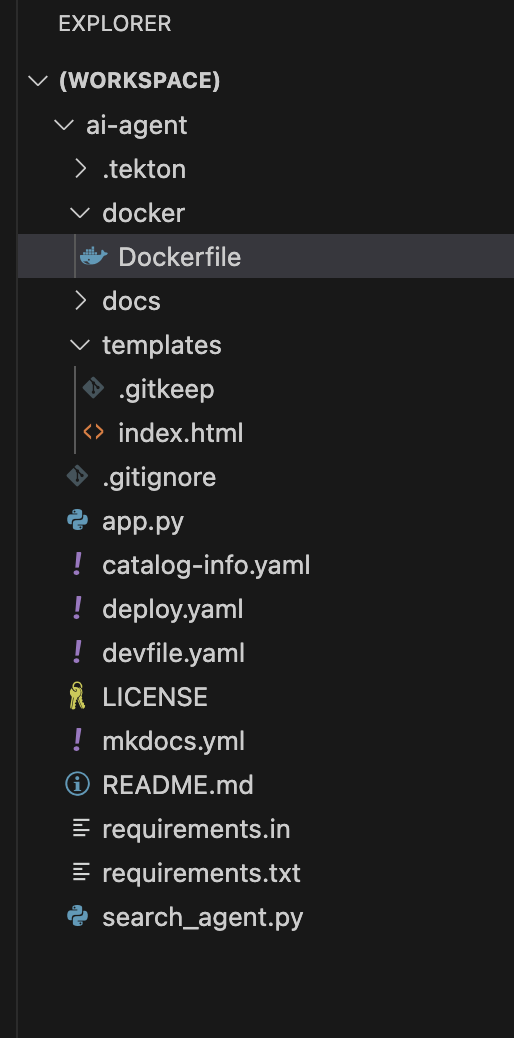
Verify your changes: Your directories and source code should look similar to this:
-
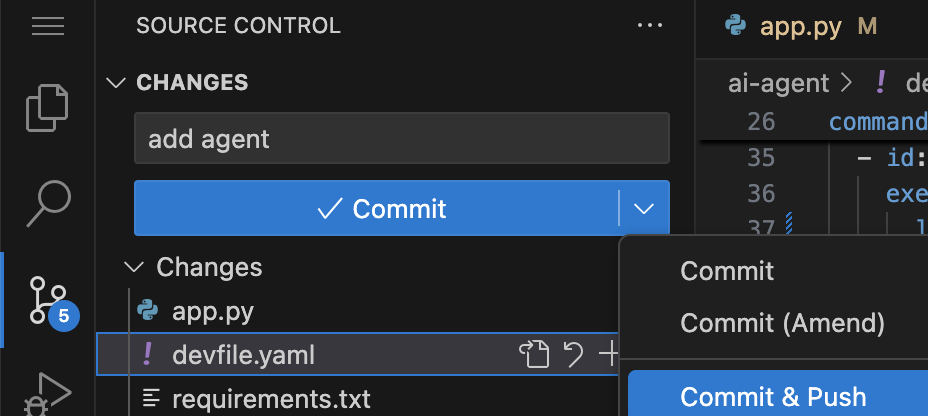
Next, push your changes to the GitLab repository. Click the Source control icon:

-
Add a commit message by copying the following description:
add agent -
Click the Commit & Push icon.
Note: If you face an authentication issue when pushing changes, restart the Red Hat Dev Spaces workspace.
-
Click Restart Workspace from the three dots on the running workspace.
-
Click Open from the three dots and try to push the changes again.
Explore the Trusted Software Supply Chain
-
Go back to Red Hat Developer Hub UI
-
Click the CI tab and review the running pipeline. Wait for all stages to finish and appear in green, as shown in the picture:
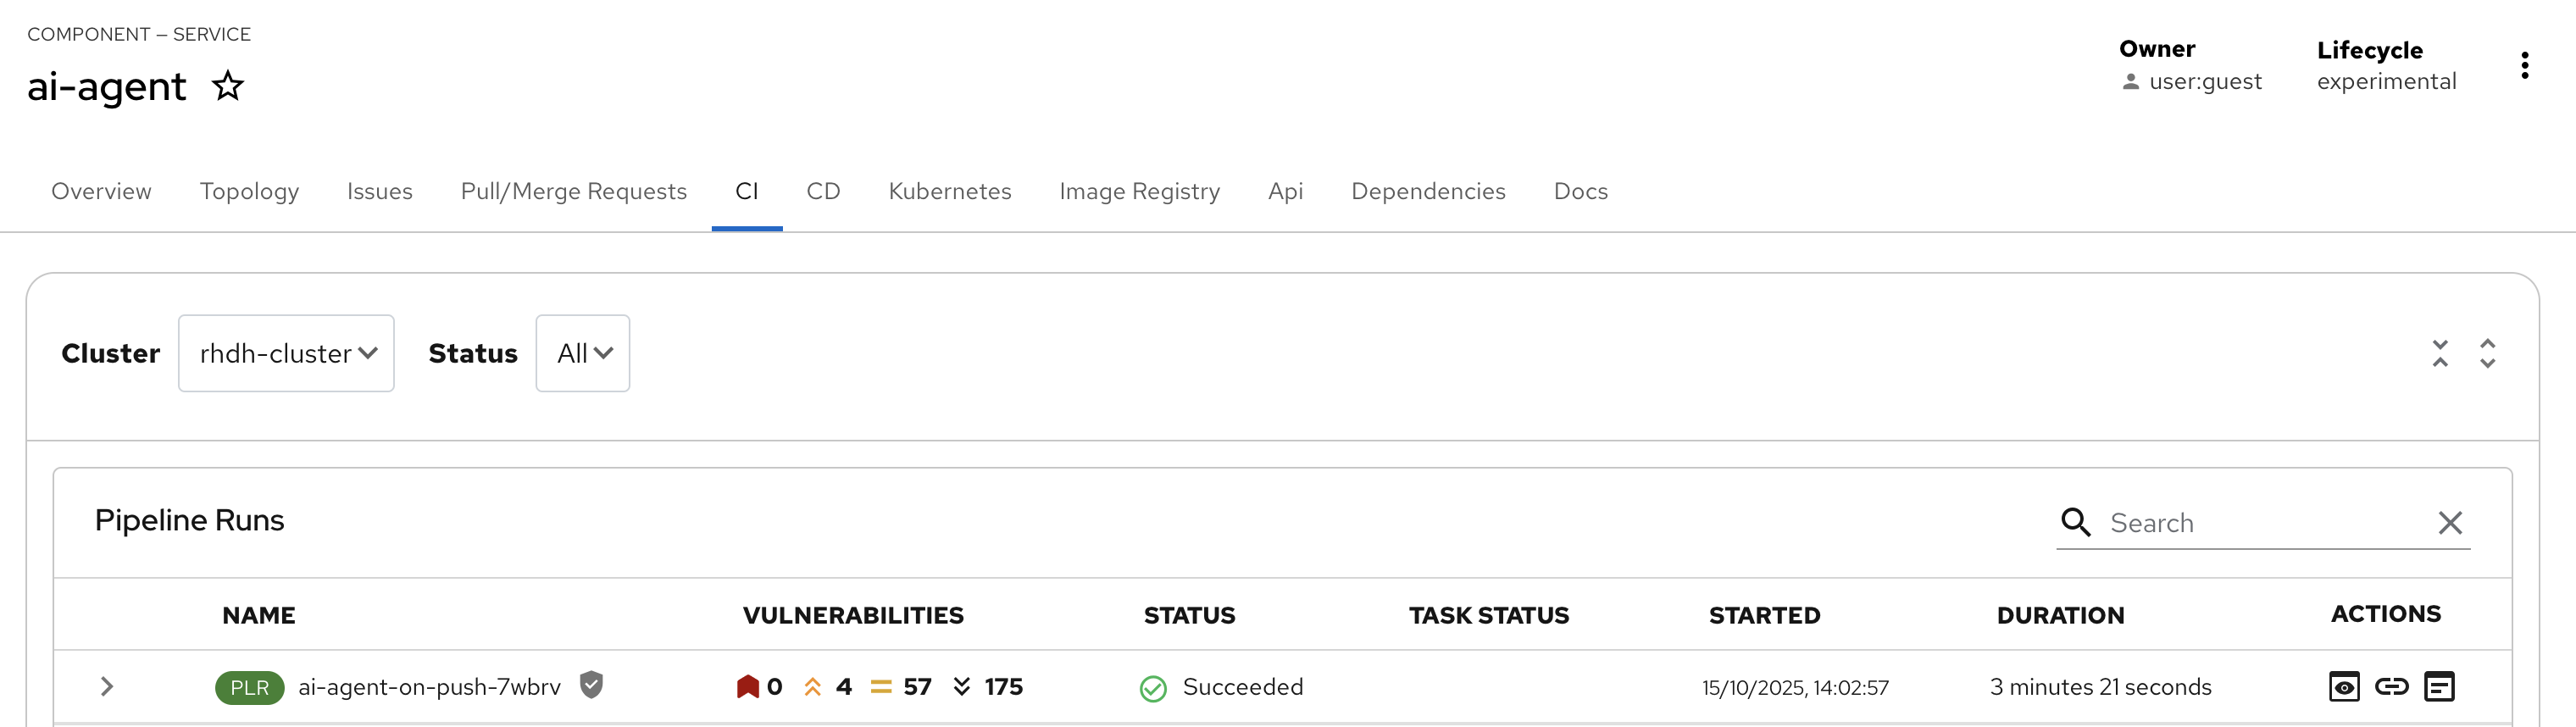
As a developer, you are building an AI application with security guardrails already set up by the Platform Engineering team. Red Hat Advanced Developer Suite safeguards software artifacts (including AI applications) using digital signing, cryptographic integrity checks, and comprehensive provenance tracking. This capability automates building and deploying AI applications. Developers can focus on source code, while Software templates validate and package images, ensuring they adhere to Trusted Software Supply Chain for Software Artifacts (SLSA) standards and improving developer productivity.
Test the AI Agent
-
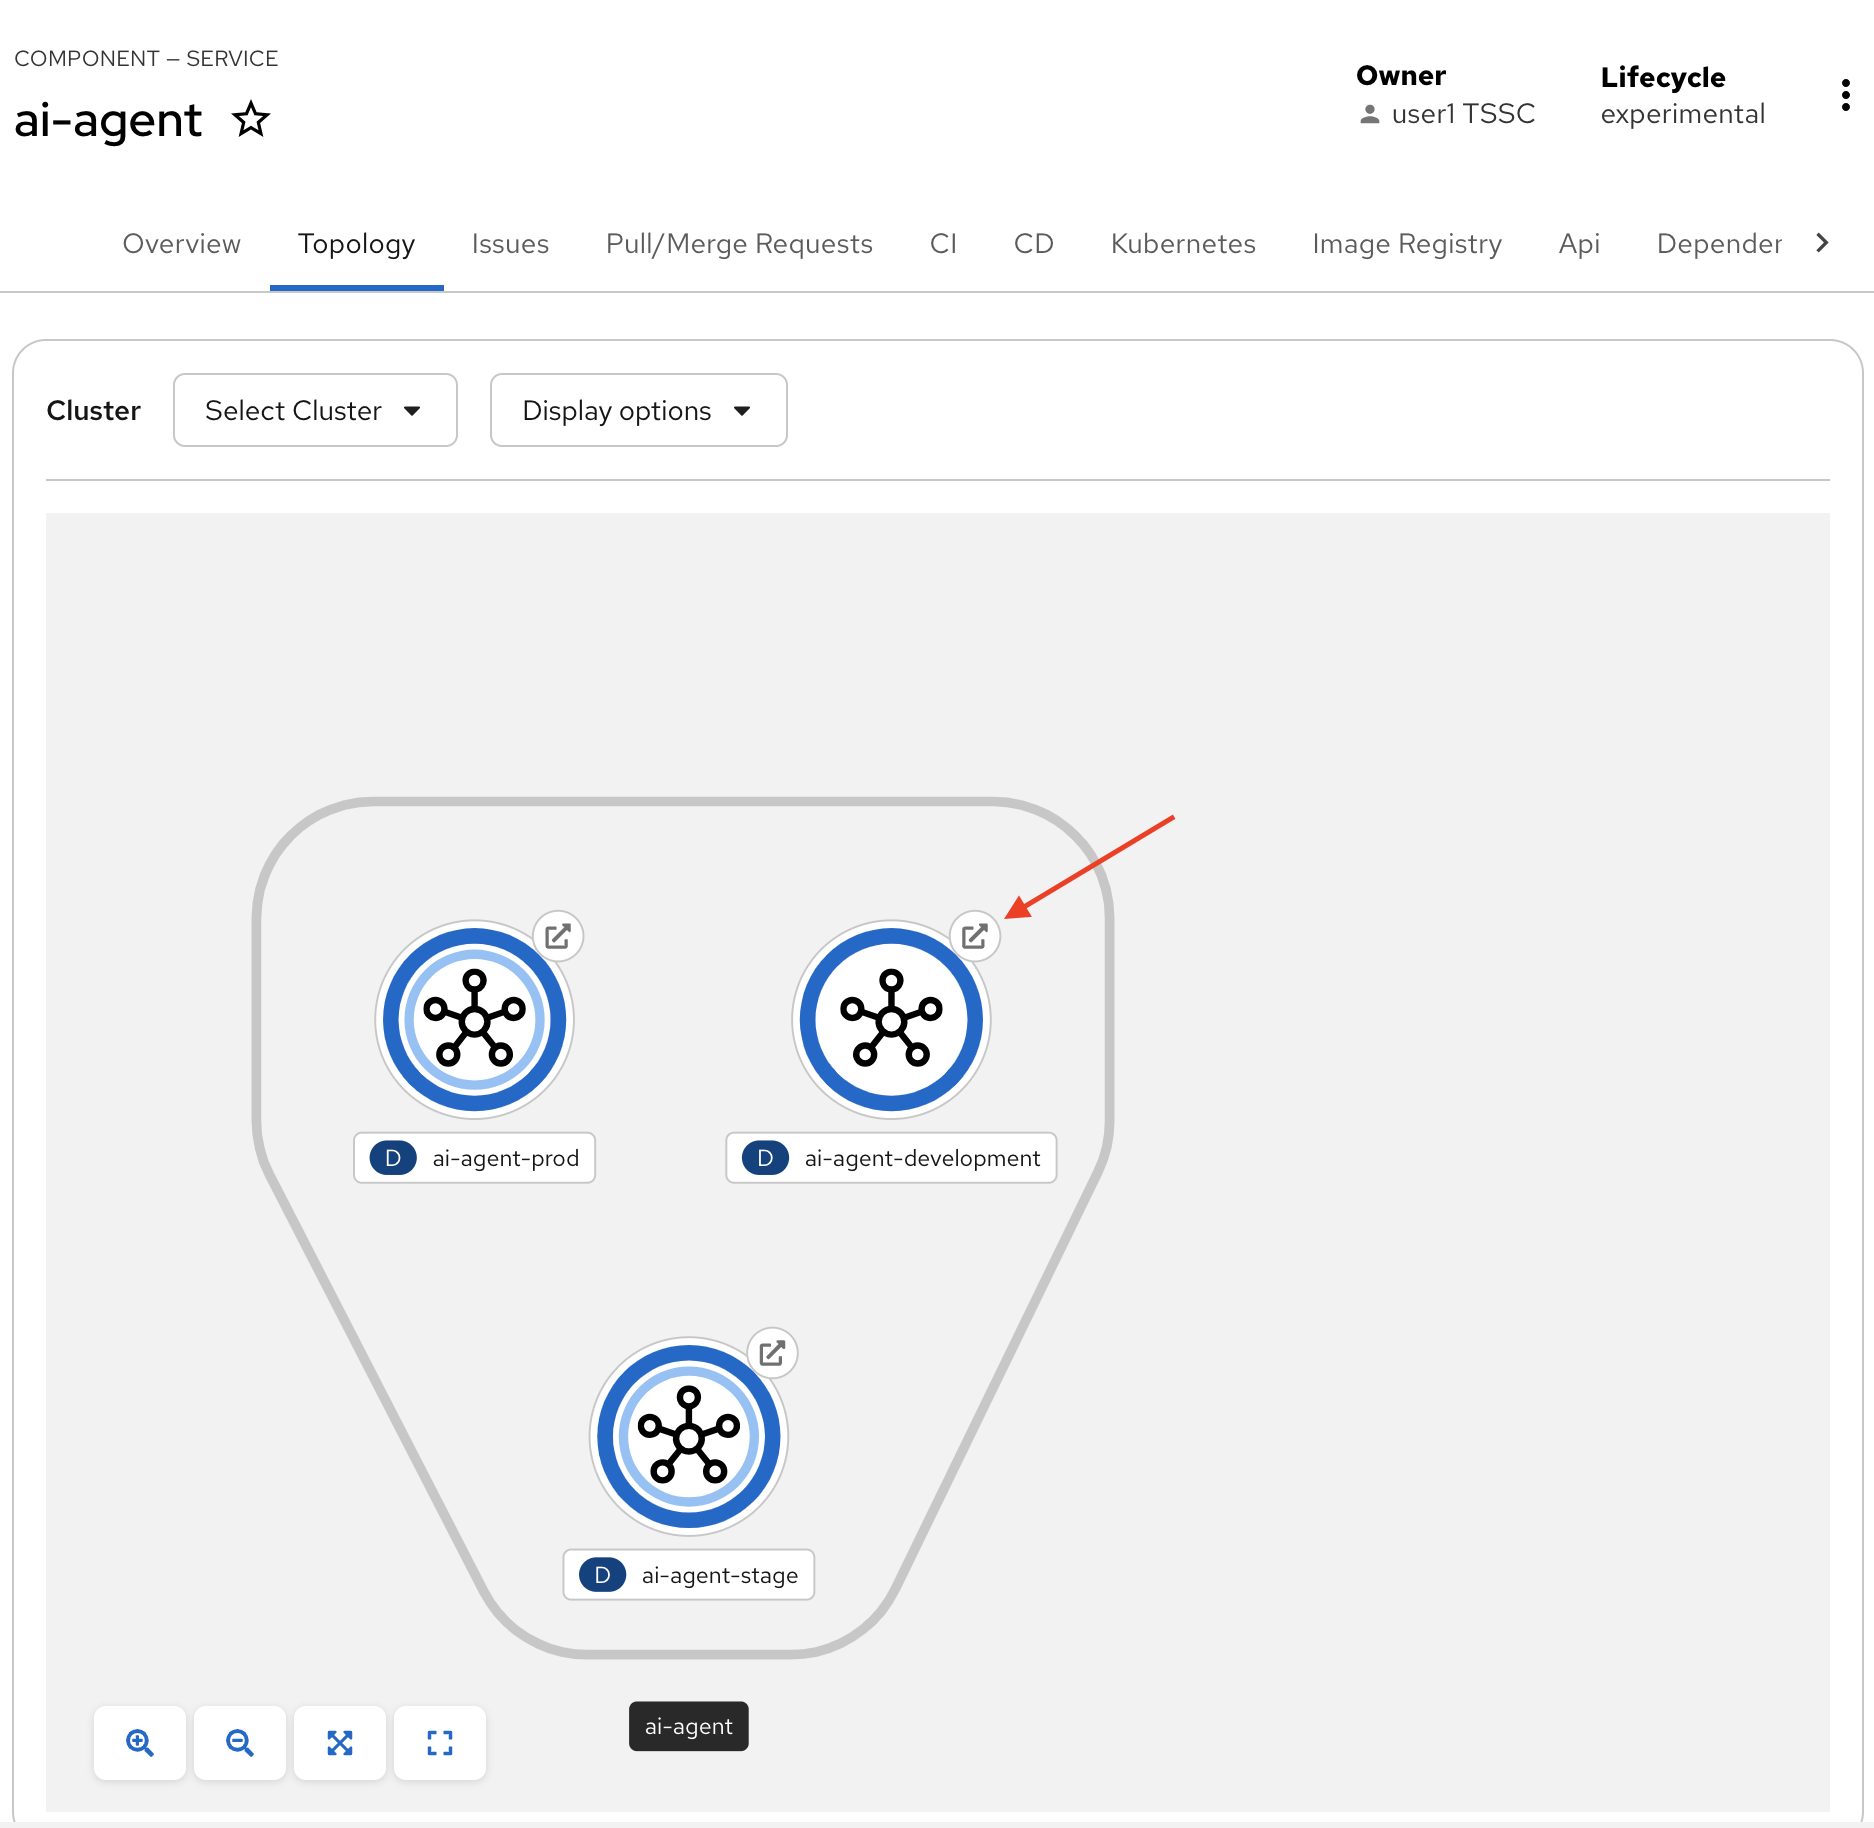
Click the Topology tab and review the deployed component.
-
Click the arrow on ai-agent-development to access the AI Agent.
-
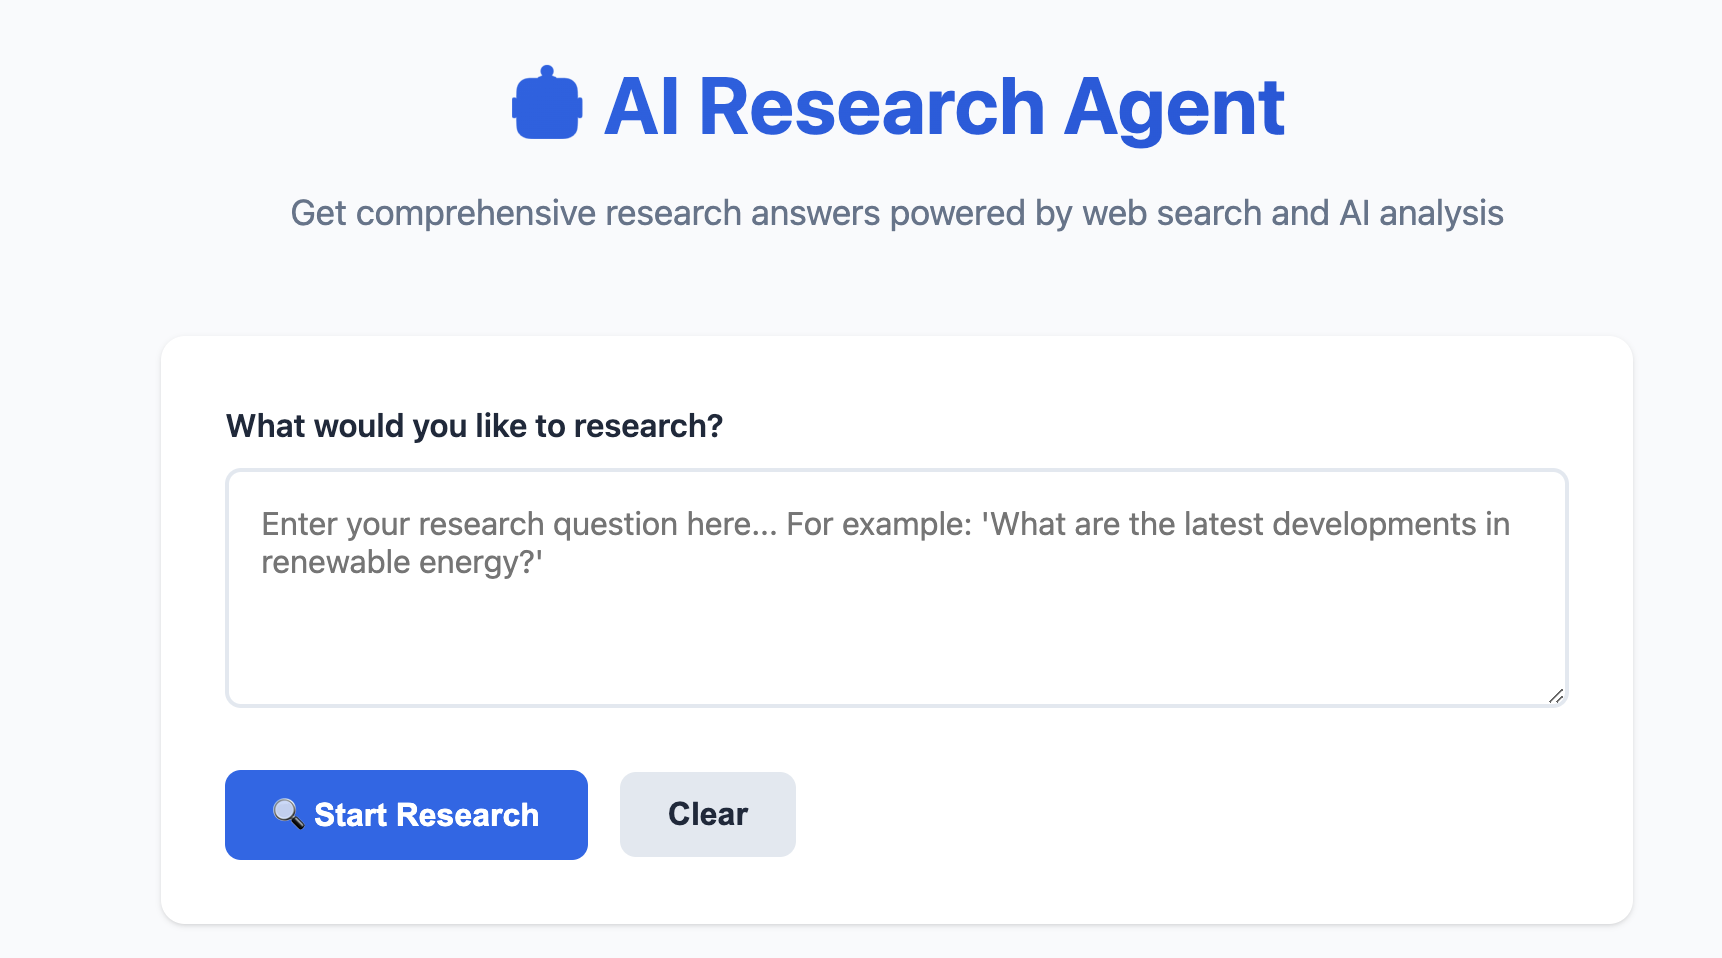
You should see a screen similar to this:
-
Note: For this lab, we have only deployed to the Development environment. The other deployments use a "dummy" image.