Setup TPA on OpenShift
Overview
This guide covers the installation and configuration of Trusted Profile Analyzer (TPA) on OpenShift Container Platform. TPA on OpenShift leverages container orchestration for scalable and efficient security analysis workflows.
To install TPA on OpenShift, we have two options:
-
The Operator-based install
-
The
helminstall, using the official helm chart from theopenshift-helm-chartsrepository
|
We will go through both installation paths, but there are some prerequisites that we need to look at first:
|
Prerequisites
For ease of use, we have prepared some k8s artifacts and helper scripts that you can use. Please open the {openshift_console_url}/terminal[terminal^,window="terminal"], logging in as {openshift_admin_user} / {openshift_admin_password}.
Then, clone the following repository:
| It’s a linux terminal, so use CTRL+SHIFT+V (or CMD+V on macOS) for pasting 🐧 |
git clone https://github.com/redhat-tssc-tmm/l3-enablement-helpers.git
cd l3-enablement-helpers
While we’re here let’s quickly create two projects to install TPA, one for the operator-based install, one for the helm-based install.
The instructions will use these namespaces, but you’re free to choose any name / namespace you want. Just make sure to change it appropriately in the instructions that follow.
Paste this into the terminal and press Enter
oc new-project student-tpa-helm
oc new-project student-tpa-operator
Storage
For (object-)storage, the recommended and supported option is to use S3, provided either by ODF (OpenShift Data Foundation) or Amazon S3.
However, for proof-of-concept purposes and tests without S3 available, filesystem is also a configuration option that is recognized by the helm Chart and the helm-based Operator. This effectively triggers the helm chart to spin up a PVC.
|
If you choose With the help from OpenShift’s internal PVC/pod affinity rules, this should work in most cases, but it is definitely not recommended for production. Once you install TPA later on, you can see the actual PVC and its usage in the OpenShift Console with these example commands: |
S3 Storage using ODF
ODF is pre-installed in your environment. ODF is part of OPP (OpenShift Platform Plus), so we expect customers to use it for production-grade S3.
With ODF installed, all you need to do is create an ObjectBucketClaim CR. We have prepared that for you in the /prerequisites folder, so:
-
Make sure you are in your desired namespace (the generated bucket is namespace-scoped)
-
Go into the directory and create it
cd ~/l3-enablement-helpers/prerequisites/
oc project student-tpa-operator
oc apply -f tpa_objectbucketclaim.yaml
./s3.sh
The resulting output should resemble the following sample:
bash-5.1 ~ $ cd l3-enablement-helpers/prerequisites/
bash-5.1 ~/l3-enablement-helpers/prerequisites $ oc project student-tpa-operator
Already on project "student-tpa-operator" on server "https://172.31.0.1:443".
bash-5.1 ~/l3-enablement-helpers/prerequisites $ ls -al
total 24
drwxr-xr-x. 2 user root  173 Oct 17 16:14 .
drwxr-xr-x. 4 user root   71 Oct 17 16:14 ..
-rw-r--r--. 1 user root  674 Oct 17 16:14 client_tpa-cli.json
-rw-r--r--. 1 user root  776 Oct 17 16:14 client_tpa-frontend.json
-rw-r--r--. 1 user root 2931 Oct 17 16:14 postgresql-openshift.yaml
-rwxr-xr-x. 1 user root  440 Oct 17 16:14 s3.sh
-rw-r--r--. 1 user root  134 Oct 17 16:14 secret-oidc-cli.yaml
-rw-r--r--. 1 user root  181 Oct 17 16:14 tpa_objectbucketclaim.yaml
bash-5.1 ~/l3-enablement-helpers/prerequisites $ oc apply -f tpa_objectbucketclaim.yaml
objectbucketclaim.objectbucket.io/tpa-bucket-claim created
bash-5.1 ~/l3-enablement-helpers/prerequisites $ ./s3.sh
Access Key ID:
uQJELScAXek96XcUUrAl (Yours will be different)

Secret Access Key:
OFCB8spseTxVPFrUTc3nZecqi+D51IpIpvLBo9gt (Yours will be different)

Endpoint:
https://s3-openshift-storage.apps.cluster-mdt2d.dynamic.redhatworkshops.io (Yours will be different)

Bucket Name:
trustify-c443fd04-cc20-4455-ac54-f02921669428 (Yours will be different)

bash-5.1 ~/l3-enablement-helpers/prerequisites $
As you can see above, we have created a little script (s3.sh) that lists the data from the secret and the configmap that is automatically created for the bucket. We will need that for the values file (both for the operator and the helm chart)
|
Database (postgresql)
TPA requires a postgresql database for the graph database. We have prepared a yaml file with the required manifests that you can simply apply.
Please take note of the secret (first object in the yaml file) as it contains all the data that we need for the values file (both operator and helm install).
Specifically, we need a "regular" database user (tpauser) and an admin user that can create the database (postgres).
bash-5.1 ~/l3-enablement-helpers/prerequisites $ cat postgresql-openshift.yaml
---
apiVersion: v1
kind: Secret
metadata:
  name: tpa-postgresql-credentials
  labels:
    app: tpa-postgresql
type: Opaque
stringData:
  db.host: "tpa-postgresql"
  db.name: "tpadb"
  db.user: "tpauser"
  db.password: "r3dh8t1!"
  db.admin: "postgres"
  db.adminpassword: "adminr3dh8t1!"
  db.port: "5432"
---
oc project student-tpa-operator
oc apply -f postgresql-openshift.yamlbash-5.1 ~/l3-enablement-helpers/prerequisites $ oc apply -f postgresql-openshift.yaml
secret/tpa-postgresql-credentials created
persistentvolumeclaim/tpa-postgresql-data created
deployment.apps/tpa-postgresql created
service/tpa-postgresql created
bash-5.1 ~/l3-enablement-helpers/prerequisites $OIDC setup
We are using RHBK (Red Hat Build of Keycloak) here, but you can also use Amazon Cognito. Refer to the product documentation for that setup if you’re using Cognito. However, we need to configure OIDC scopes and redirect URLs and we’ll show you using Keycloak.
|
|
We already have a working install of TPA that we’ll use in later exercises - this uses the |
With that said - let’s use the |
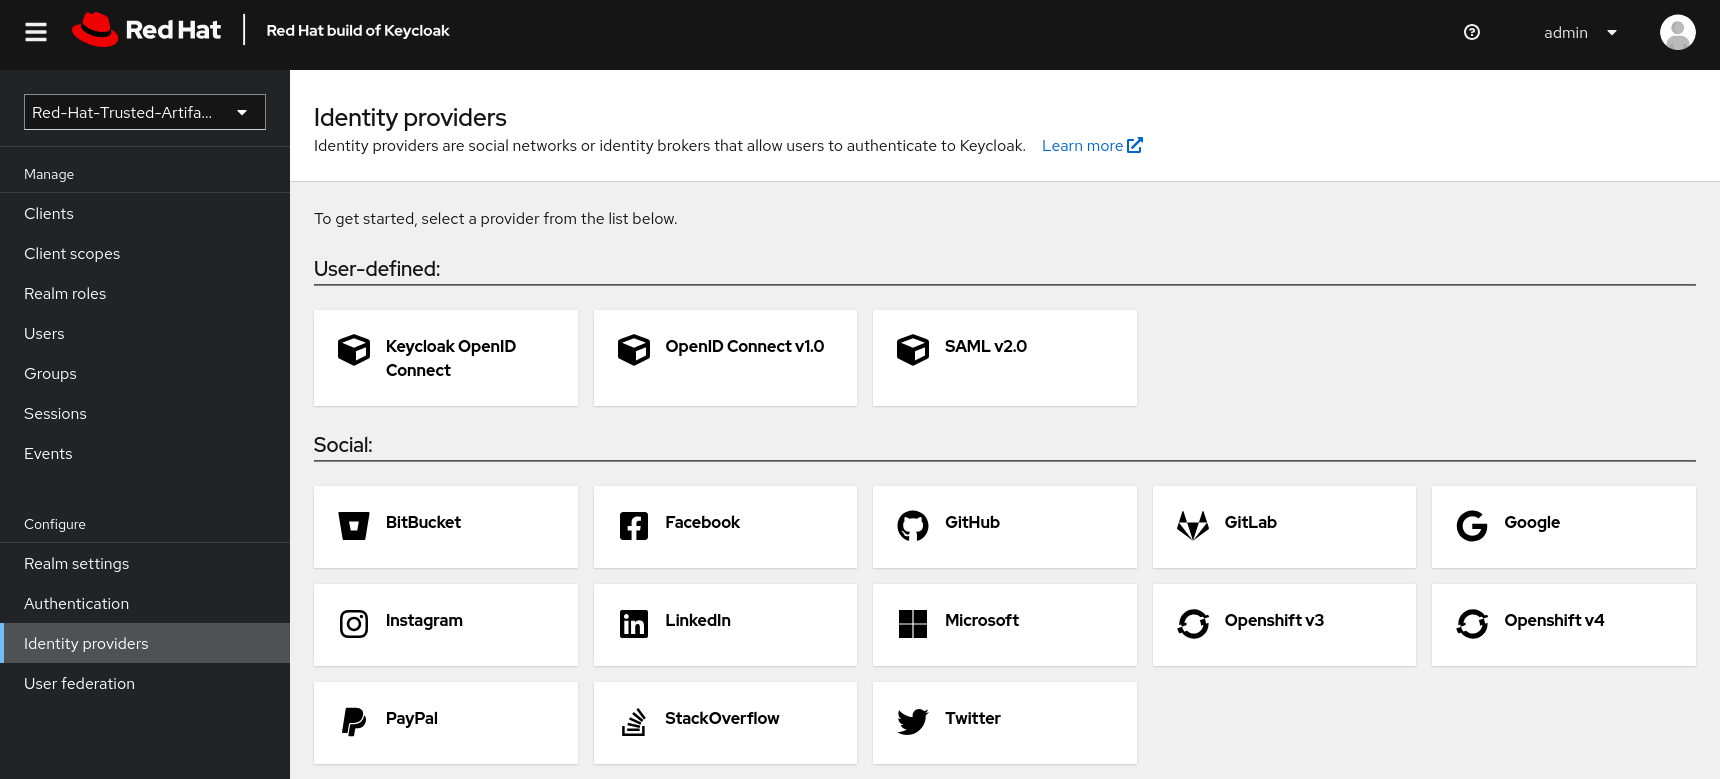
Clients, Client Scopes and RBAC
Using the same realm as other applications, we share the same user base.
Applications might have different requirements for authentication, though. Therefore, it is a good practice to define one or more clients for each application that allows the users of a given realm to authenticate.
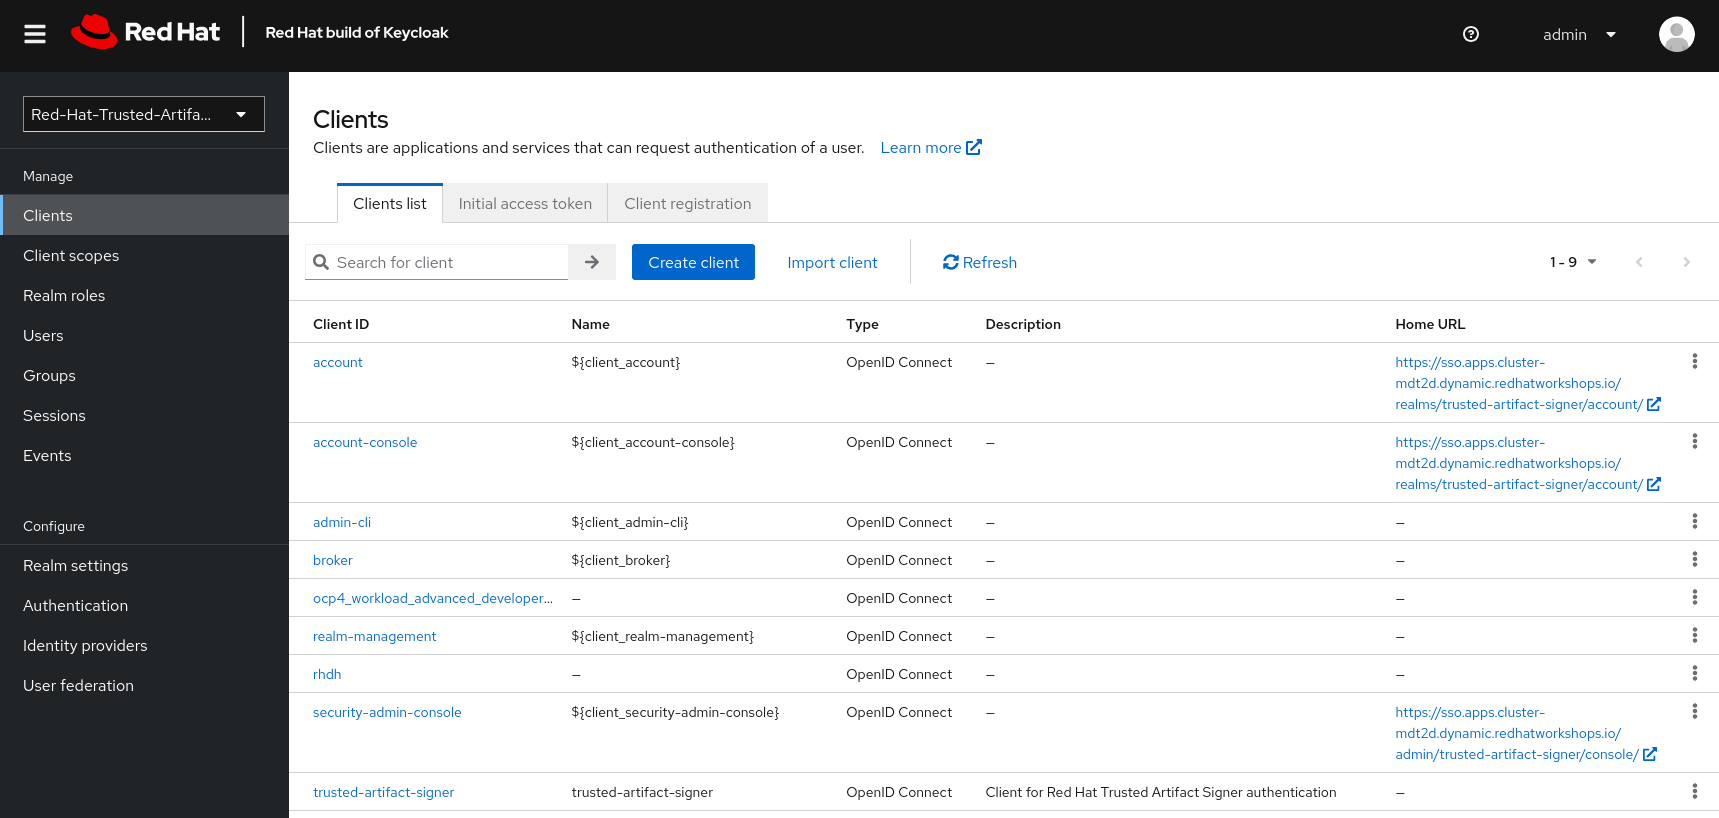
For the realm we’re about to use, we have a set of default clients (for typical OIDC and Keycloak use cases) as well as a client for Trusted Artifact Signer, one for Red Hat Developer Hub and one for OpenShift.
We will add new clients for TPA later on (we’ll name them tpa-frontend and tpa-cli). We need to do some setup first. Once the clients are added, it will look like this:
In addition to Clients, TPA uses Client Scopes for authorization. In other words, depending on the client scopes associated with a user, it determines what a user can and cannot do.
TPA uses the following custom OIDC client scopes:
-
create:document -
read:document -
update:document -
delete:document
We need to create and assign these scopes to individual users or groups of users. We do this by creating roles with a mapping of client scopes and then assign those roles to users or groups.
A typical mapping could be:
| Role | Client Scopes |
|---|---|
|
|
|
|
|
|
Adding Client Scopes & Roles
We should first add the roles, then the client scopes. After adding the client scopes, we also need to make them available to the clients. We have client files prepared for you. However, if you import the client files first (which has the client scopes assigned already), these assignments will be ignored, since the scopes are not yet available on the system (they’re not added automatically), so we need to add the client scopes first.
In your {openshift_console_url}/terminal[terminal^,window="terminal"], go to the prerequisites folder and run the get-keycloak-info.sh script, which will give you the admin login details for the Keycloak Management Console:
cd ~/l3-enablement-helpers/prerequisites/
./get-keycloak-info.sh
bash-5.1 ~/l3-enablement-helpers/prerequisites $ ./get-keycloak-info.sh
Keycloak Route: https://sso.apps.cluster-mdt2d.dynamic.redhatworkshops.io
Username: admin
Password: 8bf84c6d862a4205aab02253c0f1b0a1 (Yours will be different)Roles
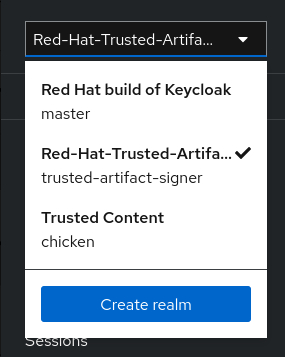
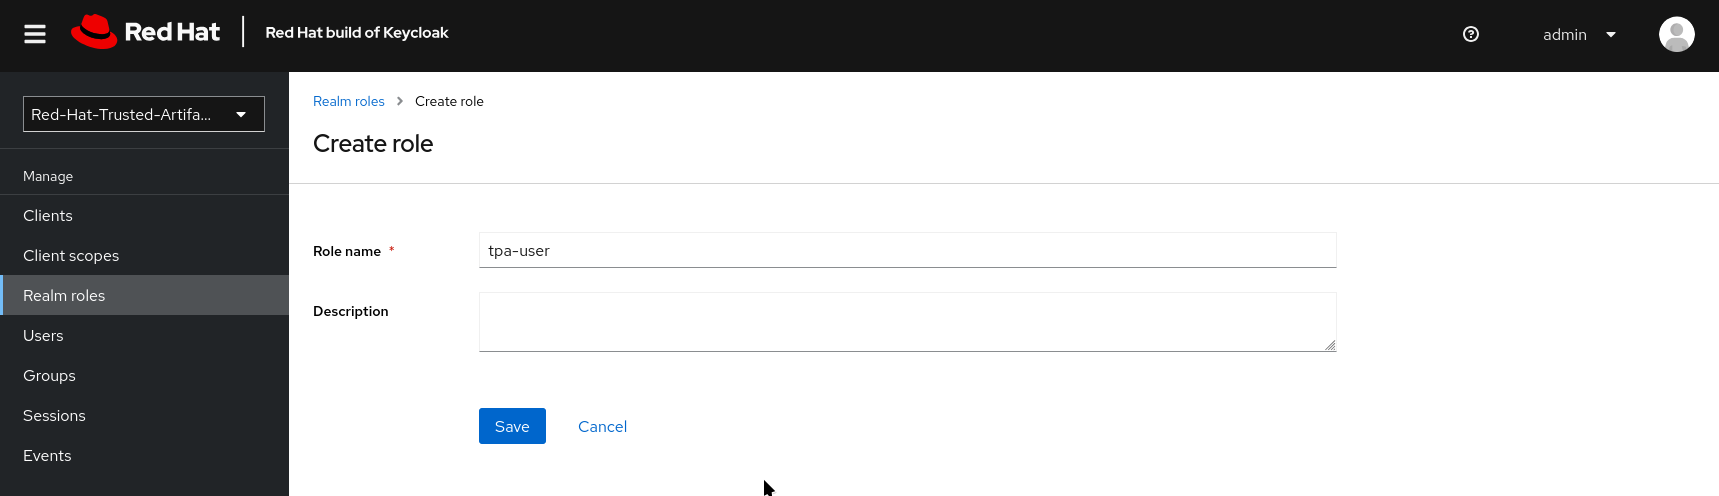
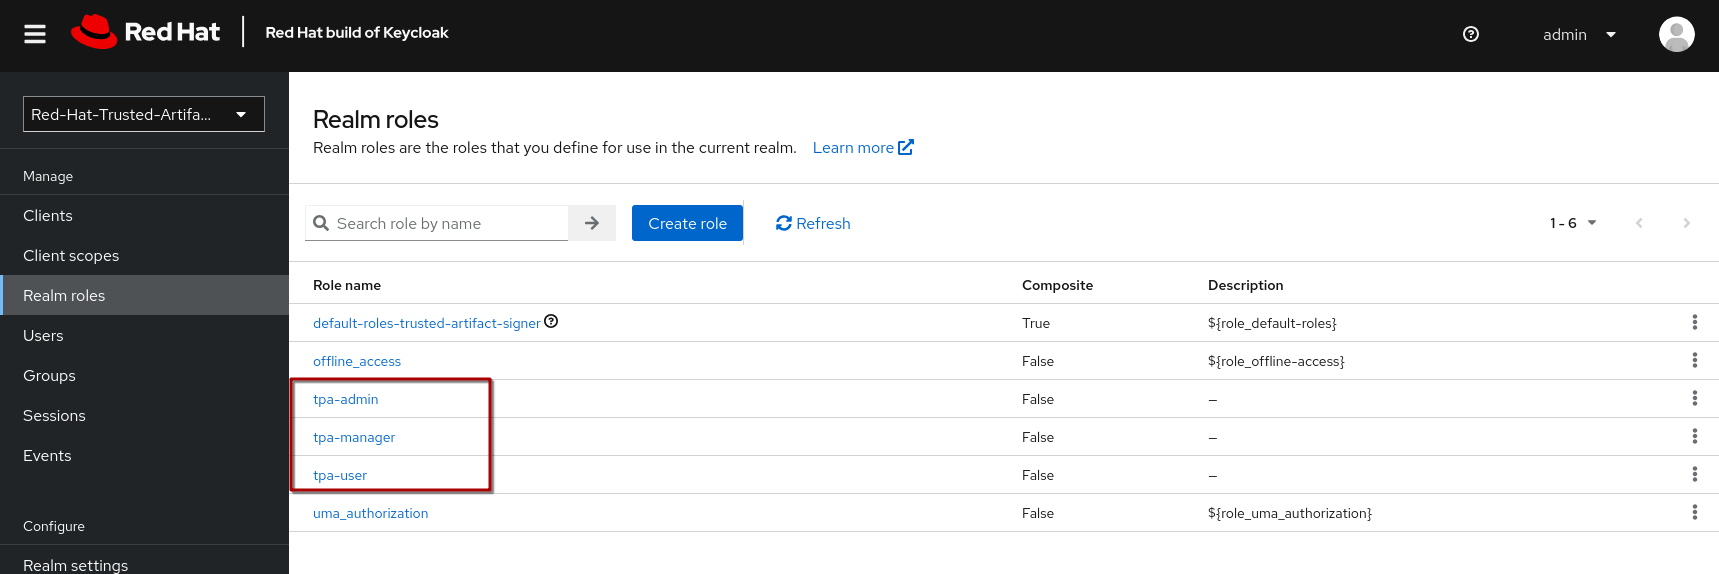
Using the credentials from the output of the get-keycloak-info.sh script, (1) visit the Keycloak Admin Console and login. Select the Trusted Artifact Signer realm (by clicking on the dropdown in the top left), then (2) click on Realm Roles, then (3) Create role:
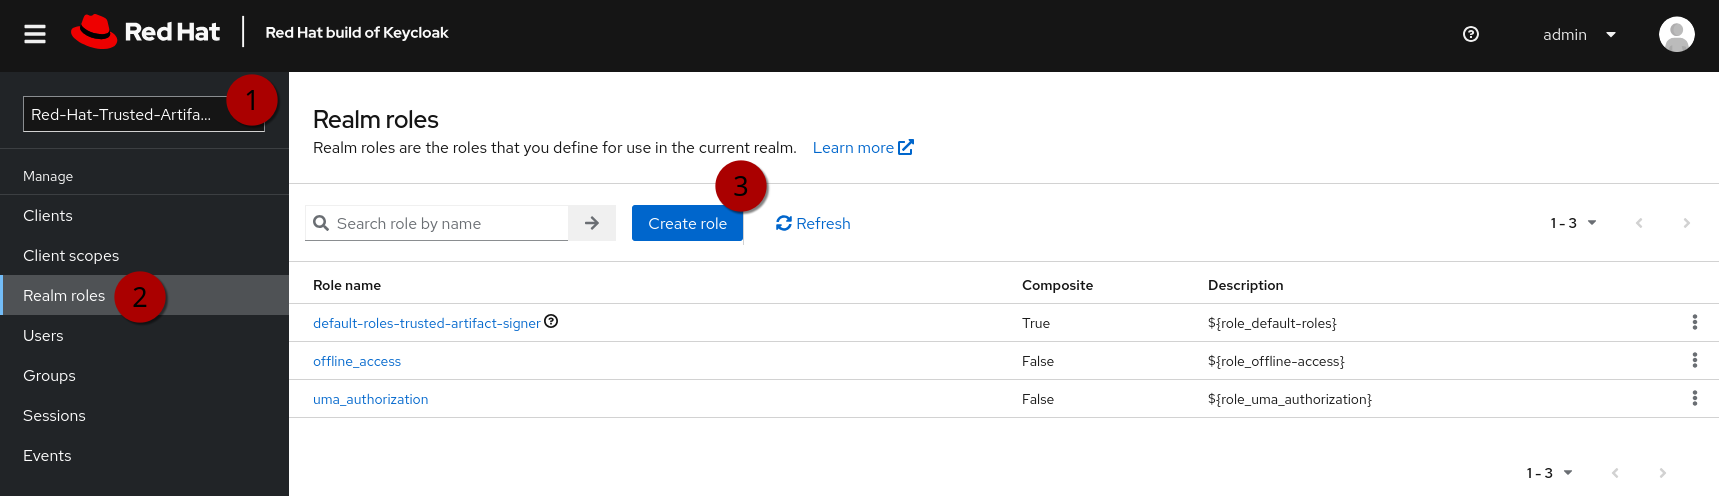
Create the roles:
-
tpa-user -
tpa-manager -
tpa-admin
|
Client Scopes
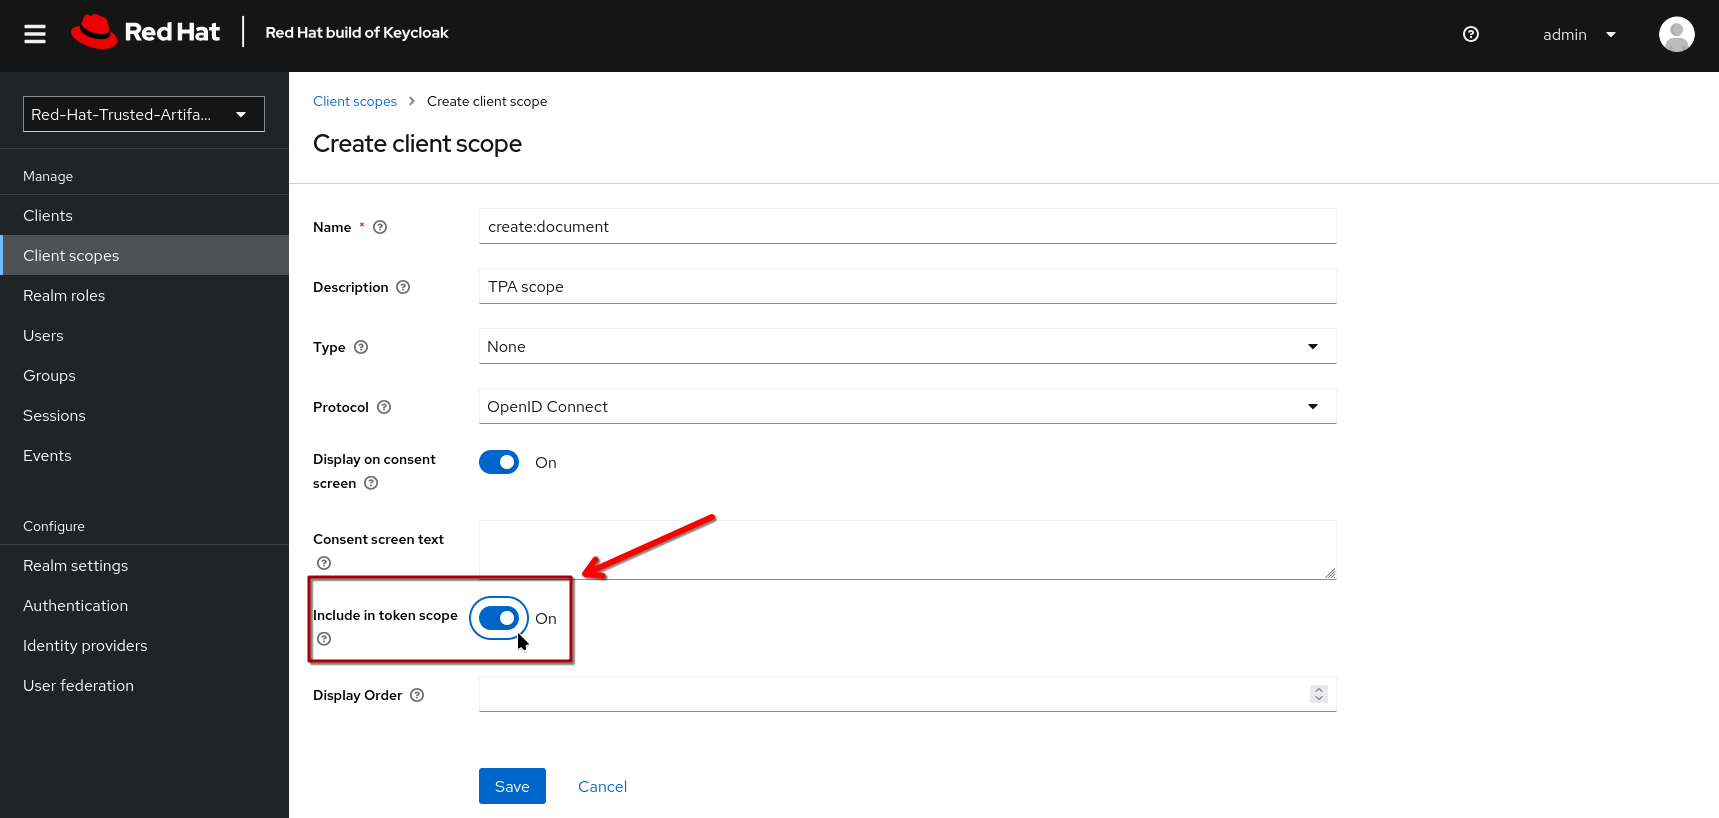
In the same (1) Trusted Artifact Signer realm, (2) click on Client Scopes, then (3) Create client scope:
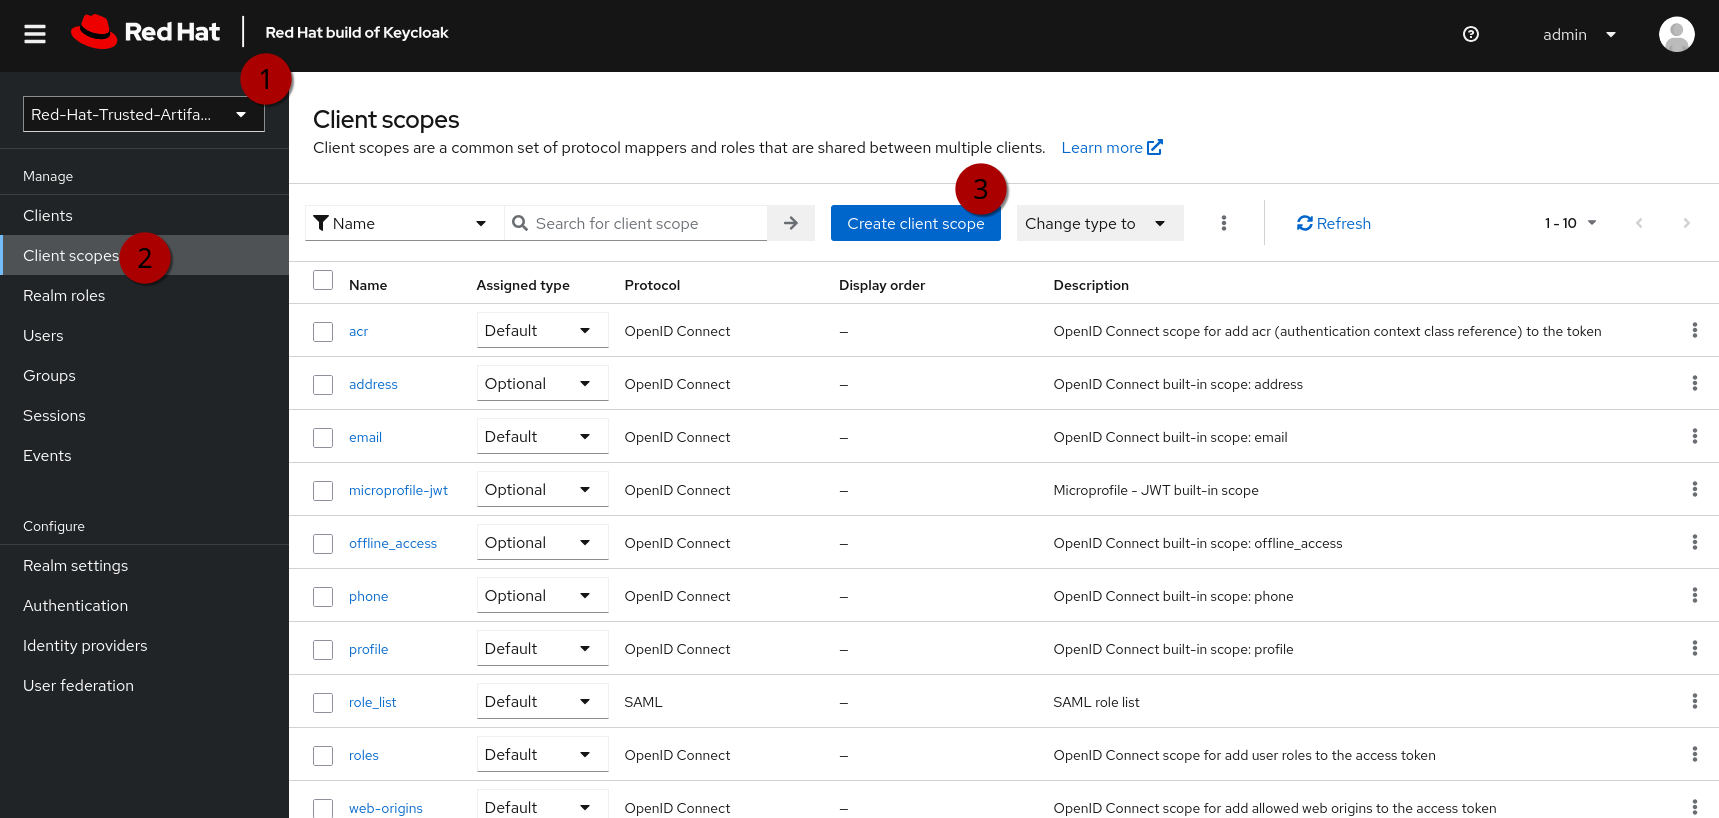
| In the next step, make sure you toggle the Include in token scope switch (default is "off", it needs to be "on") - if not, the scope will not be in the login token and you’ll get a lot of "403" errors when opening TPA. |
Create the scopes read:document create:document update:document delete:document and give them a description, if you want.
Now, open each scope you created, and assign a role under the Scope tab:
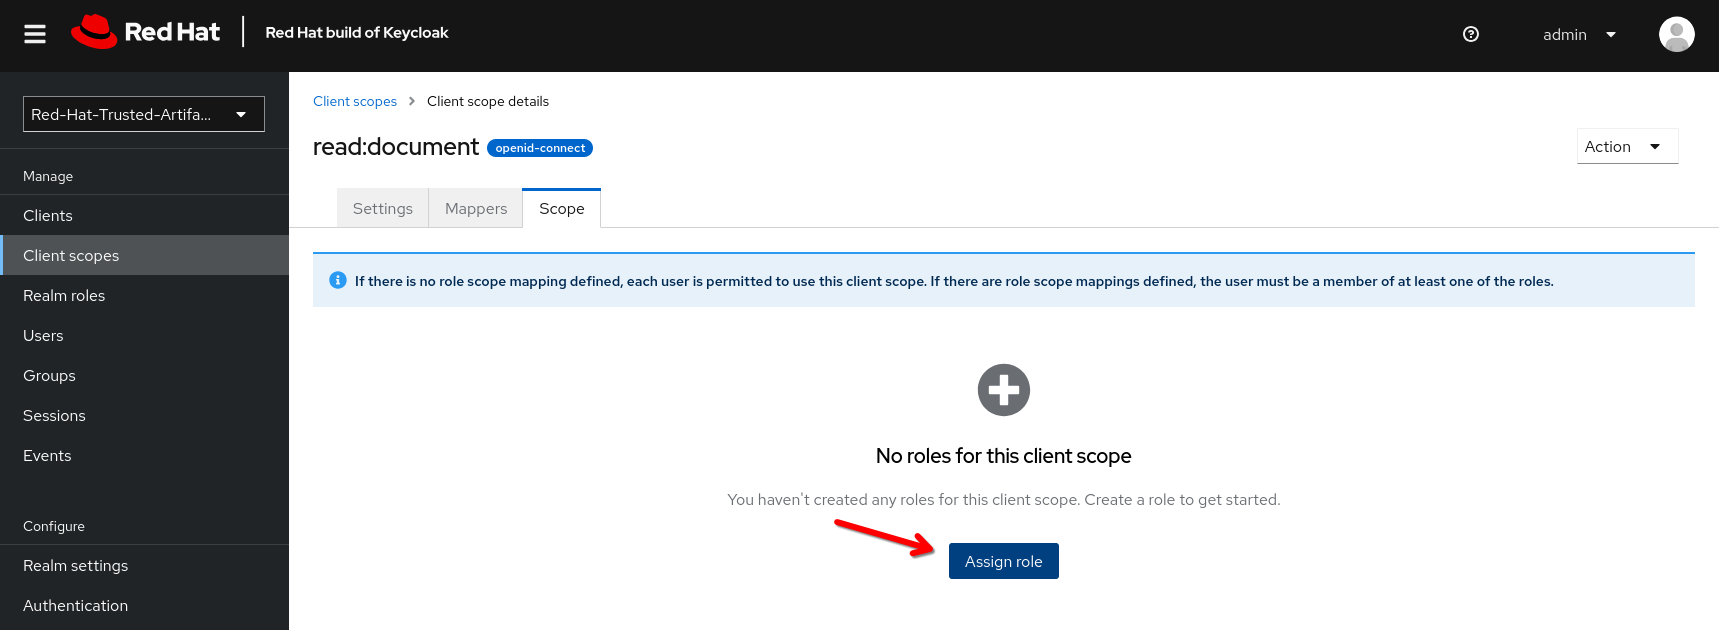
Assign your tpa-* roles to the read:document scope
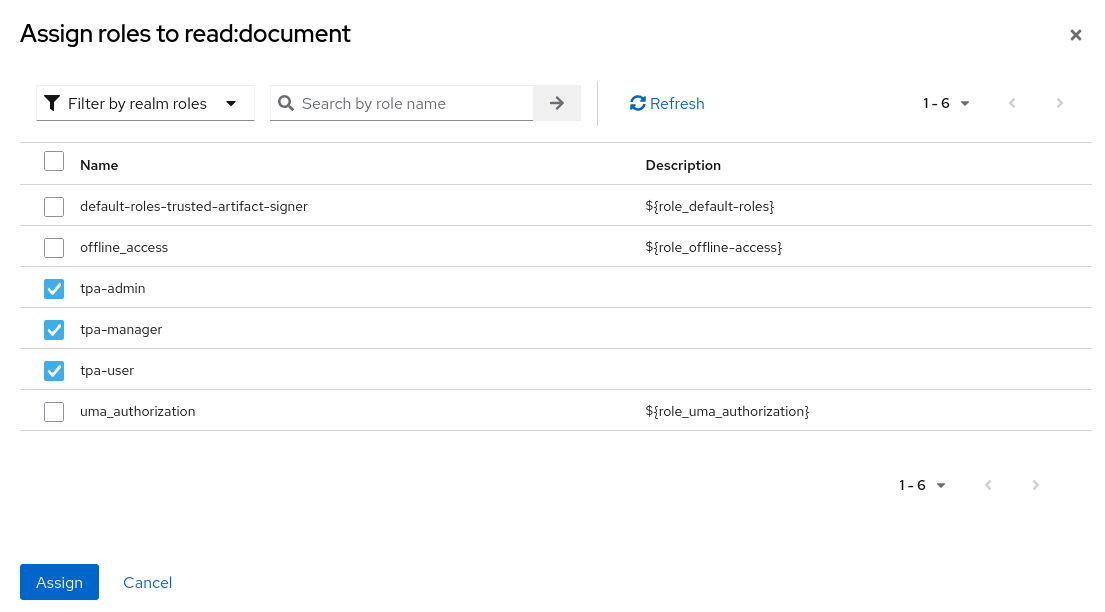
Continue assigning the roles to the client scopes as follows:
| Client Scopes | Roles |
|---|---|
|
|
|
|
|
|
|
|
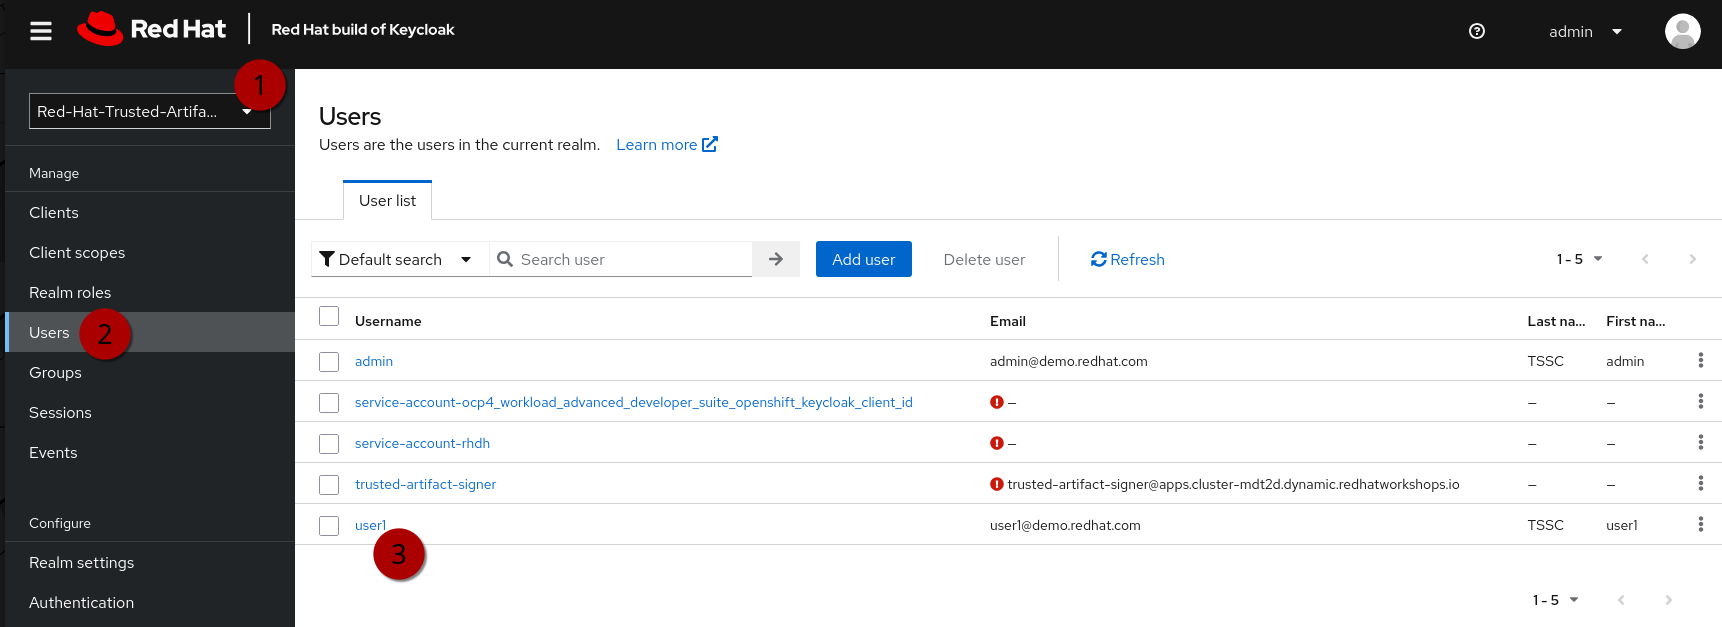
Users
Now that we have the client scopes and assigned those to specific roles, we need to assign those roles to our users (or, in a production environment, more likely to groups of users).
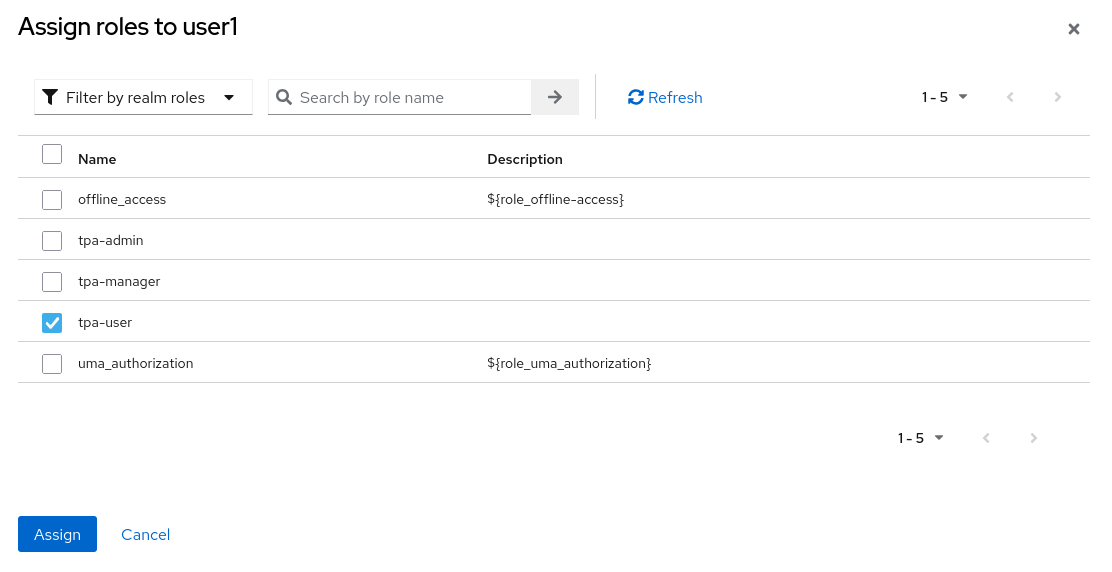
In the same realm (1) go to users (2) and click on user1 (3):
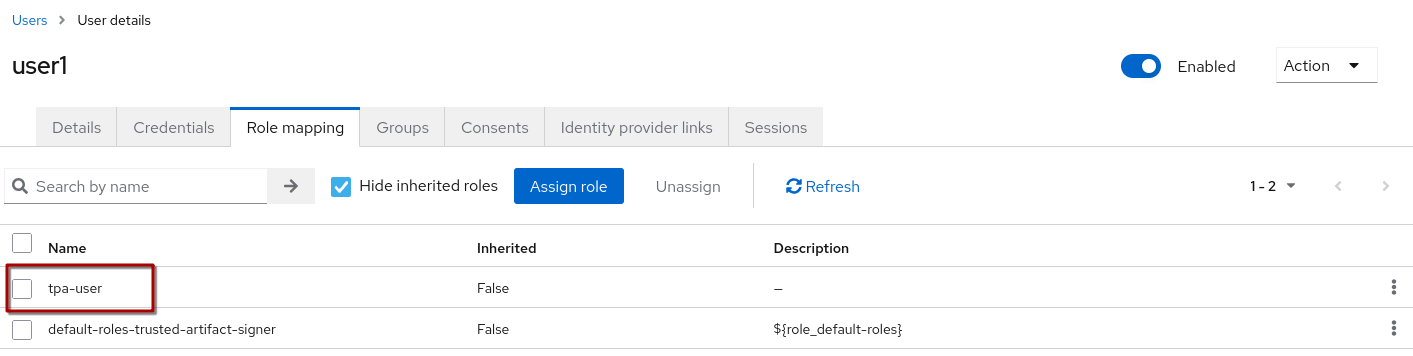
Click on the Role Mapping tab (4) and then Assign Role (5) and assign the tpa-user role to user1:

You should see the assigned role now:
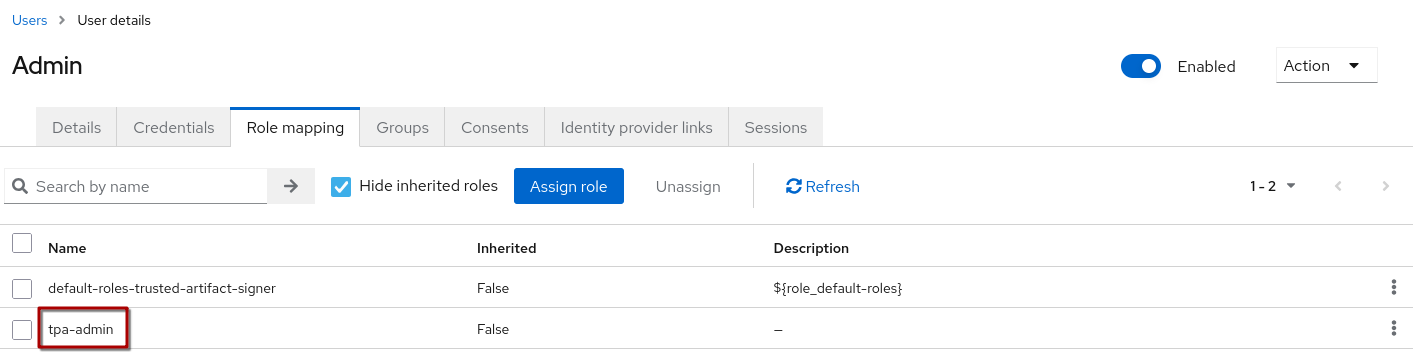
Now do the same for the admin user and assign the tpa-admin role to that user:
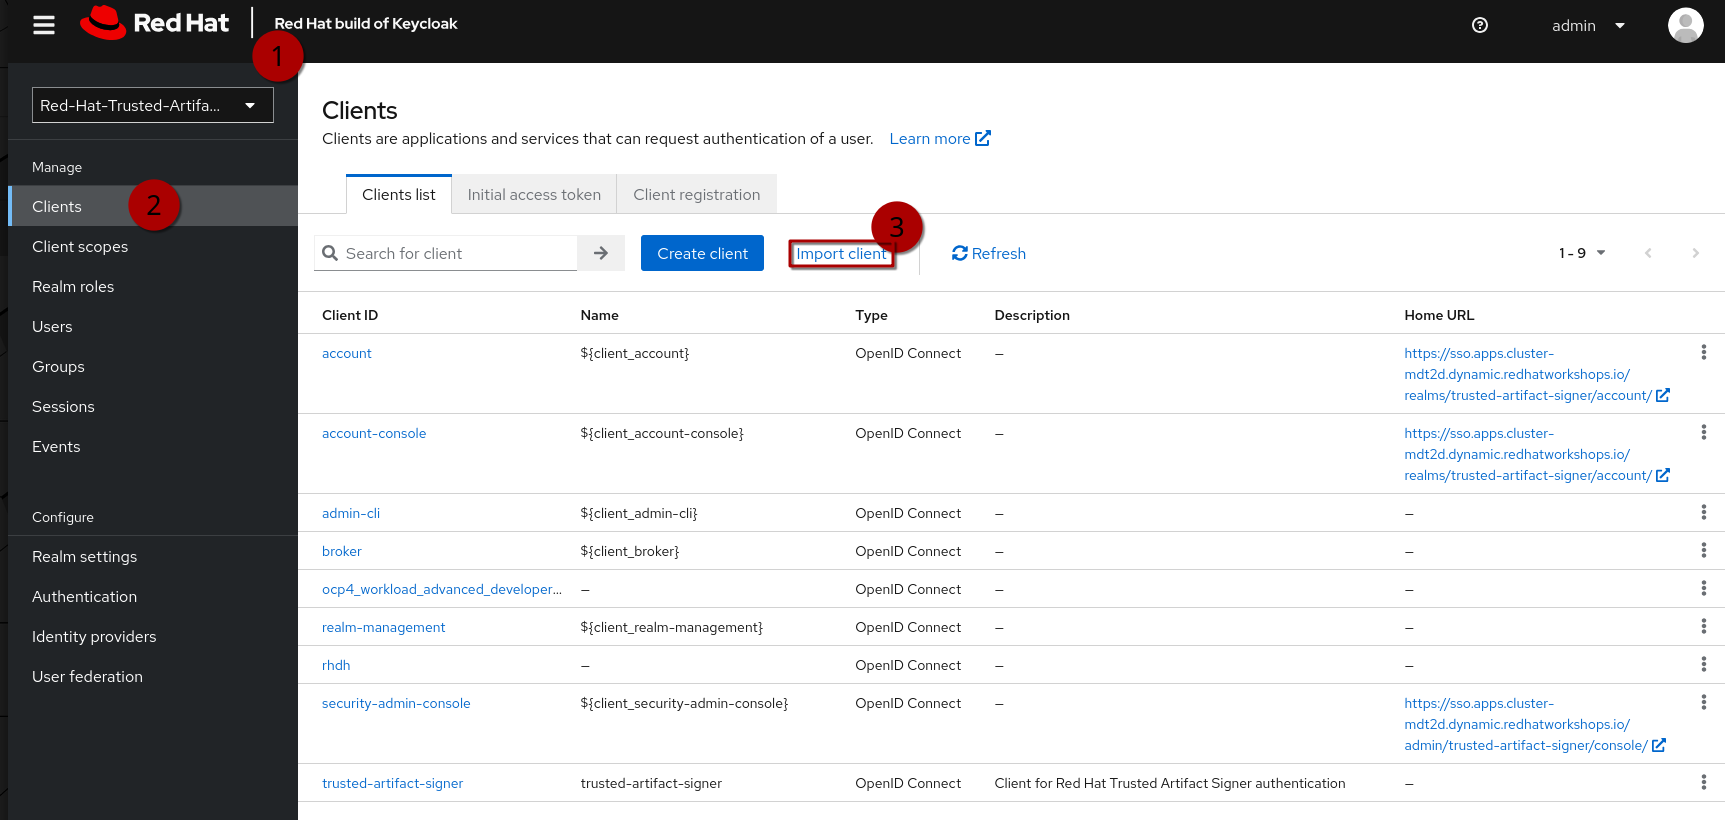
Clients
Now that we have the client scopes, have assigned these to new roles that we created and assigned those roles to users, we need the clients that provide us with the authentication endpoints for TPA:
In the same realm (1), go to Clients (2). Here, you could create the clients manually and configure them (especially the client scopes that we need associated with this client) - but we have created import files for you, so you can instead use Import Client (3).
We need a frontend client that will handle the authentication with the UI and a cli client that we will use as a technical user, or in Keycloak terminology, as a Service Account (not to be mistaken with a k8s ServiceAccount). Basically, it is a user with a set password to be used for service-to-service communication.
|
TPA doesn’t care if we use a "regular" user or a Keycloak Service Account for authentication. From a Keycloak / OIDC perspective, separating Service Accounts for machine communication from users is a good practice, even though you could have a regular user (e.g. "tpa@acme.com") for that use-case. |
Please download the following files to your machine and inspect them:
-
client_tpa-frontend.json (Right-click and "Save link as…" or "save as")
-
client_tpa-cli.json (Right-click and "Save link as…" or "save as")
Frontend
First import the client_tpa-frontend.json file (click Browse… and select the file you downloaded) - it will populate all the fields and options that we need, then click "save".

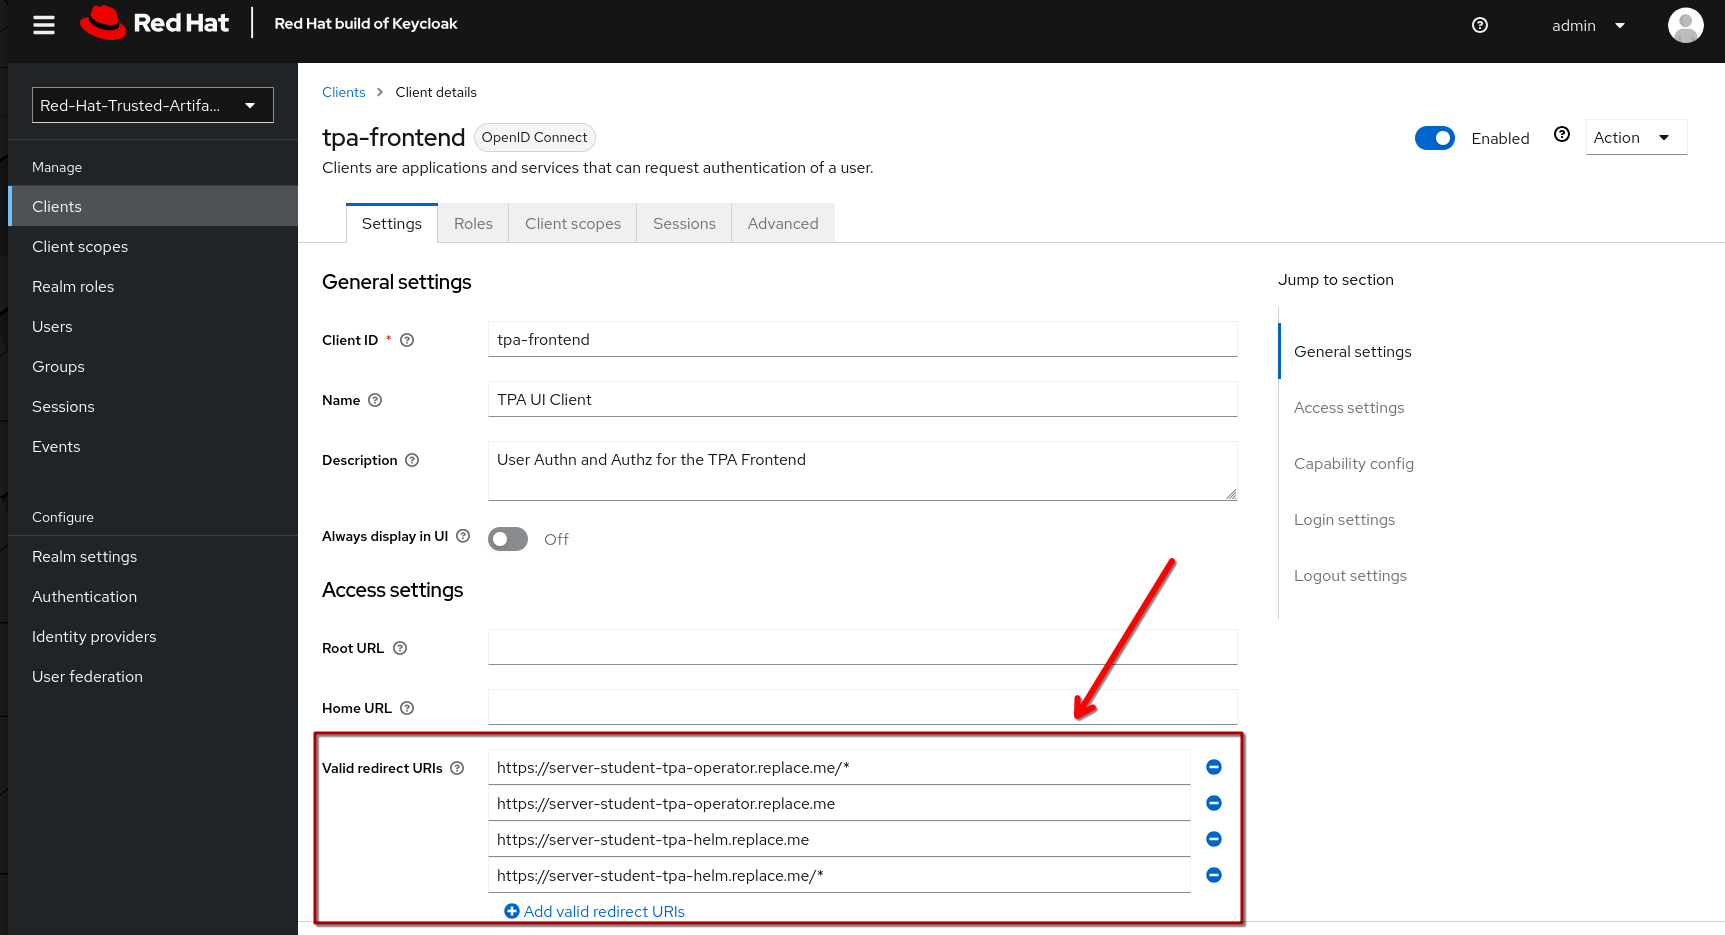
|
After saving the frontend client, scroll down and replace the for your redirect URIs - if this is not set correctly, you will get an error when trying to login to the TPA UI. Be sure to click Save to save the changes. If you changed the namespace(s) where you install TPA, please amend accordingly. |
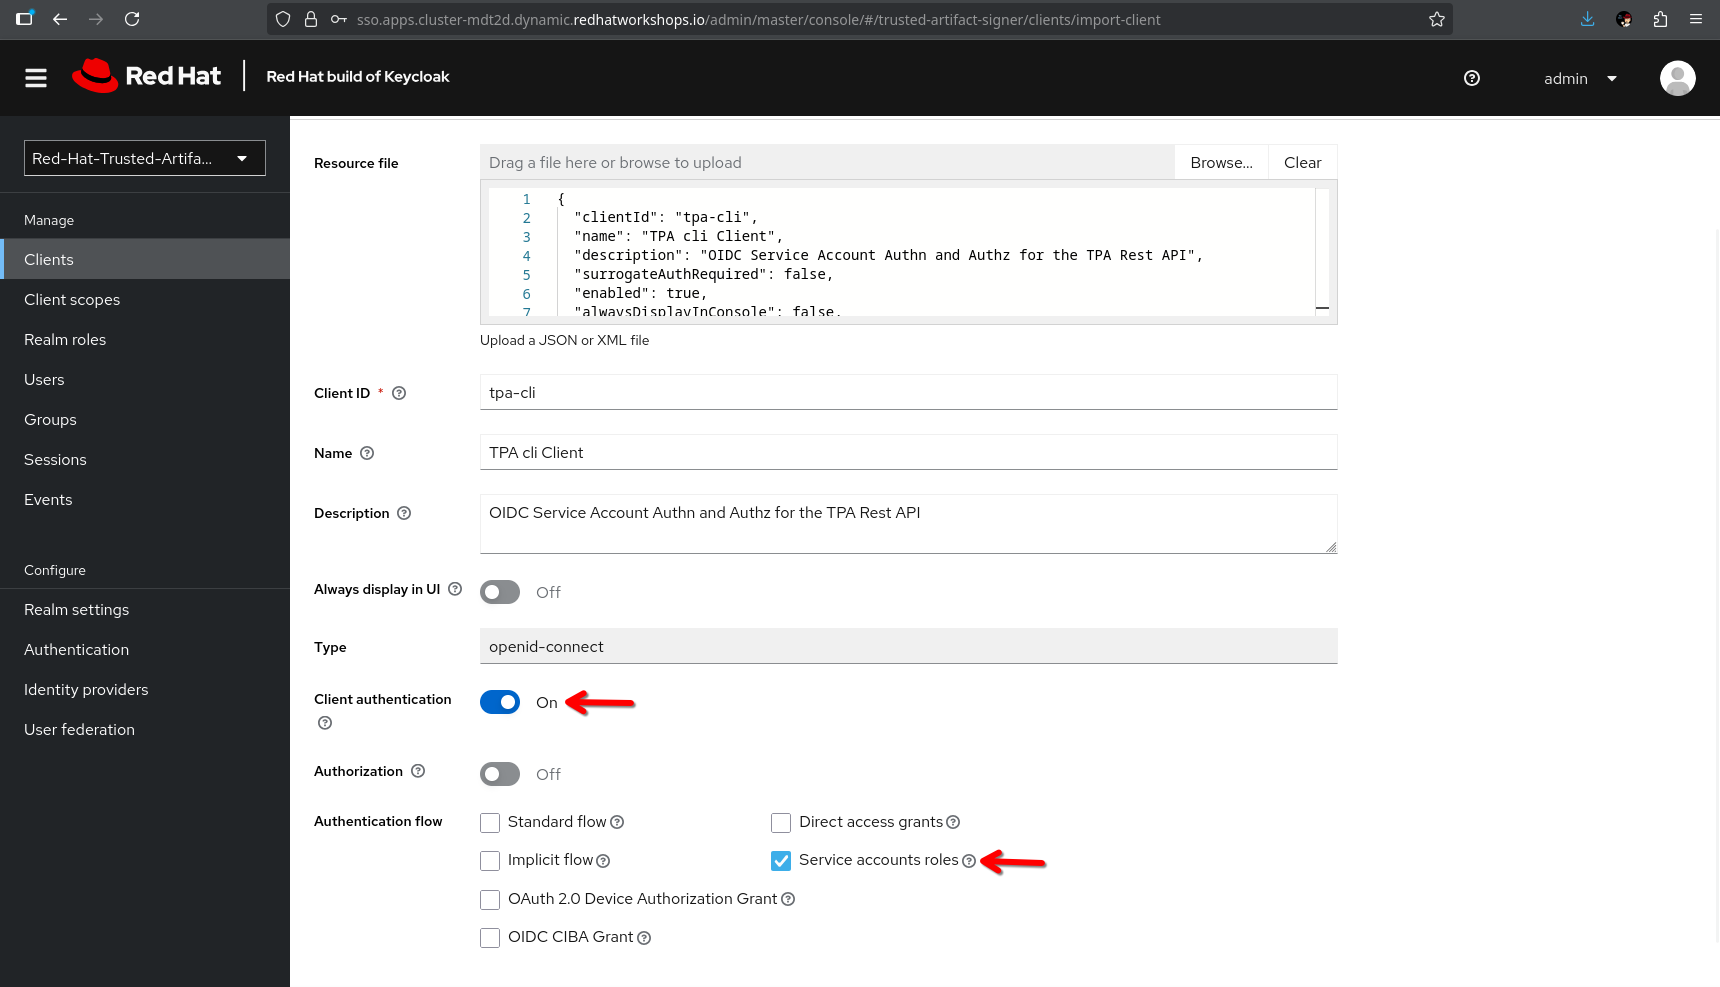
CLI ("Service Account")
Now, import the CLI client. When you do, you will notice that the Client Authentication is switched on (to access this client, the user will have to provide the client secret) and the service account roles box is ticked, meaning that this will generate a technical user that we can assign roles (remember, we need the roles for the client scopes that tell TPA what the user is allowed to do).
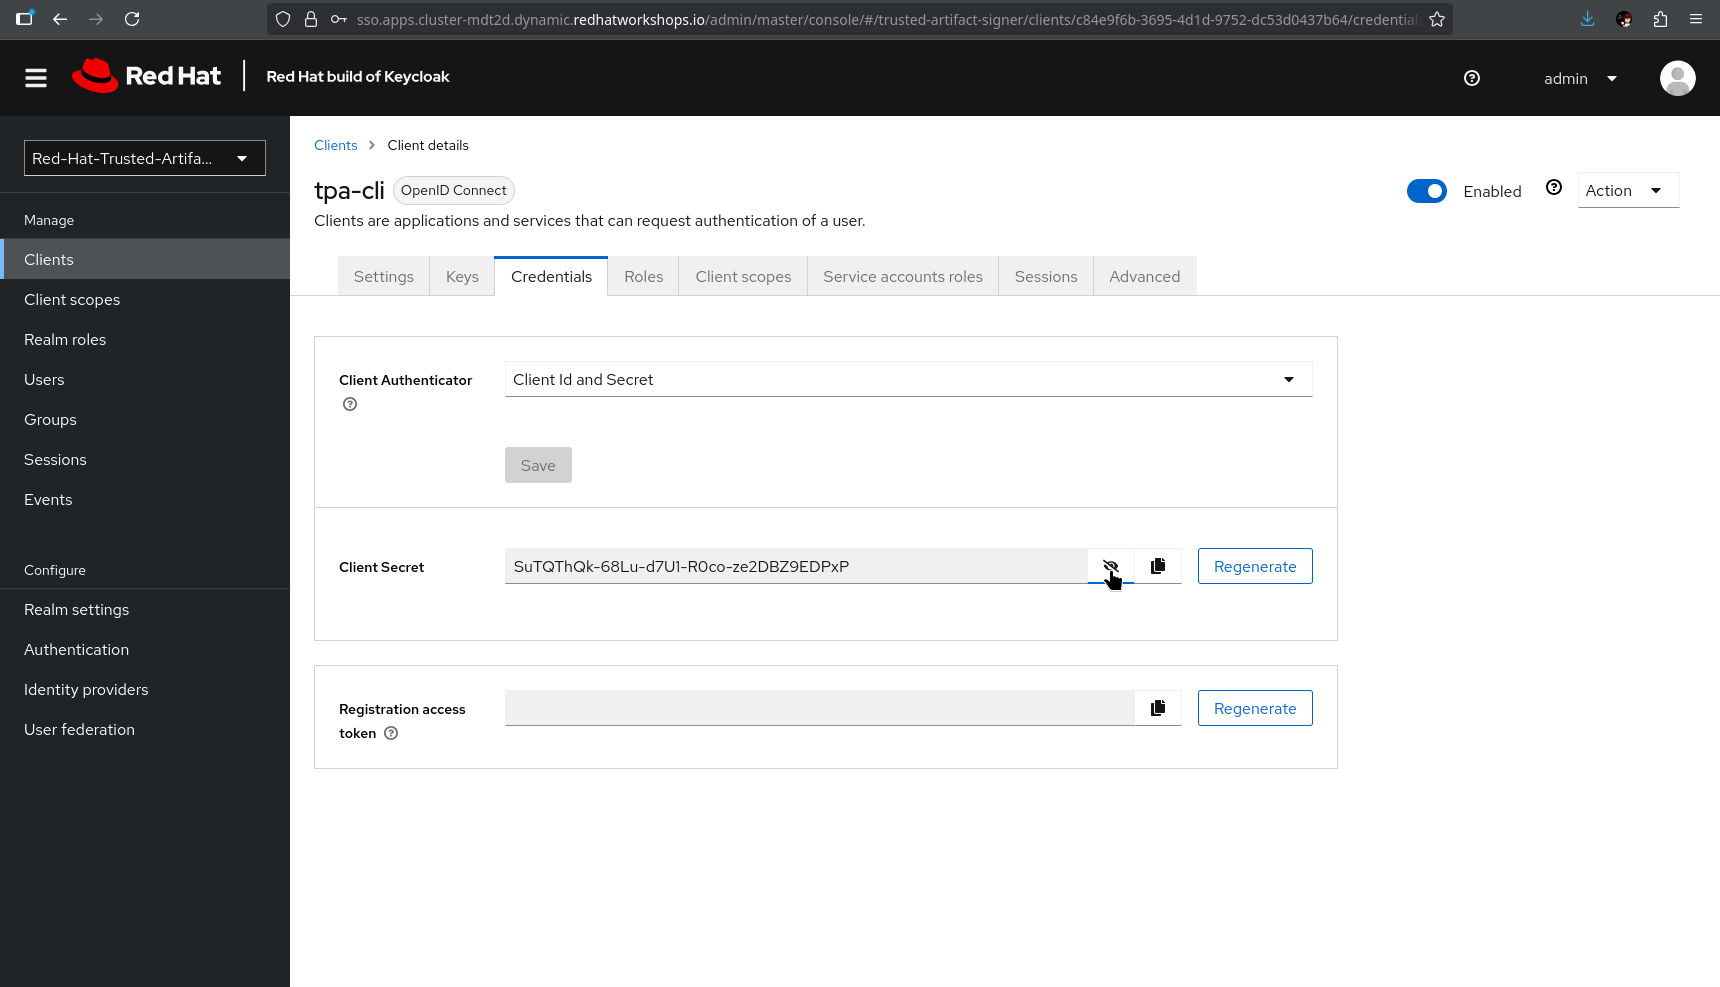
After saving, you can see in the Credentials tab, that the client has a client secret assigned.
Now, go to the Service Accounts Roles tab and assign the tpa-admin role to the service account (unless you want to restrict what can be done via the client).
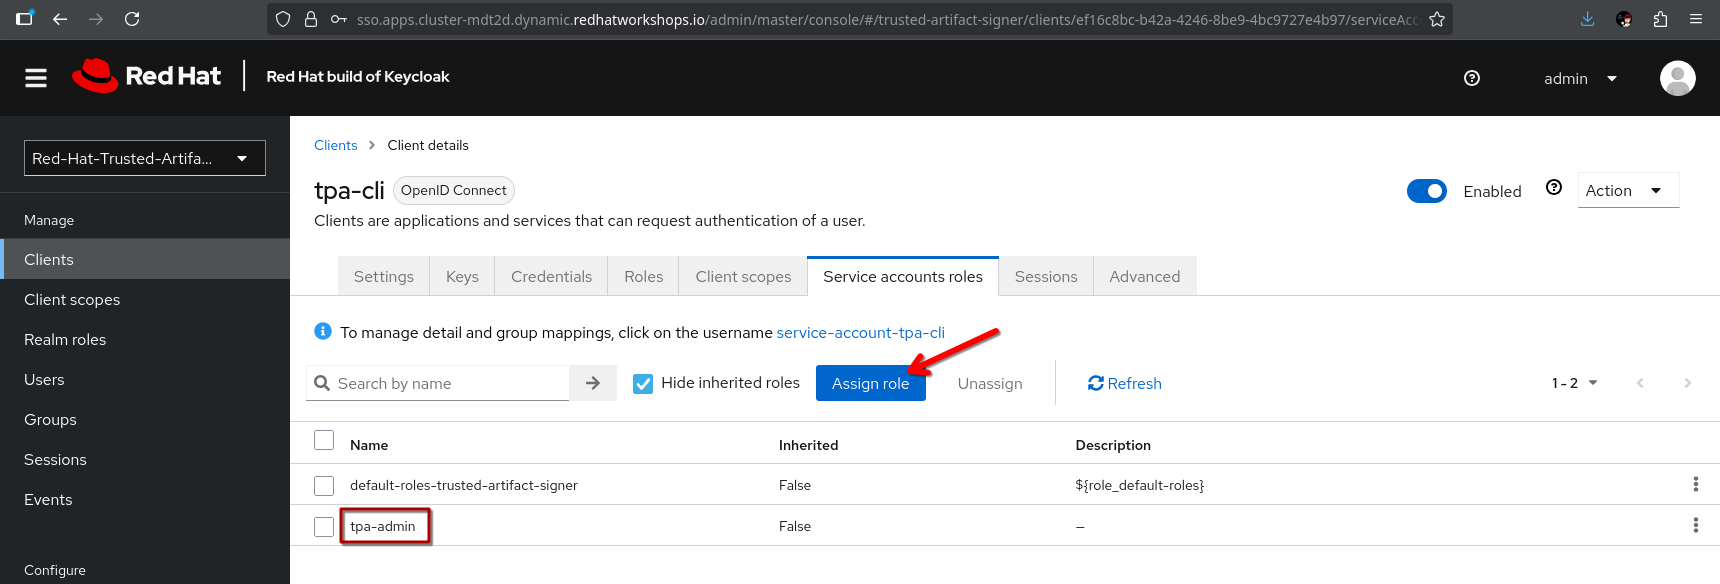
|
Alternatively, you can also assign that role via the Users view, since the client has automatically created that |

Last, but not least, we need to create a k8s secret for the client secret that is referenced in the helm chart (and the operator-install).
If you haven’t changed the client secret from the imported client_tpa-cli.json file, you can go to the {openshift_console_url}/terminal[terminal^,window="terminal"] and use the secret-oidc-cli.yaml we have prepared for you:
cd ~/l3-enablement-helpers/prerequisites/
oc project student-tpa-operator
oc apply -f secret-oidc-cli.yaml
bash-5.1 ~ $ cd ~/l3-enablement-helpers/prerequisites/
oc project student-tpa-operator
oc apply -f secret-oidc-cli.yaml
secret/oidc-cli createdOIDC Summary
Phew - you’ve made it through the OIDC prerequisites. The point here was not to generate a really boring wall of text, but to show what TPA needs to be successfully integrated with an existing Keycloak realm.
What we did:
In an existing realm, we
-
Created (realm) roles
-
Created custom client scopes, that TPA needs for Authorization
-
Assigned these scopes to the roles we created
-
Assigned these roles to users (thus assigned the scopes to users)
-
Created an OIDC "public" frontend client (with the "normal" OIDC authentication flow)
-
Created an OIDC "private" cli client (aka a client with a client secret)
-
Assigned the administrative role to that cli client

Now, let’s boldly go to the installation 🖖
|
Before we move on - Since TPA only supports Keycloak for authentication/authorization - if there is the need for integration with other providers:
Keycloak’s Identity Provider (IdP) federation is designed exactly for this scenario. Here’s how it works:
Setting Up Role Mapping In your Keycloak admin console, for each Identity Provider you can configure Mappers to:
…but that is beyond the scope of this Lab. |
Operator Installation
The operator is currently in tech preview and has some issues handling multiple installations on the same cluster (it is also using helm). Since we already have installed a TPA instance for reference using this method, you might see some misleading errors, but the installation itself (and the resulting TPA) works.
|
So far we have configured:
-
Storage
-
Postgres Database
-
OIDC
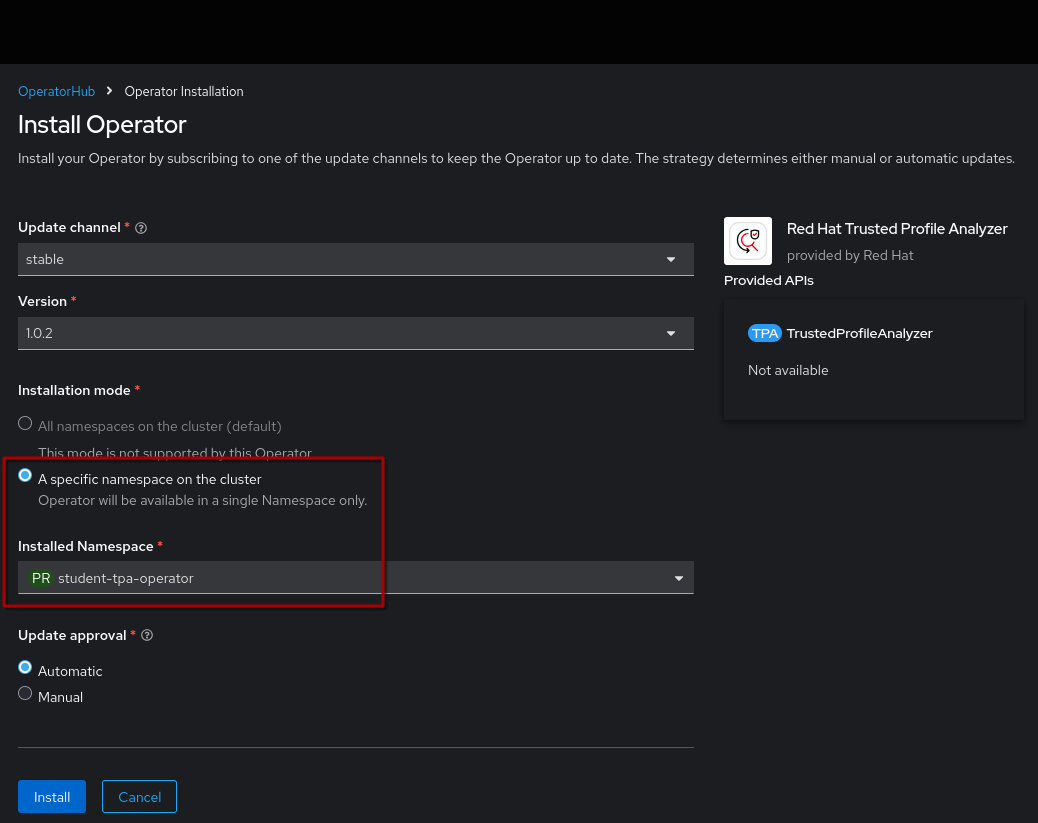
Go to the Operator Hub (just follow the link) and install the TPA Operator in our namespace (the Operator is namespace-scoped):
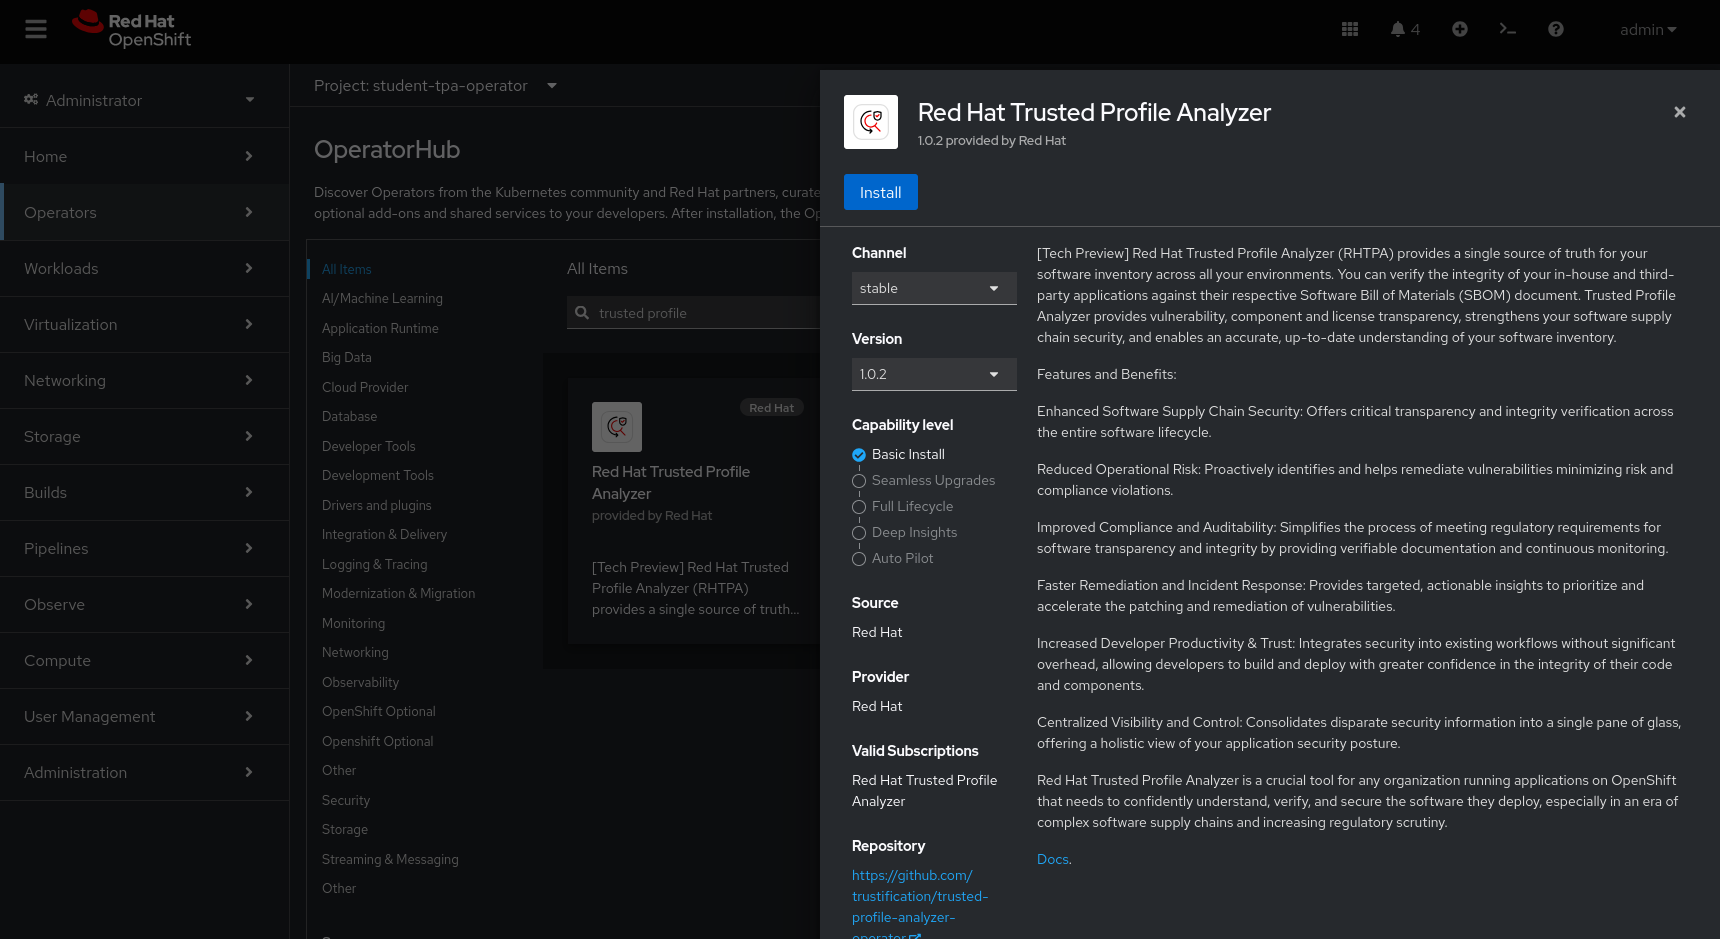
Make sure to install it to the correct namespace (for this exercise, we created student-tpa-operator at the beginning of this chapter).
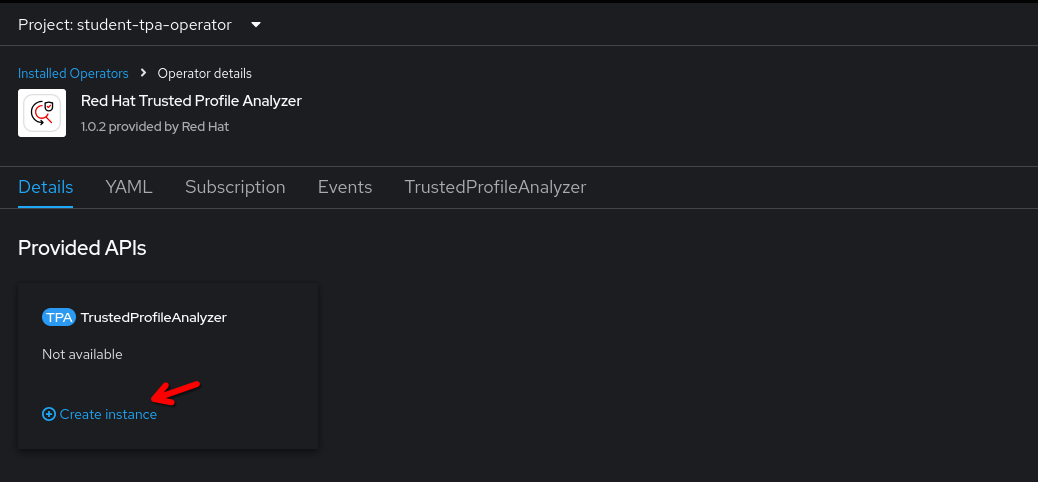
Once the installation has finished, click View Operator (ensuring the student-tpa-operator namespace is selected at the top) and create a TrustedProfileAnalyzer instance.
In the instance, switch to the YAML view.
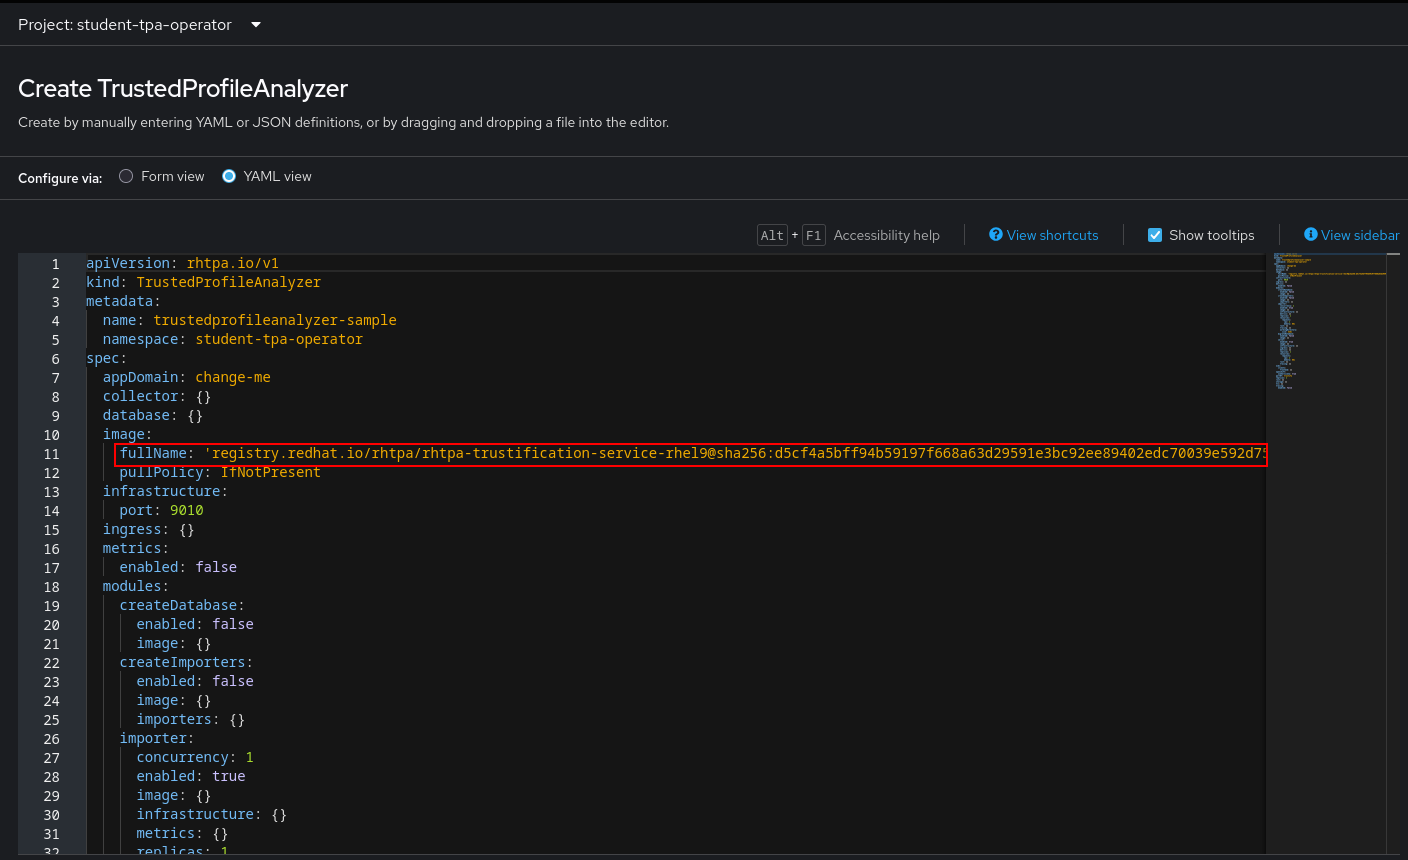
We have prepared a TrustedProfileAnalyzer.yaml file for you (right-click and download, or open the link and copy&paste)
|
Don’t paste & save just yet, there are some fields that you need to change - either locally before pasting into the |
What’s inside and what needs to be changed
Replace the spec.appDomain value with:
appDomain: -student-tpa-operator.{openshift_cluster_ingress_domain}
Do the same in the spec.oidc.IssuerUrl (this is Keycloak realm where we defined our clients and client scopes):
issuerUrl: 'https://sso.{openshift_cluster_ingress_domain}/realms/trusted-artifact-signer'
And, while you still have it in your clipboard, also for the spec.storage.region:
region: https://s3-openshift-storage.{openshift_cluster_ingress_domain}:443
Even though it is called region here, for ODF we need to use the OpenShift Storage s3 endpoint, including the port :443. For AWS S3, you’d need the actual region (refer to the product documentation for setup with AWS services).
|
Since we’re in the storage section - you can use either s3 (as is recommended, and we created a bucket already), or you can comment the existing storage section and uncomment this section
#alternatively, uncomment for filesystem / PVC storage
#  storage:
#    type: filesystem
#    size: 32Gi
which will create a PVC.
Sticking with s3, we need to get the actual bucket name to be set in the spec.storage.bucket field:
bucket: <run_s3.sh_from_your_namespace_to_get_the_bucket_name>
We can get that from the tpa-bucket-claim ConfigMap in our namespace, or by running the s3.sh script (which will also give us the s3 endpoint, which we already changed above).
cd ~/l3-enablement-helpers/prerequisites
oc project student-tpa-operator
./s3.sh
bash-5.1 ~/l3-enablement-helpers/prerequisites $ ./s3.sh
Access Key ID: uQJELScAXek96XcUUrAl (Yours will be different)
Secret Access Key: OFCB8spseTxVPFrUTc3nZecqi+D51IpIpvLBo9gt (Yours will be different)
Endpoint: https://s3-openshift-storage.apps.cluster-mdt2d.dynamic.redhatworkshops.io (Yours will be different)
Bucket Name: trustify-c443fd04-cc20-4455-ac54-f02921669428 (Yours will be different)What else?
Importers
The spec.modules.CreateImporters.importers contains the definition and configuration for the various importers. These load (and update) TPA with cve, advisory and SBOM data.
By default, only the cve and osv-github importers are active (disabled: false) - without cve and advisory data, TPA couldn’t match vulnerabilities with SBOM packages.
Database
The spec.database, spec.createDatabase and spec.migrateDatabase contain the configuration for the postgresql database - since we already created that in the prerequisites section, along with the secret that is referenced here, no changes are required.
You will notice that the spec.database.sslMode: require has been commented - for "real" scenarios, this should be enabled, but we decided to keep the database setup simple here (no certificates added to the postgresql setup).
Ok, changed the values? Then let’s hit "Create"!

As expected (see the note in the beginning) the Operator install seemingly fails with helm error messages.

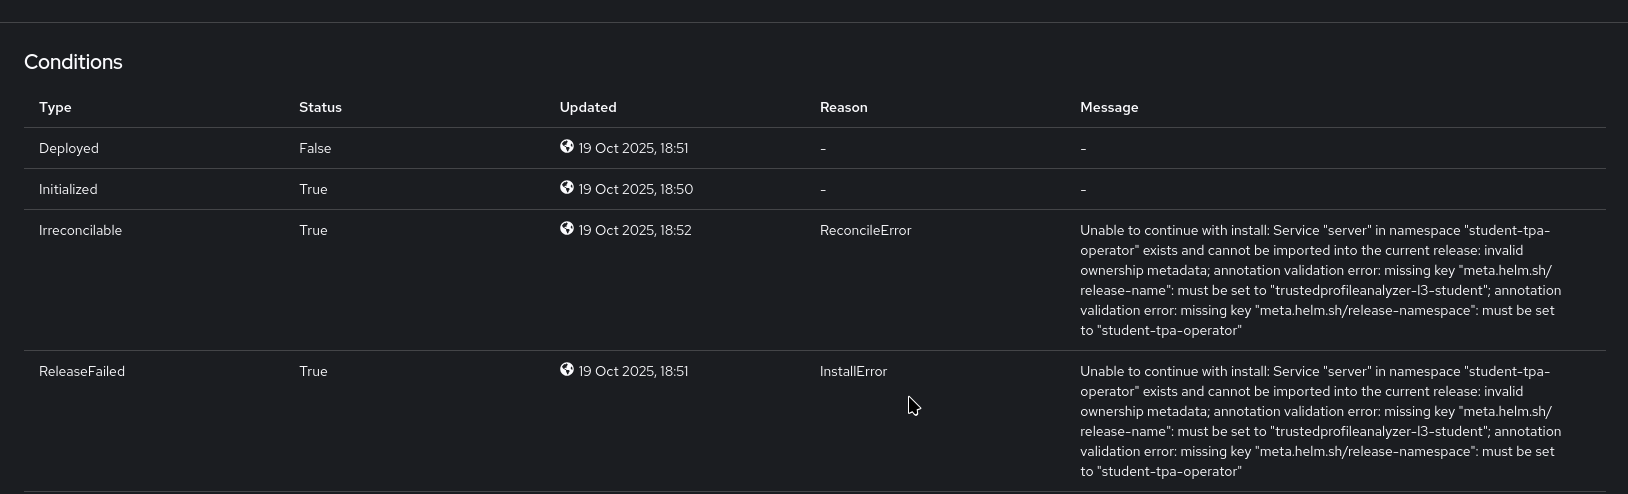
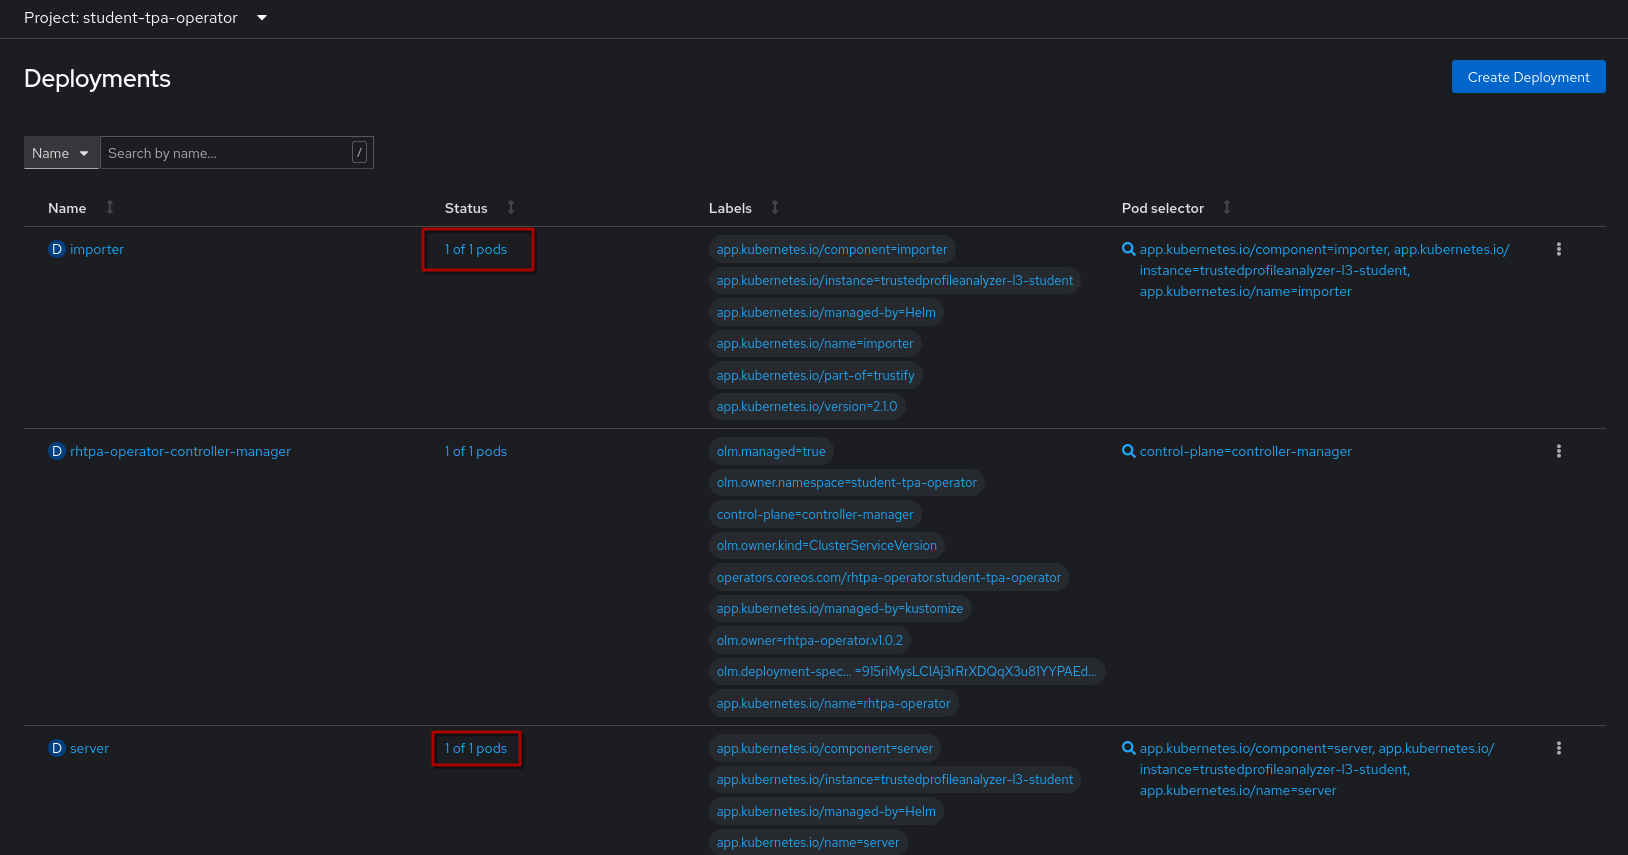
However, if you go to the Deployments Page, you can see the importer and server deployments with 1/1 pods.
| This may take a while and they even might fail first, before they are healthily up and running as shown below. In some instances, we have seen 10-15mins before the Operator "calms down" and the deployments are available and stable, so please give it some time. |
So, let’s quickly check the pod logs for:
1) The importer pod (click on the name of the importer pod, then click Logs):
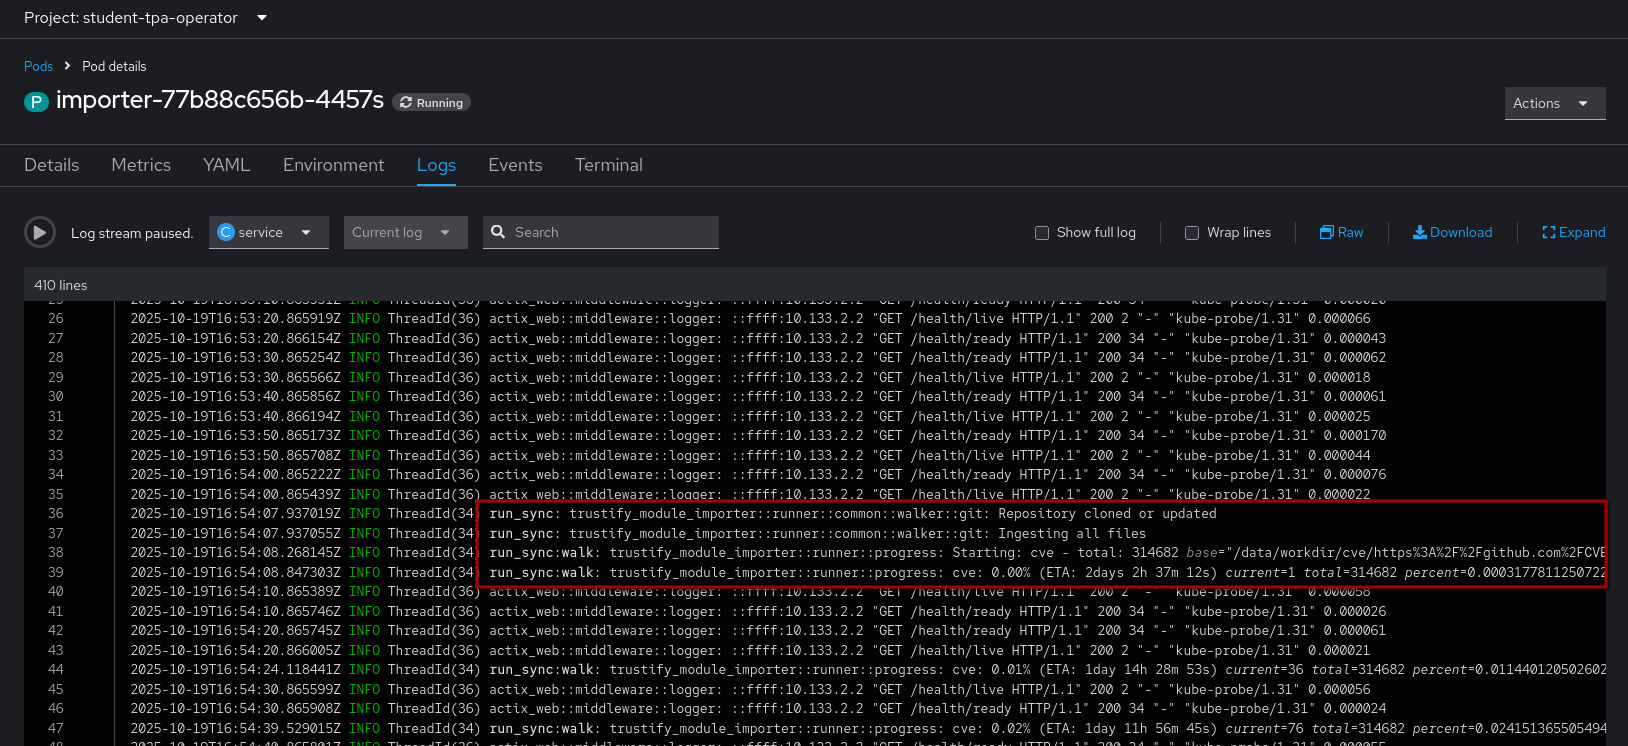
If configured correctly, the importer will start with cloning the cve repository and importing them into the graph database.
2) The server pod (click on the name of the server pod, then click Logs):
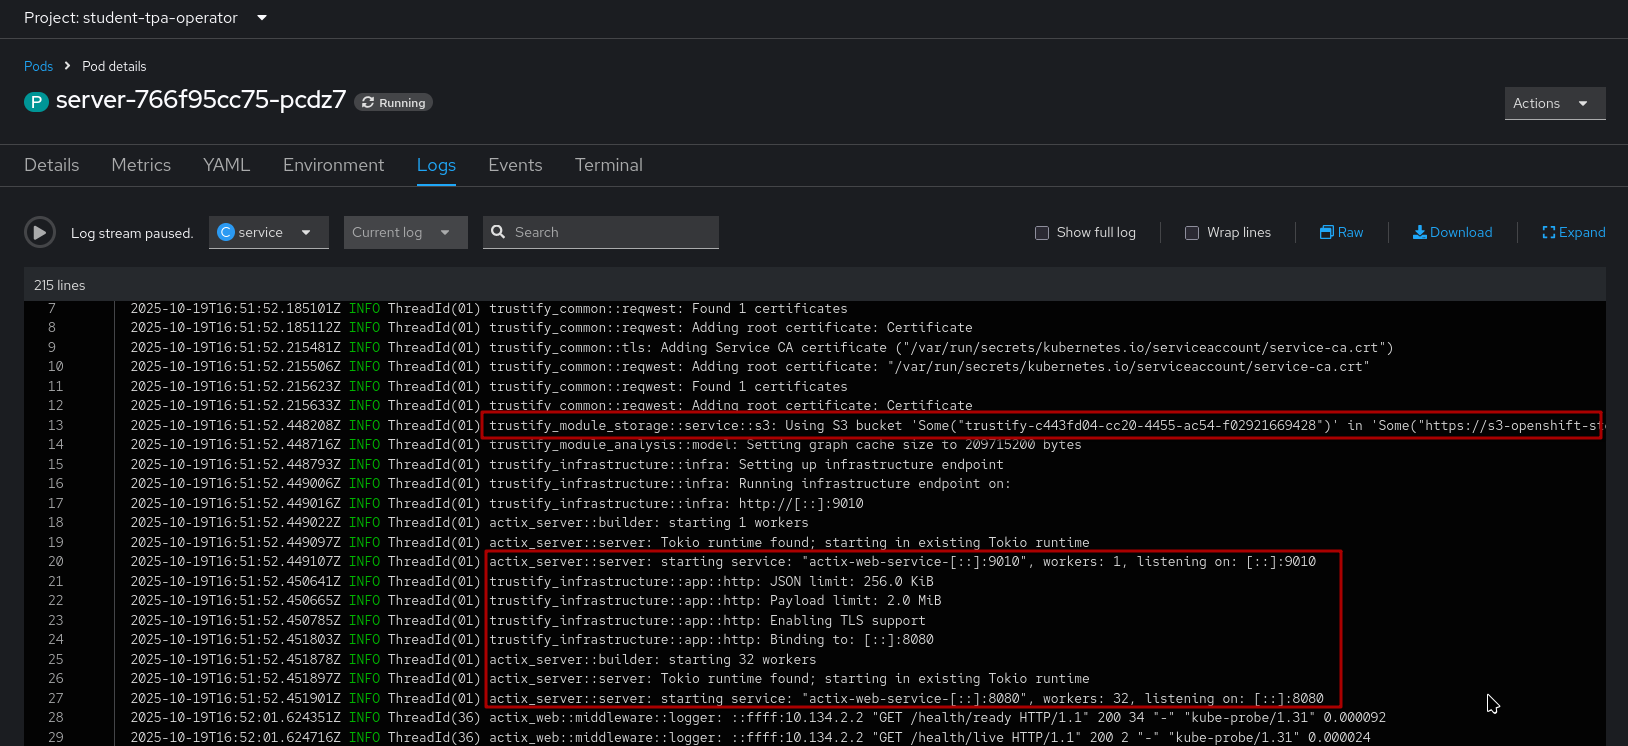
If configured correctly, the server will start but there will not be much activity, aside from the health/readiness probes.
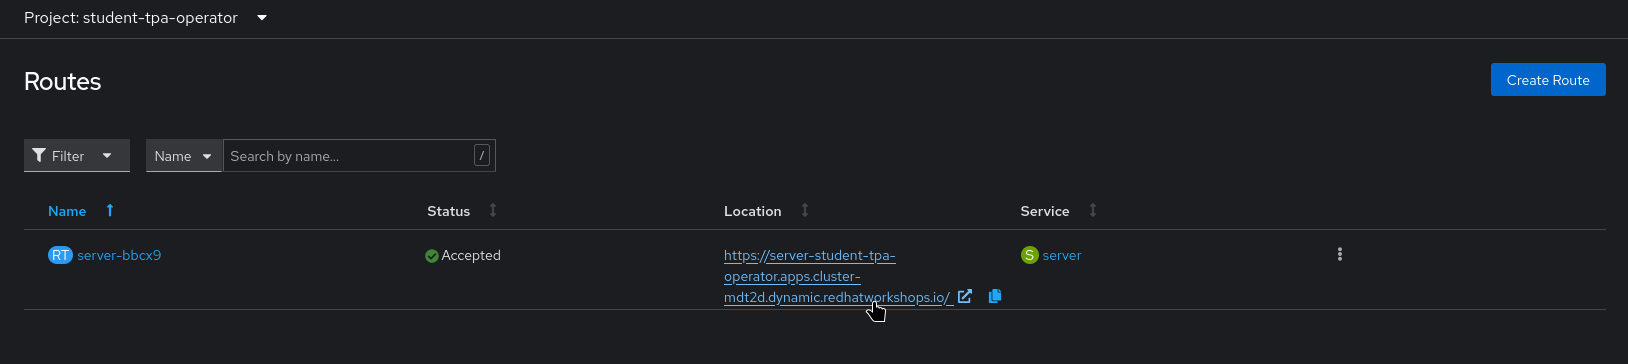
Lastly, we should check the Route that has been created:
|
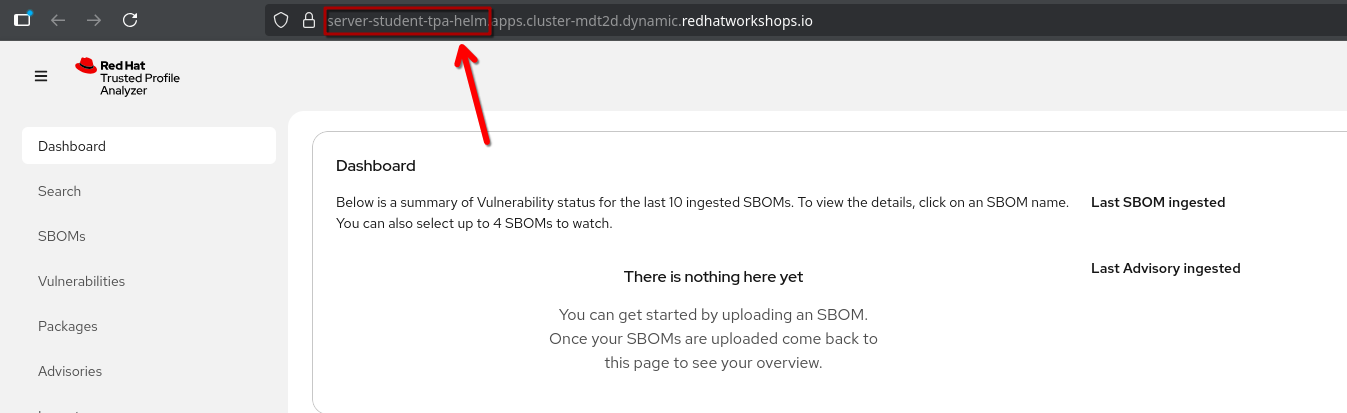
Verification
Frontend
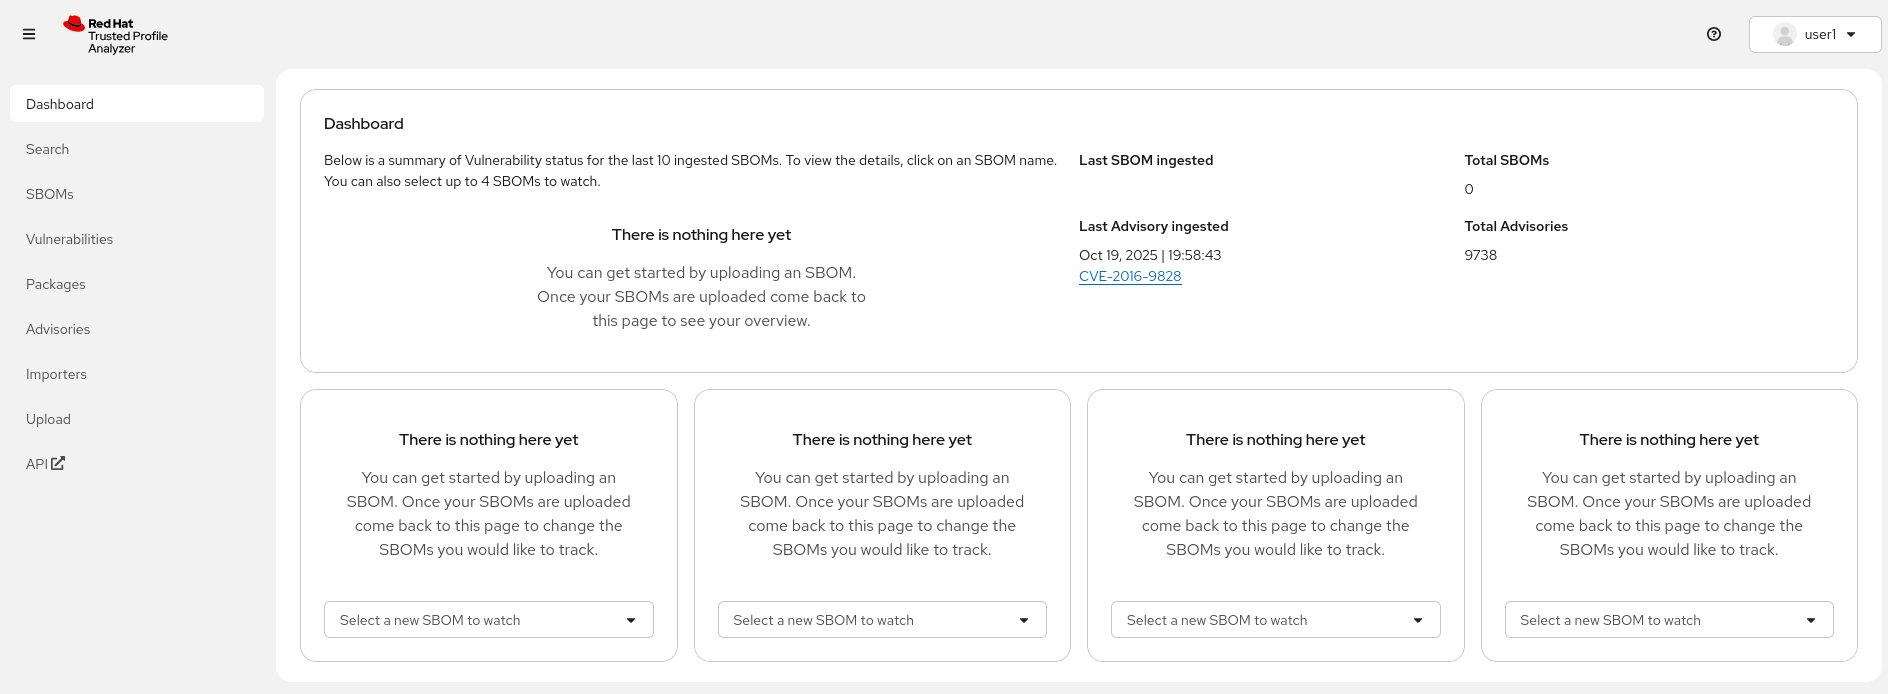
After opening the route URL, logging in as {openshift_admin_user} / {openshift_admin_password}, you should see the TPA UI ✅:
|
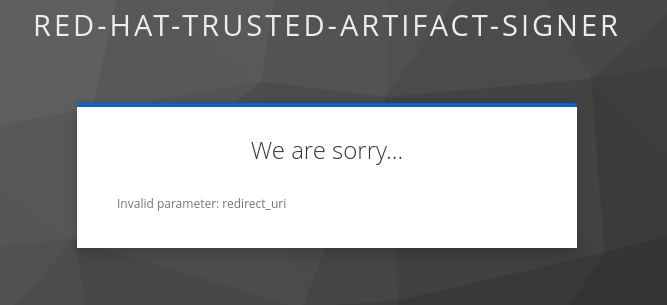
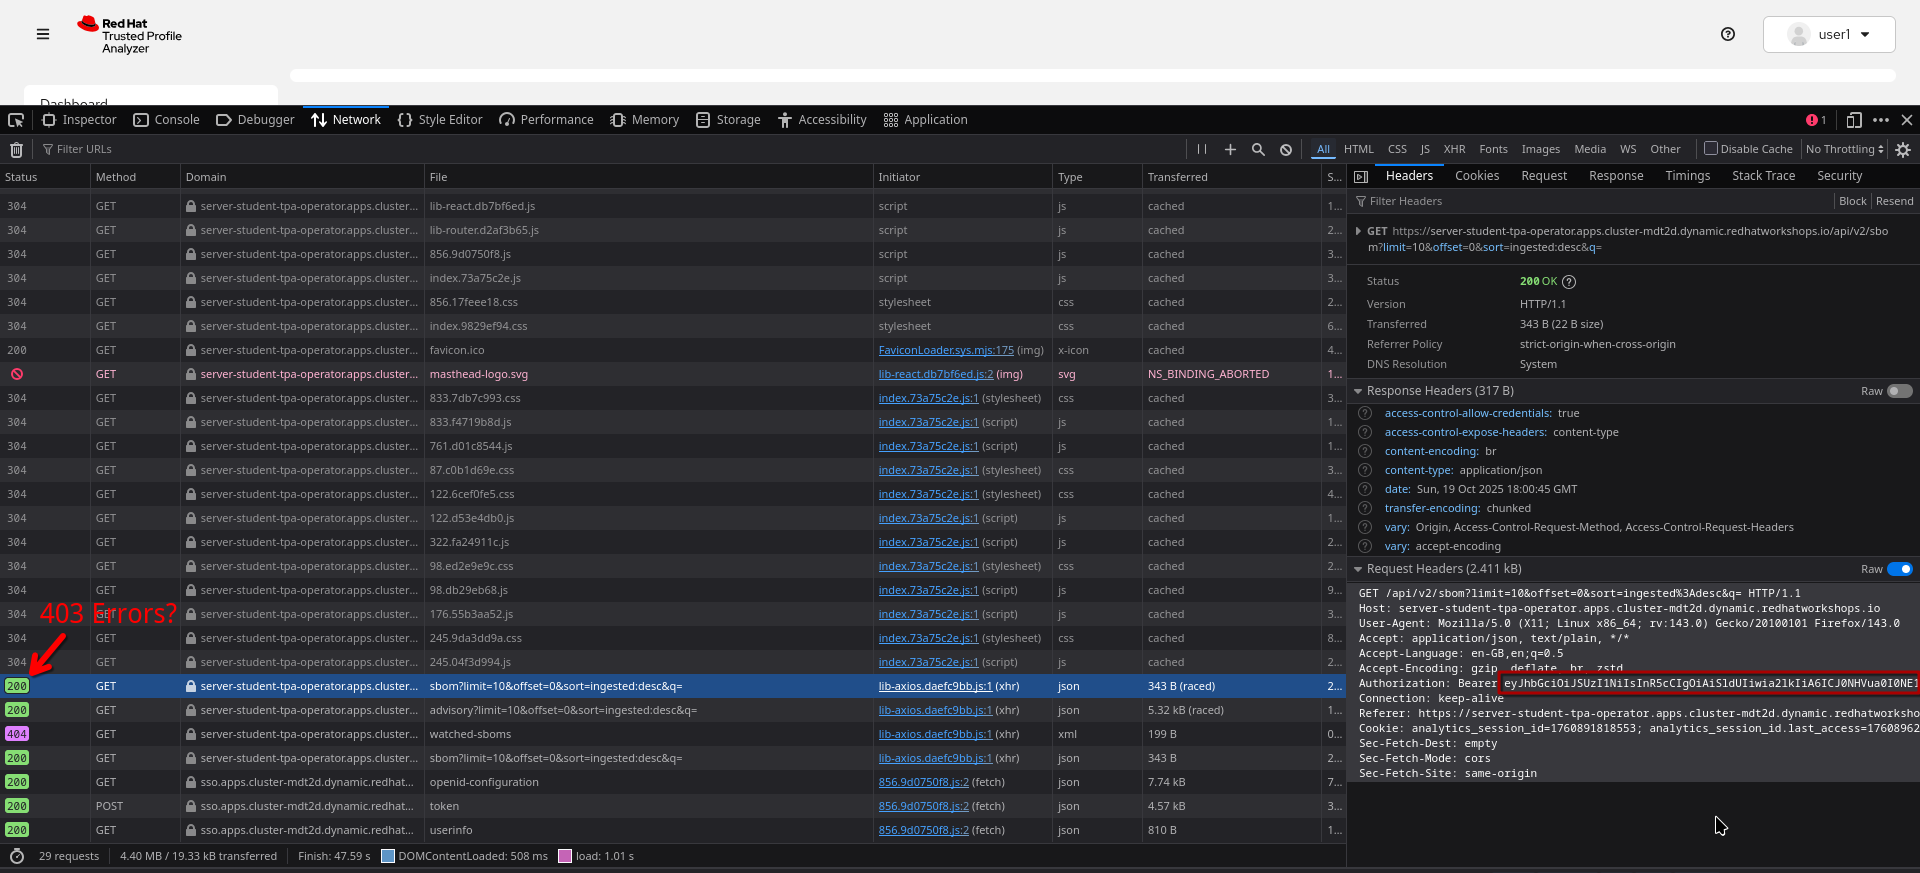
Should you see network-related errors in the TPA UI, this is most likely due to some OIDC misconfiguration. Open the developer perspective of your browser of choice and check if you get
Then, copy the Take note of the scope OIDC claim - in this case it contains the |
CLI
To verify the CLI (REST API) connectivity, go to the {openshift_console_url}/terminal[terminal^,window="terminal"] and inspect the verify-sbom-upload.sh we prepared for you:
cd ~/l3-enablement-helpers/tpa-operator
oc project student-tpa-operator
cat verify-sbom-upload.sh
The verification is quite straightforward:
-
We obtain the
access tokenusing theclient_idandclient_secretthat we set earlier -
Using that
access token, we post to the/api/v2/sbomendpoint (we have prepared a simple SBOM to test this with).
In the same way, you would use that in a CI Task, uploading an SBOM that has just been generated.
Now, let’s do this:
./verify-sbom-upload.shbash-5.1 ~/l3-enablement-helpers/tpa-operator $ ./verify-sbom-upload.sh
Access Token:
==================================================================================================
eyJhbG[...]GGHw
==================================================================================================
Uploading homebanking SBOM
{"id":"urn:uuid:0199fdf6-f4ce-7fd1-8d7e-89c8b03cafb8","document_id":"urn:uuid:18ca2b81-e4d2-4c6a-8bb5-54bfb6ae47a3/1"}
bash-5.1 ~/l3-enablement-helpers/tpa-operator $You should see this now in your TPA instance after a few moments, including the labels we assigned ✅.
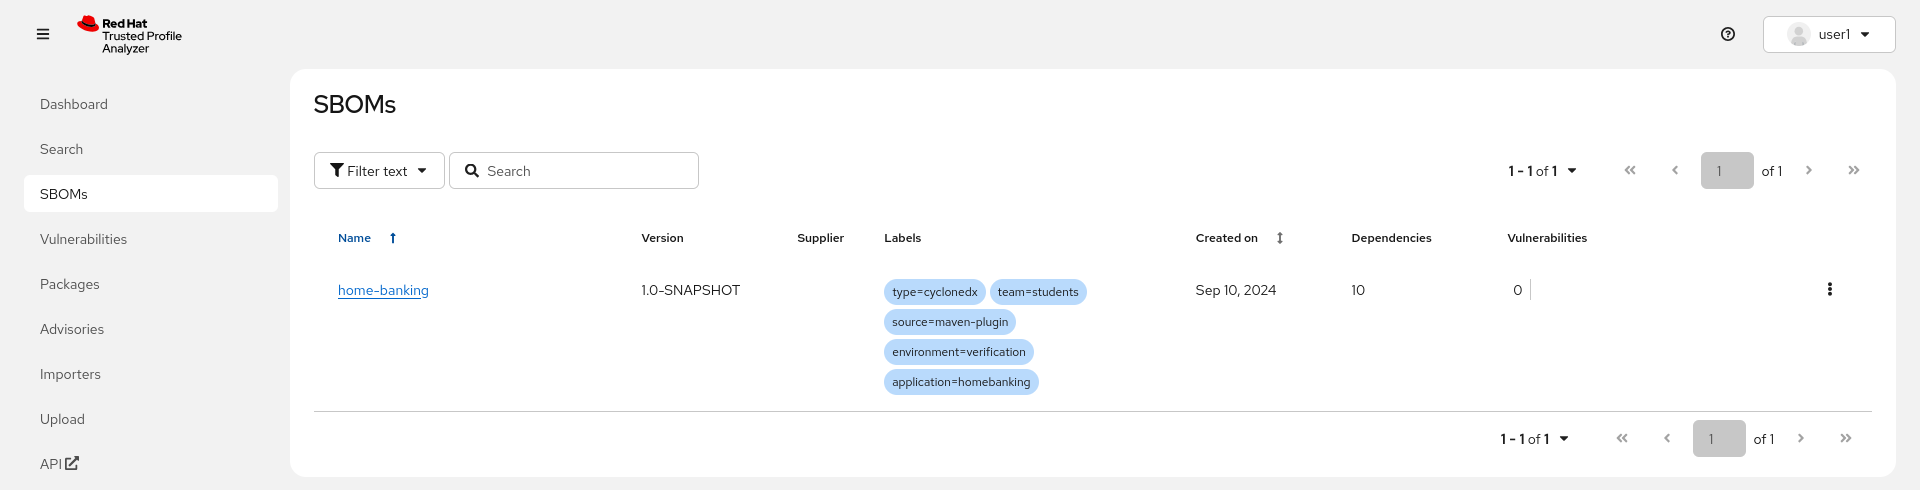
|
If you are wondering why there are no vulnerabilities - we have imported the SBOM right after installation, but the importer is still running, importing CVEs and security advisories. So, this will take a while - on a system with fully imported advisory/cve sources, the vulnerabilities will be available momentarily. |
Helm Installation
|
If you want to use
The template file you’d need to modify (with the RWO PVC) is
This is not possible for the operator-based install, since the helm chart being used cannot be modified and the official chart uses RWO. |
For the helm-based installation, we will use the student-tpa-helm namespace, and we had created the appropriate redirect_URIs in the frontend OIDC client, which we will reuse.
So, first, let’s get ready to configure the database, s3 bucket and the OIDC secret in this namespace:
Go to your {openshift_console_url}/terminal[terminal^,window="terminal"] and run the following commands:
cd ~/l3-enablement-helpers/prerequisites
oc project student-tpa-helm
oc apply -f postgresql-openshift.yaml
oc apply -f tpa_objectbucketclaim.yaml
oc apply -f secret-oidc-cli.yaml
./s3.sh
cd ../tpa-helm/
ls -al
Same as in the operator-based exercise, we have prepared values files for you:
-
A values.yaml file for the S3-based installation
-
A values-fs.yaml file, if you want to try with the filesystem (for quick testing and PoC/non-production)
-
A values-importers.yaml file, with the default settings (osv-github and cve enabled, the others disabled). There is no need to modify any value here, unless you want to.
Since we’re running helm to install, you don’t have to download them - but you need to modify them in your terminal session from above:
Use your editor of choice (nano or vim) and change the following values (for values.yaml or values-fs.yaml depending on which storage option you want to use):
-
Set
storage.regiontohttps://s3-openshift-storage.{openshift_cluster_ingress_domain}:443
Make sure you copied and ran the above commands, as that makes sure you’re creating all the artifacts and you get the correct bucket name when running the s3.sh script.
|
-
In
storage.bucket, paste the value for thetrustifybucket that we just got as output from thes3.shscript.bucket: <run_s3.sh_from_your_namespace_to_get_the_bucket_name> -
Set
oidc.issuerUrltohttps://sso.{openshift_cluster_ingress_domain}/realms/trusted-artifact-signerIf you decide to try out the filesystemstorage, obviously you don’t have to change any value there - these are left in thevalues-fs.yamlfile for reference, but commented out. You still need to change theoidc.issuerUrlfield, but that’s all. -
Make sure you save the changes to the file and exit the editor.
Ok, ready to go?
Let’s helm!
cd ~/l3-enablement-helpers/tpa-helm
source appdomain.sh
helm repo add openshift-helm-charts https://charts.openshift.io/
helm repo update
helm upgrade --install redhat-trusted-profile-analyzer openshift-helm-charts/redhat-trusted-profile-analyzer -n $NAMESPACE --values values.yaml --values values-importers.yaml --set-string appDomain=$APP_DOMAIN_URL
NAMESPACE is: student-tpa-helm
APP_DOMAIN_URL (needed in helm values) set to:
-student-tpa-helm.apps.cluster-mdt2d.dynamic.redhatworkshops.io
"openshift-helm-charts" already exists with the same configuration, skipping
Hang tight while we grab the latest from your chart repositories...
...Successfully got an update from the "backstage" chart repository
...Successfully got an update from the "rhtap" chart repository
...Successfully got an update from the "openshift-helm-charts" chart repository
...Successfully got an update from the "bitnami" chart repository
Update Complete. ⎈Happy Helming!⎈
Release "redhat-trusted-profile-analyzer" does not exist. Installing it now.
NAME: redhat-trusted-profile-analyzer
LAST DEPLOYED: Mon Oct 20 14:38:19 2025
NAMESPACE: student-tpa-helm
STATUS: deployed
REVISION: 1
NOTES:
OpenShift:
Detected: true
Use Service CA: true
Console:
server-student-tpa-helm.apps.cluster-mdt2d.dynamic.redhatworkshops.ioVerification
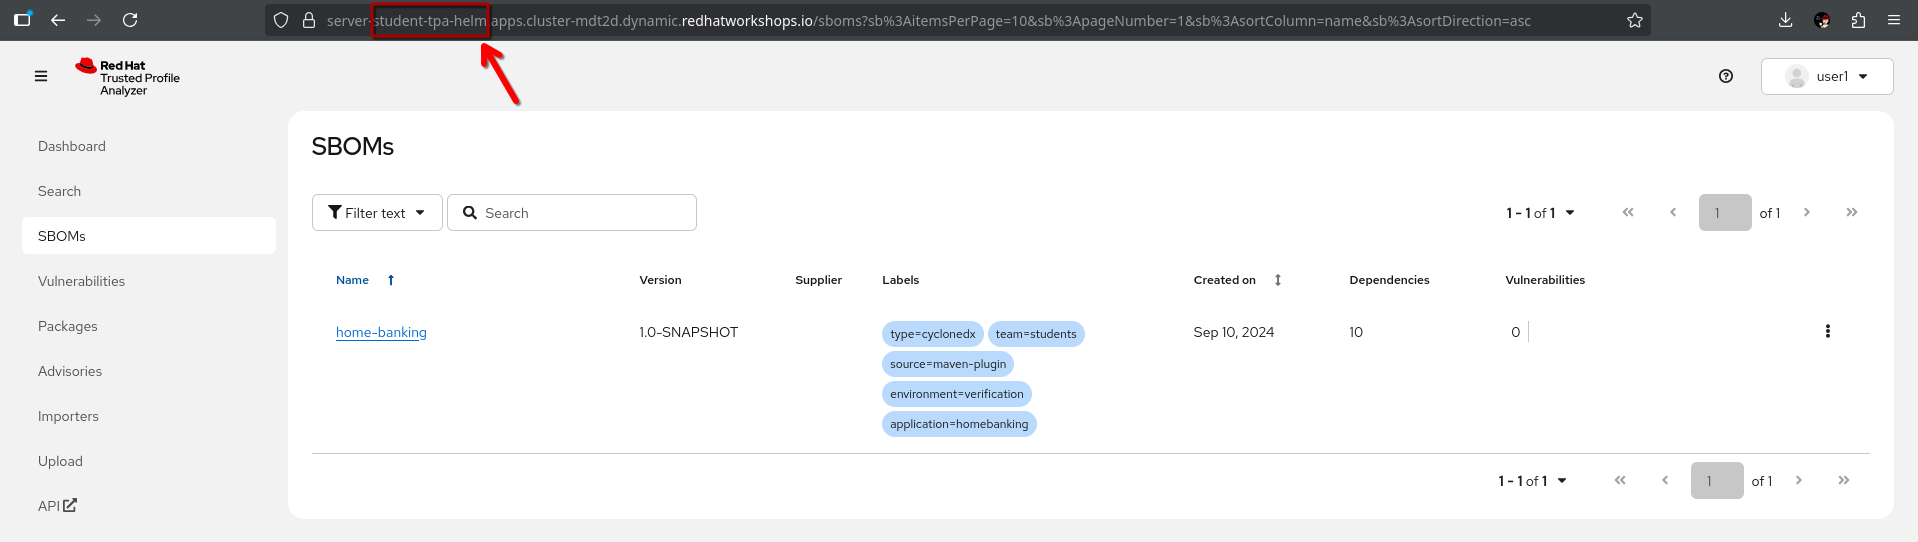
Frontend
So, you can open your helm-based install of TPA now from here, and logging in as {openshift_admin_user} / {openshift_admin_password}, you should see the TPA UI based off of the student-tpa-helm namespace ✅:
CLI
We have prepared the verification script in the tpa-helm directory as well:
cd ~/l3-enablement-helpers/tpa-helm
oc project student-tpa-helm
./verify-sbom-upload.sh
So, we should see the uploaded SBOM now in the TPA SBOM View after a few moments, including the labels we assigned ✅.
Congratulations!
You’ve successfully installed and configured Trusted Profile Analyzer (TPA) on OpenShift! In this module, you accomplished:
-
Set up all prerequisites including S3 storage (via ODF), PostgreSQL database, and OIDC authentication using Keycloak
-
Installed TPA using the Operator method in the
student-tpa-operatornamespace -
Installed TPA using Helm in the
student-tpa-helmnamespace -
Configured OIDC integration with custom client scopes, roles, and clients for both frontend UI and CLI/API access
-
Verified both installations through the web UI and REST API, successfully uploading SBOMs
This knowledge is valuable for customer engagements because it demonstrates:
-
Multiple deployment options: You can help customers choose between Operator-based and Helm-based installations based on their infrastructure preferences and operational requirements
-
Enterprise integration patterns: The OIDC setup shows how to integrate TPA with existing identity providers using Keycloak’s federation capabilities and custom authorization scopes
-
Production-ready architecture: The use of ODF S3 storage, PostgreSQL, and proper OIDC configuration represents enterprise-grade deployment practices
-
Practical verification workflows: Demonstrating both UI and API access validates that the installation works for end-users and CI/CD integration scenarios
-
Real-world application: Customers can immediately apply these installation patterns to deploy TPA in their own environments, with the flexibility to choose the method that best fits their operational model